
聊天主题开始于 bughunter
添加了一个新相册
53 图片
Work In Progress of the last steel donkey 
1:48
After all parts are in place I call this project done. So this is the last picture of this build log.


项目: Junkers J 2


 3+
3+ 61 26 November, 19:15
The kit really comes as on the box picture: only 22 parts, all printed and all support struts removed and sanded 👍 LukGraph, do you here me?
26 November, 19:20
Welcome Bernhard! This will be a quick project due to the great preparation of the resin parts by manufacturer.
26 November, 21:08
Very nice start, Frank! 👍 Following for sure. The fact, that support struts are removed, is very interesting. Never seen this.
1 27 November, 14:57
Thank you Jakub and Robert!
That seems to be a small business from a modeler for modelers! Audrius is also a user here. After I found the 1:72 version I asked about an upscale but he explained that the big parts of the 1:72 are resin cast. Months later, the 48s finally arrived, in a limited edition printed entirely in 3D. The resin is hard and brittle, but if you glue it with CA both materials have the same hardness which is good for sanding.
Robert, the 1:72 from the same manufacturer is something for you 😉
2 27 November, 18:35
It is something for me indeed, Frank... but there is also my wife 😉
27 November, 18:38
When I die, I hope my wife doesn't sell the kits at the prices I told her. 😄 😄
4 27 November, 19:20
Thank you for the comment, which may be applied to future models. You are right, the model is heavy and attention should be paid to the tailskid. The undercarriage is more reliable; my test model has been standing in an open area (in the sun) for more than two months without any deformation (except the rear support). You are a bit mistaken in referring to a small business — it is an expensive hobby, from modeler to modelers. Good luck with assembling the model.
2 27 November, 20:15
Thank you Audrius for leaving a feedback! Your work is fantastic and I love the kit 👍
I have no doubt that the landing gear can support the model; it is sufficiently dimensioned. However, as a matter of principle, I equip all my models with a robust metal landing gear(sometimes with wooden parts) so that I can transport them safely to exhibitions. This also gives me the opportunity to make the landing gear more similar to the original.
27 November, 20:36
Wonderfull, a new self made wooden airscrew.
I love these little gems.
1 27 November, 20:47
Thank you Christoph! Those wooden airscrews are always a fun part of the projects 🙂
I will also try to use wood for e new tail skid.
2 28 November, 11:01
Thank you Yngve, Alec, Johannes, Guy and Marcel! Nice to have you on board 👍
Johannes, this propeller has 7 layers of wood, of 3 different kinds. This starts years ago as I was not able to paint such layers on a plastic propeller. With wood I have such layers automatically 🙂
2 28 November, 19:00
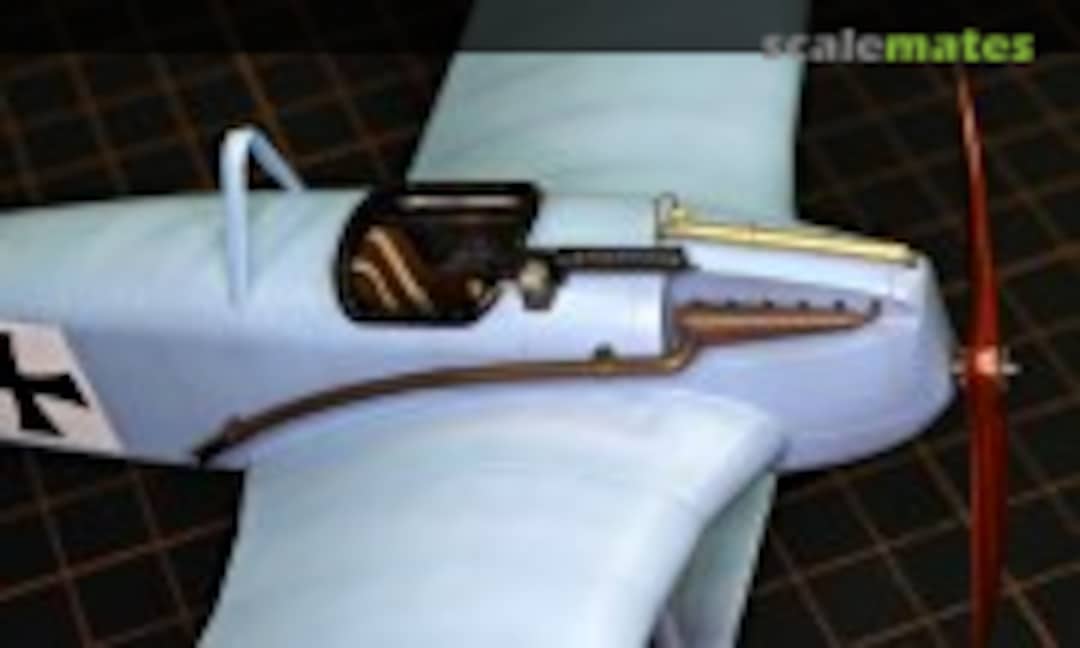
New photos uploaded. The control horns are scratched and a very important task was finished some minutes ago: a new robust tail skid made from metal and wood.
I spent several days thinking about it and trying to interpret the available photos in order to find a solution. In the end, it went faster than expected, even though I had to work on the brass profile twice. On the first attempt, the profile was too large.
2 28 November, 19:48
The undercarriage is done!
A problem was to understand how it works ...
There is a "wing" around the axle, but connected only to the axle it would rotate. So some other part needs to hold this wing. (Btw, I soldered wires onto the wing. I have seen no, two and in the case of the E251/16 three seams.)
Another problem: the axle moves with suspension up and down, so it is not connected to the struts on left and right.
There is a rigging cross inside the struts, that means a force pulls the left and right legs together which means a compression strut between them is needed. It seems to run inside the axle wing, and the axle too. But how the suspension could work then?
See the Sopwith types (e.g. my builds), there the axle is running in a slot and moves up, but here the wing is closed on top.
I found the solution in the factory drawings shown in my reference book: there is only one compression strut in the front and the wing rotates with the axle.
Up in the air the axle is springed back, so the wing is flat. If the axle moves up in the suspension during landing, the wing rotates, but in that moment it is aerodynamically not important.
That was a very clever solution by Prof. Junkers or his engineers 👍
I need to pant it before I can add the "rubber" suspension to hold the axle.
1 December, 22:17
Thank you Jakub, Alec and Ricardo! I forgot to mention that my new legs are 1.2mm thick, the ones in pic 6 are 2.3mm.
@Arseny materials: brass, nickel silver, solder, wood. Tools: lathe, various files, scissors, soldering iron and more then 40 years of soldering experience 🙂
@Ricardo I must admit I have many projects running. But this allows me, in case something going wrong or I'm not happy with something but can't fix it quickly, to put it aside and work on something different. E.g. the BE12b night fighter is running for more then a year, but that beast is really very detailed and complicated.
I hope to be able to finish this project, but the first primer is applied so it looks good this time.
Is there light at the end of the tunnel, or is it just a panoramic wallpaper? Could it be an oncoming train? 🙂
3 2 December, 15:39
Late to the party as usual, but never too busy for a Buggy build.
The prop is a thing of beauty. 😮
1 3 December, 07:56
Thank you and a warm welcome gorby!
I like to make wooden props but I guess to produce them only would be no more fun. Until now I made only one for another mate ❤️️
2 3 December, 17:17
Good progress! Wheels and water cooler are painted. The model is primed and the paint job is started.
1 3 December, 21:50
Next step towards the finish was the painted of markings. All was masked.
9 December, 20:34
Thank you very much mates!
Yes Robert, it looks very modern! It based on the J.1, the first flying metal plane. For both J.1 and J.2 steel plates were used. Smooth on the outside and corrugated on the inside, spot welded together. Six J.2 were built, but with many differences sometimes even on the same plane.
The J1 survived in a museum but was destroyed during WWII. Recently a group of volunteers built a (not flying) J.1 from scratch for the Junkers Museum Dessau. Their work was documented in a series of Youtube videos, very interesting!
The next J.3 used aluminium, but was never finished and flown. The J.4 was the successful armored ground attack plane (military name J.1 ).
3 9 December, 21:14
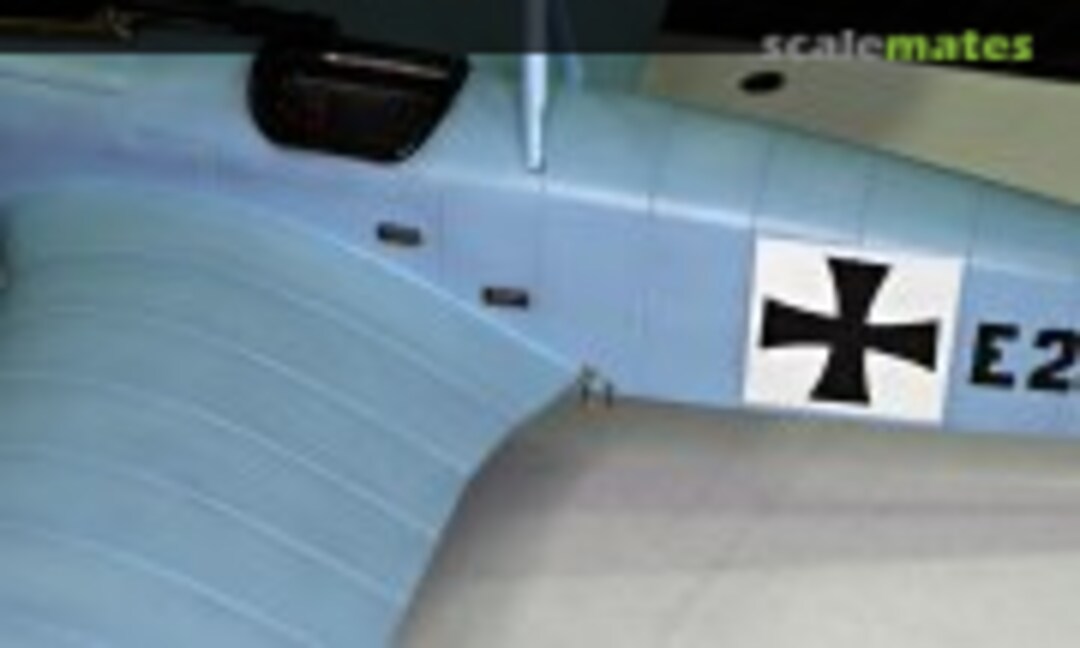
Self painted markings - no decals.
Next step taken to Level 10 AMS. 😉
Very nice. 👍
2 9 December, 21:30
See is looking realy good. How did you manage to get those letters so crisp and neat.
1 9 December, 21:43
Thank you very much mates! Your feedback is highly appreciated 👍
A vector drawing program and cutting plotter is a useful tool, but a cutter has limits on small elements. I'm 100% happy with the crosses, but the number is not perfect as I wanted it. Also the positioning of the masks is more complicated than decals as you can see the position better while applying decals.
1 10 December, 12:30
Thanks gorby! Yes, but that is a damn tricky business ...
I added the next batch of pictures, the brass water tank has just cool down from soldering 🙂 Very fresh parts!
But I forgot to take on overview picture - do you want a teaser?
2 10 December, 16:45
Next update: all parts form the kits are done, rigging is finished and the end of this project comes close.
Some things needs to be done, for example I have to scratch a wind shield and have to paint the exhaust smoke trail ( I hope not to ruin it here).
Metal paint on the rigging wires is another task ...
2 13 December, 19:45
My fears have come true. After a painting accident, the exhaust stains are now more visible than I would have liked, but I'll just have to live with it.
Now I'm just hoping for better weather in the next few days so I can take the final photos.
Thank you so much for your support, comments and likes during this project!
1 15 December, 16:03
The exhaust staining looks good to me Frank - the curse of being a perfectionist. 😉
Lovely work all round in fact.
1 15 December, 16:33
Thank you very much mates! Your great feedback is highly appreciated 👍 That is great motivation and fuel for the next builds.
My wife complained that my mechanics are unable to keep the aeroplane reasonably clean. She does not like weathering.
@Robert For sure this was an elegant plane. In my opinion, it had more aesthetic lines than some later models.
I will add some words to the final album. In short:
That was a fun project for my taste: a good base and still enough room for some scratched details to give the model my own personal touch 🙂
2 15 December, 21:27
Thank you! But I must admit that this colour is difficult to photograph. At least it looks different in every photo.
@Thomas Frightening? I've thought about it again, and I should confirm that I haven't made a pact with the devil for better models. You know, like Goethe's Faust. 😉
2 16 December, 09:15
Hey bughunter, I like your weathering! It´s still subtle but straight forward and resembles especially the exhaust stains very convincing!
1 16 December, 16:37
Thank you mates!
Still only dark gray fog outside ...
@Sven I used a Clear Smoke paint for the exhaust stains so depending on light you can still look through.
2 16 December, 20:24