
Thread started by DokAlex144
added a new photoalbum.
135 images
T-14 Arctic Camo Build
1:35
With the lower mud effects done I could now finally start to seriously put this thing together. Hence, I glued in the ro...


Project: T-14 Armata What-If Splinter Camo


 7+
7+ 49 13 January, 21:51
After some time away from the bench I am returning not with an airplane as usual but with something different (although still modern) - a tank in 1:35.
Specifically it's the T-14 Armata. Although it is in development for quite some time, not many units have been produced. So I took the creative liberty to imagine a what-if splinter camo to add a bit of color to the tank instead of painting it in the dark green as it is seen in the victory parade.
My first tank model ever, will see how it goes. Also, some aftermarket as always.
13 January, 22:02
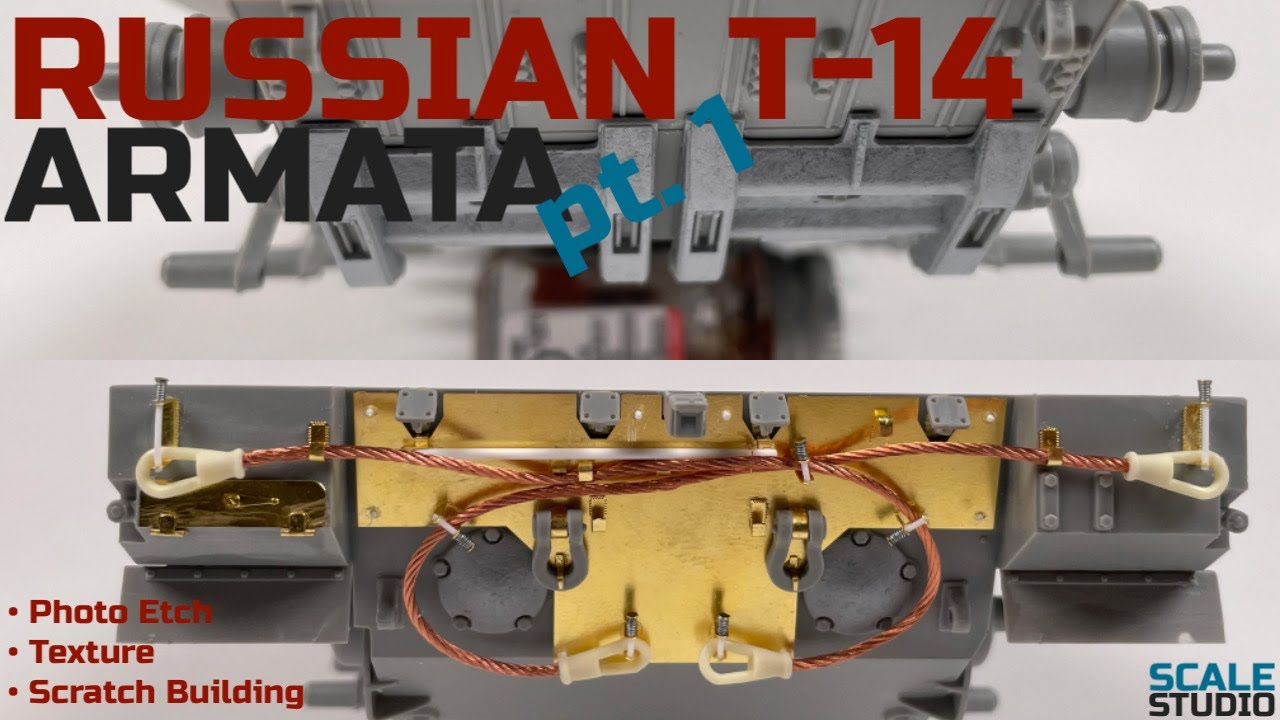
Finished detailing the rear of the kit.
I am actually following a pretty detailed and useful build series on YouTube about the exact kit with the exact aftermarket. Highly recommend for anyone interested in this subject as well.
Youtube Video
19 January, 17:47
Welcome Pepe! Progress is slow but steady, since there is a lot of small PE to assemble. Currently almost finished on the main gun barrel.
22 February, 22:55
After some time off I finally finished the soldering of the slat armor. I have to say that this was far from easy. I had to repeatedly solder back in elements after sanding down the excess since sometimes pieces would come off. This also caused quite a few imperfections. Still, in the end I think I achieved a decent look. I also think that I can hide the excess solder and dirt with the snow application in the end as I am doing an arctic what-if.
Hopefully the most difficult part out of the way now so I can finally continue with the rest of the build. Next is finishing the turret and then I should be able to start painting this thing.
20 June, 21:44
Wow! You definitely go all in with your builds! I would have fainted on the tracks, and definitely died with the clean and beautiful PE work!
17 July, 17:48
Thank you, I like to get out the most of the kits I build, so I spent more time on each with detailing and aftermarket. 😄 There also many other builders around the net, including this site which inspire me for things like this.
The tracks aren't too bad (for single-piece tracks at least), I guess I should have sanded down much more plastic so the fit was not so tight that it bended the shape over a longer piece of segment. Still, for a future T-15 I have bought Friul tracks which hopefully will be better.
1 17 July, 18:11
Soo, after a long time the tank is finally built up (mostly). Several pieces are still dry fitted now only, but now I can continue with the painting process.
Definitely took much more time than anticipated, all the small and fiddly PE took quite a bit to assemble properly (though I think it'll be worth it). Of course, a major pain point was me learning how to solder and to solder properly..
I will clean up this thing and then put some primer on it soon. In the meantime, I am contemplating again on the color scheme I chose initially.
18 August, 19:10
Thanks Guy!
I am waiting for some modeling stuff to arrive to finish up some areas before moving on to painting this thing.
23 August, 15:32
Alright, after a long time of arduous assembly, I could finally start to paint this monster. It took me two sessions just to prime this thing, definitely noticed how big this tank is again!
After several days of intermittent masking I could also start with the actual paint job. Pictures will follow soon (and I have to say, I am confident in my choice of camo already, haha).
20 September, 00:14
Main paintjob finished. There are some areas where I have to touch up, but then I can begin the post shading later this week.
Also, I couldn't wait and dryfitted parts again just to see how the paintjob looked on the whole model.
22 September, 10:14
Impressive camo painting, its worth the many hours spent masking. Lovely work
1 24 September, 11:59
Yes, haha, thanks!
Although for me more of a sprint since I was quick with finishing the whole paintjob in a couple of days. It's also not that difficult, in a way, since it is purely fictitious, so I don't really have to make sure it is similar to some real camo.
A much more tedious marathon experience was me masking a Meng F-35 once..
28 September, 15:02
I have for the first time in my modeling career done some real postshading on the model. Thanks to my H&S Evolution, it was not very difficult, though I still had to learn a bit how to control the pressure and paint outflow to not overspray too much.
I oriented myself along the build by TheScaleEngineer linked above and also NightShift's Puma IFV paintjob (since that is a good example from him of a more modern armored vehicle) to do the postshading. I did three coats times four colors, where I mixed in either Tamiya's deck tan or buff, depending on the color and coat.
I think I exaggerated it a bit, but it's not too bad for my first try I think.
What do you guys think? Is it too much? I will do oil painting later, so I guess I can blend in things a bit.
But before that, I think I will do some detail painting first.
Youtube Video
28 September, 20:30
The postshading looks good, but you probably started doing that after masking the light color. You could mask the borders where you would postshade the white and complete it, they would not have added this white later than the other 2 colors that look more worn now. To modulate the colors, only add 1 drop of a complementary color (not black /white but e.g. blue or yellow).
1 30 September, 09:13
I see, so postshade the white again/more with some blue or yellow tint if I understood correctly?
30 September, 09:49
For the white you should only use light grey for the panellines, even one drop of color would turn it blue. If it is pure white, you can only use extra white layers for the panel centers. But any green or brown can benefit from a little hue change. For green it could be dark blue and yellow depending on if you want to go darker or lighter. For NATO black it's real black and dark bluegrey. For sand color it would be red and very light yellow. I use 3 tones for almost every paint layer.
1 30 September, 11:04
I understand now. I will do oils paints later, so I can modulate the color more there. I also plan to use different panelline washes depending on the color.
Thank you very much for the feedback!
30 September, 11:38
I find it hard to control a selective panelline wash, it will flow out of the desired area very fast. Good luck with those oils.
1 30 September, 11:42
Wow impressive painting. The picture with only the turrent could just be a rendered pic.
1 5 October, 09:39
Thank you guys! I am finishing up the detail painting now and will then cover the model in a clear coat for the oil paints later.
@Timmie
Haha, that was kinda the goal I was going for. In the video about the Puma, NightShift also comments how it looks like a computer-generated render after post-shading and that it suites the modern style of the vehicle.
I have to say that I agree with both notions. 😄
1 5 October, 15:19
Fantastic work so far. Post shading is something in would like to master as well at some future time.
24 November, 01:45
Thank you very much Villiers de Vos, though I think I can still learn how to do it more subtly.
After some busy weeks I will continue again, now doing oil painting and then probably some light chipping.
1 25 November, 22:23
Alright, I am seriously close to the finish line with this beast.
I spent the last days dipping my toes into mud effects. I could have done better, but I was initially hesitant to even try it to begin with, and I think my results are passable.
The next step is adding dust and bit of dirt/mud on to the side and slat armor. Then, the final step are adding some snow effects to go hand-in-hand with the arctic scheme.
2 4 December, 16:46