
Vlákno založeno bughunter
přidal nové fotoalbum.
269 obrázky
Build log of the Blacksnake
1:48
A lot of details to be painted!
Many layer of clothes and belts. There's even a handgun in there.


Projekt: A-10C Blacksnake


 12+
12+ 132 1 July, 16:59
After no modeling for a while I have done something different. May be the success of the little Goblin tries to invite me to do another jet?
3 1 July, 17:43
Hy, good to know you're back at the bench 🙂
A jet this time...
Well, I don't know anything about modern jets.
So it's going to be a surprise to me what you are building this time.
1 1 July, 18:08
Thank you very much mates!
Yeah Christoph, that was a long brush painting task! The seat was printed in one piece, only the green oxygen bottle and the two sensors on top are individual parts. So it was much easier to paint the (mixed) green with an airbrush. So you will need some time and care to paint all the little details and cables.
@gorby I am satisfied that after my ordeal with different colors, the resin lump now looks more or less like my reference photos 🙂
2 1 July, 19:40
Wie was wo? bughunter und ein Schleudersitz? Dann stellt sich nun die Frage, wann du einen Hubschrauber baust? 🙂
1 1 July, 19:41
Thank you very much And a warm welcome!
@Bernhard You saw my last ejection seat at the EME in Lingen - yes, the Goblin also had one. Although it was certainly much simpler.
Prior to my static model business I was flying RC helis quite a while. That was probably enough. But you never know ... Sag niemals Nie ...
@Alexander My most successful model this year (gold at the EME) was also a jet 🙂 You should think outside the box!
But PLEASE PLEASE not another ambulance! They just took me to the emergency room two weeks ago! 🙁
1 1 July, 20:23
Well, that was a well timed joke.... Sorry to hear about that, I hope you are doing better 👍
1 2 July, 21:44
Frank it's so good to see you back!
I wish you well and may you continue to build your great models.
The seat looks impressive. I'm very curious to see what project you're going to pair it with.
1 3 July, 08:18
Guys, I might need a hand or two to hold Frank back the minute he starts rigging this thing. An early warning sign might be if the cockpit floor appears to be wood. Be prepared!
3 3 July, 08:28
Thank you very much mates!
As often - if you know what to do the job is much easier. In this case good reference photos helps a lot for the paint job.
Michael, in this case I'm sure no rigging and no wood 🙂
2 3 July, 19:56
A jet, at least one with an ejection seat, needs flares.
That are parts of the kit which needs to be fixed with some PE parts.
4 July, 16:35
Still don't have a clue which jet...
But so jappy to see your fingers are "geschmeidig" again.
1 4 July, 18:41

To comment on your remark about the oblong holes: these are AN/ALE-40 dispensers that can hold both flares cartridges and chaff cartridges. What was actually carried depends on mission requirements. And they can be mixed as depicted by the kit. There are rectangular and squre flares as can be seen here: tara-aerospace.com/AN-ALE-40
2 5 July, 05:42
Was ist denn jetzt los? Ein Jet?! 😄
Bin gespannt, den Kit habe ich mir vor 2 Wochen auch gegönnt. 😉
1 5 July, 10:22
Thank you very much mates!
Wow tyu, great explanation! All my reference pics have shown only square flares and I do not know much about jets. Something learned 🙂
@Erik I'm not sure if this jet will be as beautiful as my first jet model, but one can hope.
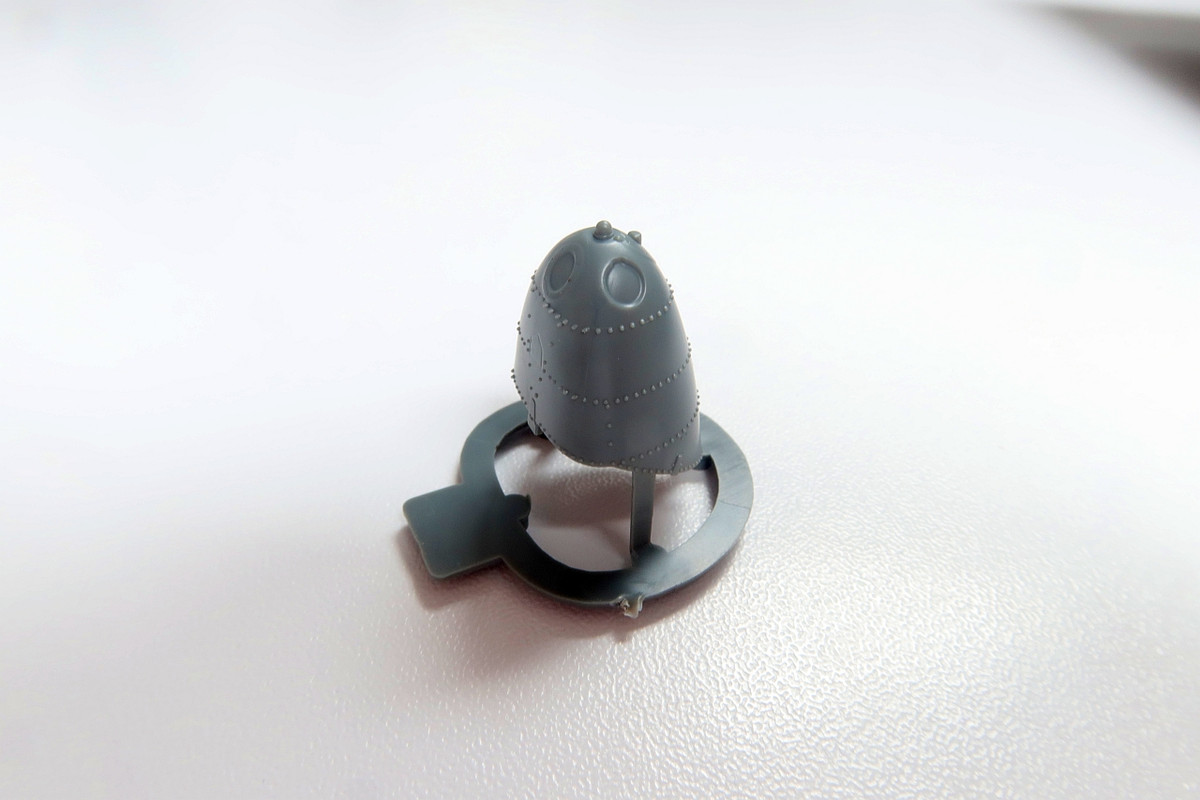
Do you ordered the Limited Edition Blacksnake? Please check your tail cone! See pic 17 🙁
5 July, 11:36
I wonder where you have heard this part is often defective. None of my 12 GWH A-10 kits have defective tail cones.
5 July, 11:39
Wow 12 A-10 👍 After 12 models, you'll have every move down pat, so you could probably build them in your sleep!
I saw a picture on Britmodeller, where the part looks broken as mine. And there it was mentioned, that the replacement is hard to get due to high demand.
i.imgur.com/3ap0OvI.jpeg
5 July, 11:57
More pics added.
And another example of a rushed after market set. Nice but not usable. No useful feedback from manufacturer 🙁
5 July, 12:25
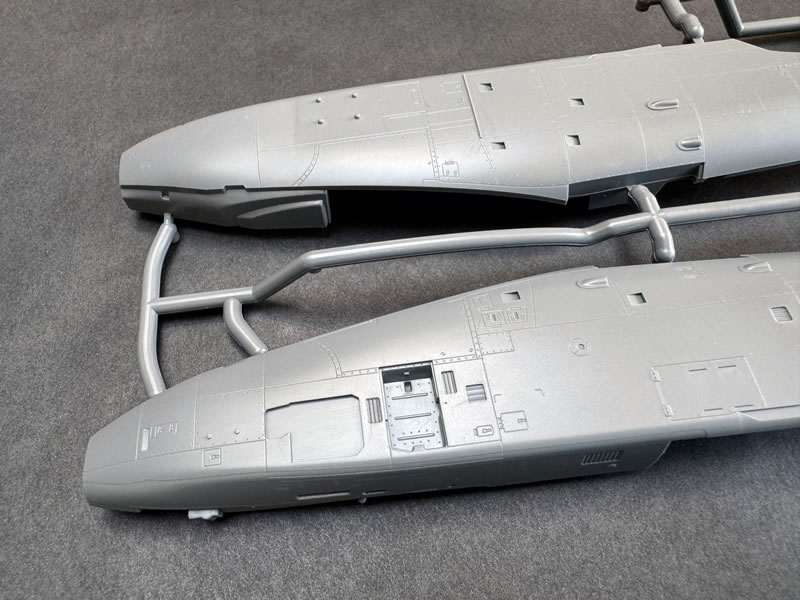
And the next pictures of the wing. As I build it out of the box there is not much to say about it.
That beast is huge - I will need a new cabinet.
5 July, 16:08
Annoying. But I'm lucky, everything's ok. Thanks for the tip and hopefully you'll get a replacement quickly.
[img1]
5 July, 18:19
Sorry David, but that bird does not appeal to me at all!
Erik, I got the okay part from my friend 👍 And as he ordered both kits, he is now clarifying this with the dealer to get his kit complete 🙂
5 July, 20:23
gorby I'm glad you like it! Yes, this modern kit makes it interesting for me. The split of the parts looks promising. And there are very nice accessories which are not available for my biplanes so I try this one.
Erik, another point regarding the tail: the part shown in Britmodeller was the A-10C, the first kit edition. That it happens now again in the third/Limited Edition is not a good sign for quality control.
1 6 July, 11:20
While I was on a short vacation, interesting things happened here.
So it's the A-10, that's a big surprise to me.
Whenever you say "A-10 Thunderbolt", I think of a publicity photo of its impressive rotary cannon along with a VW Beetle.
[img1]

I wish you well with your work on the model and look forward to seeing more progress.
4 6 July, 12:38
Ludvík, it surprised me too 🙂
As I wrote above your post I found this kit interesting, but the original gray colors a bit boring. But after I got a good offer for the Limited ....
Now I know that the decal sheet of the kit is incomplete and has bugs, so an aftermarket decal sheet to fix this is needed too.
This huge can cannot shown open with this GWH kit. There is a (not cheap) set from Eduard, but that is designed for Academy: A-10C Rotary Cannon Bay (Eduard 6481072, 1:48)
A gun loading carrier was available from Flightpath A.10 Mechanised Ammunition L..Flightpath FP-48-103b, 1:48)
but it seems to be no more available. The Flightpath page is somehow down too.
")
")
More pics later this day.
6 July, 13:45
As promised a new batch of pictures is online (from pic 34) - have fun!
What solution for the fuselage openings (pic 39-41) do you like more, Eduard or my own?
6 July, 17:24
The openings in photos I've seen look more like a very fine mesh rather than the small holes of the Eduard parts.
1 7 July, 06:30
I somehow missed this brutal looking beast.
Great progress so far, will follow this 👀
1 7 July, 07:06
As always, you pay great attention to detail. I'm sure it pays off. It's these little details that give the model credibility.
Replacing the Eduard PE mesh with a fine metal mesh paid off. The holes look much better now. 👍
1 7 July, 11:19
Thank you mates and welcome Jan!
@gorby To allow a comparison I added the photo of the real one.
@Ludvík The new mesh looks nice, but is hard to cut to fit precisely. I masked the mesh and will leave it unpainted.
7 July, 13:07
Uff, you snooze you loose around here…glad to see you back at it Frank, and what a subject!
1 7 July, 18:04
Frank, I also use metal mesh on some of my models. So I know the problems associated with cutting it to the exact shape.
For dense mesh, a simple procedure has worked well for me. I cut a piece of mesh a little bigger than I need. I glue that with thin CA glue to a thin plastic (or metal) plate. The CA glue needs to be spread into a thin even layer. Then it won't creep into the holes in the mesh.
After the glue dries, I cut out the exact shape with sharp scissors. The mesh glued to the plate doesn't fray and the fibers don't fall out at the edges.
2 7 July, 20:15
Good to have you on board mates!
Ludvík, did I understand correctly that you then glue the plate with the net over it into the recess?
In this case there are some ramp openings inside. I forgot to take a picture. Please see the link to a picture of a review on Hyperscale.com: [img1]
So I painted the ramps with some metallics and glued the mesh over it. I guess not on the pics, but you can perceive the ramps with the naked eye.
8 July, 11:17
Welcome Skyhiker!
Yeah AI, that is damn small! That was the reason why I wrote that it was a hard paint job 😉
The outer reflectors and the one in the middle are painted with a finest brush and a Chrome paint (I think I used MRP). On the smaller reflectors in between I tried other metallics, Titanium. Then other Alclad clear paint in thin layer on top (with brush) until I was happy. At the end with bright gray the outer ring before I glued in the clear foil with "Micro Kristal Klear" glue.
2 8 July, 12:07
I've only just discovered that! I am delighted and look forward to a new masterpiece from you on a new, unusual theme
1 8 July, 16:34
The project is developing an incredible dynamic here!🙂 I didn't quite understand what exactly you did 3D for the landing light. The inlet with these many small round parts (aka light-emitting diodes) to install in the kit part?
1 8 July, 17:41
Hey, welcome mates!
Bernhard, the LED landing lights are part of the Detail&Wonder landing gear set, see project list. The whole set is 3D printed, plus some metal and PE parts. I "only" tried to paint the LED reflectors inside according to my references. The set also contain two little round clear foil to cover the lamps, but no spares! The fit was perfect. The quality of the print and the details are impressive. The diameter of the whole lamp is 3,5mm.
Two of those lamps are glued to the front leg later.
8 July, 17:52
Yes, Frank, you understand correctly. I'm gonna put a plate with a mesh glued to it in the cavity. But if the mesh is to remain "transparent", the method described cannot be used. I misunderstood photo 41. In that photo (with a cursory glance) you can't see what is underneath the net.
1 8 July, 18:14
That's a long way from your WW1 comfort zone Frank. I'm very impressed that you've moved beyond cars to the jet area. Just keep going and don't let the spectators bother you.😉
1 8 July, 21:46
Oh, new visitors again! Welcome and thanks for leaving a comment!
Yes Kai, that livery invited me to by this Limited Edition. Really pity the decals are incomplete/wrong so another decal set is needed anyway. And the Limited kit do dot deliver many weapons, but a 3D printed gun muzzle. So may be the normal kit release could the used instead to build this livery.
@Marcel you are right! The clear parts in particular call for special care. But a new subject brings excitement!
The only disadvantage is the size: this bird is soo huge - I need a new cabinet!
9 July, 18:25
The empty lower surface of the pylons on the GWH kit surprised me! Especially as this painting can be seen on almost all photos without loads on the pylons.
A picture on Cybermodeller showed, that Academy used slide moulding to details the pylons here: [img1]
I was already thinking about using the pylons from Academy when a new Aires kit appeared on the market. But they're not perfect either, see the pictures.
9 July, 18:57
Discovered another annoying thing:
The sprue "AN/ALQ-184" is missing in the kit! There are two Sidewinder (sprue "AIM-9L") but the rails and mount parts 5 and 7 are located on the missing sprue 🙁 Also not shown in the parts list, but in the manual.
10 July, 09:03
After a lot of work all pylons are prepared (I only need to add 4 little 3D printed parts and the tensioning clamps). They can be glued on cleanly with brass pins after the painting of wing and pylons.
Picture 56 shows also the 5 suggested loads, but the first line is not possible because the rails and adapter plate are missing (kit design error and not packaging error), see previous post.
10 July, 20:15
The new pylons looks great, much better than the kit ones. I'm amazed how many there are! 😮
1 11 July, 06:20
gorby, that is not only a Warthog but also a pack mule 😄 Now if only they had positive rivets (see pic 49), they would be perfect. It is a pity.
Thank you tyu, corrected in the pic description. Only my posting above cannot be edited now.
1 11 July, 12:58
Wow, how did I miss this project? Amazing work so far, really looking forward to the rest of the build! 👍👍
Also inspiring - maybe I can try to create the same effect on my own A-10C seat as you did with that grey-blue texture.
1 11 July, 13:11
I see another advantage of trying to build something different - you will find new mates 😎 Thank you Alexander!
11 July, 22:02
All 11 pylons are painted and decaled. Only the sway braces are not yet applied because I fear to brake them.
12 July, 18:45
Thanks Pepe! You are another one who expects something with more wings from my workbench 🙂
13 July, 15:39
You need good references for the detail painting as there are many differences on the pylons. E.g. the external tank is possible on 3 pylons and those have the red metallic fuel connectors. I will add the lamps (cast in a very clear resin) after the weathering and final varnish.
14 July, 07:34
Incredible things are going on here - the details are hard to believe and extremely convincing
1 14 July, 15:30
Jaja Alex, der depperte Modellbauer an der anderen Seite des Pinsels, der nur die schönen Details ruiniert ...
Thank you mates!
1 14 July, 16:55
You're setting a pace again...
The pylons are really the Hamer. And Zack on the wishlist. 😄
15 July, 06:35
Thank you Erik! In meantime I found out that there are pylons from Metallic Details, which are more correct as they have positive rivets, like the GWH kit and the original. There also also some details on the underside, That is a set for the Hobby Boss kit, but it should be possible to use them on the GHW kit too.
In case of another A-10 fully loaded I would go with the kit pylons.
15 July, 06:41
Very nice progress.
At the end you'll have to pose it with one of your biplanes to show the difference in size.
1 17 July, 06:37
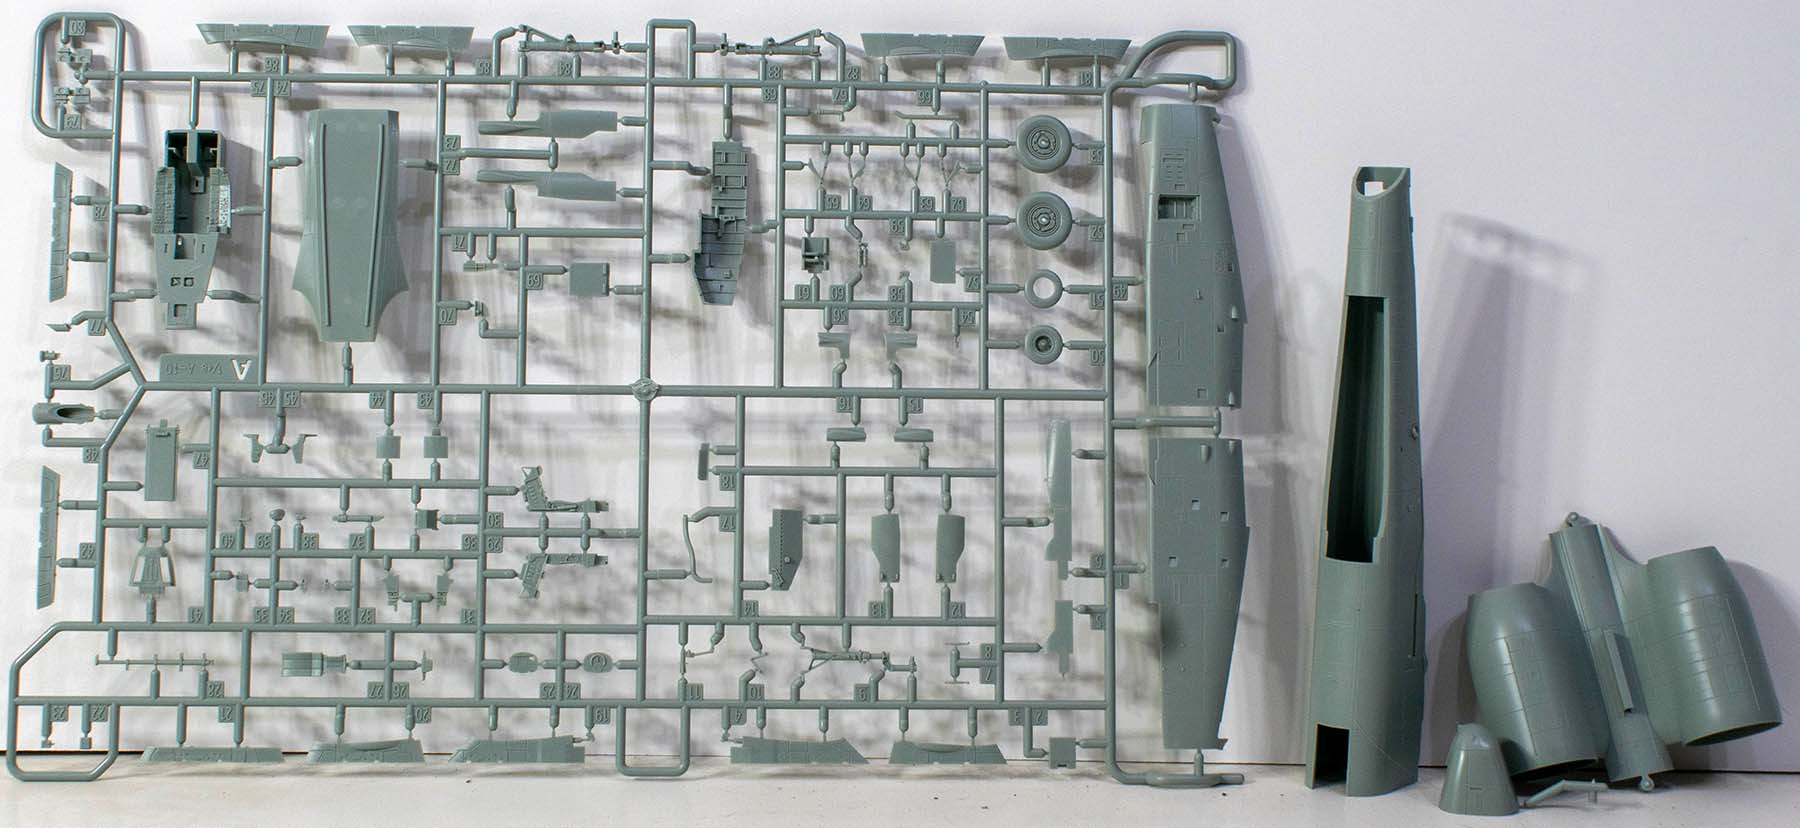
Thanks mates! The number of parts on the sprues has been dramatically reduced.
It's so big that I'm afraid one bottle of MRP paint won't be enough. 😠
Yeah gorby, I will do a comparison with the flying Flea 🙂 But there is still enough on the ToDo list, small parts and detail, clear parts, paint, decals ....
18 July, 14:16
Yeah I don't know how to feel without seeing a wooden prop somewhere in the build photos. 🙂
3 19 July, 01:54
Looking at the pictures here, my fingers are itching to pull my A-10 from Academy out of the stash 😎
1 19 July, 06:47
Thanks mates!
John and Robert, what about wooden wheel chocks?
@BAT21 It looks like the Academy kit can be build into a nice model too! Even someone wrote on Britmodeller during a build: " I'm finding more and more small shortcomings in the academy kit as I get deeper into the GWH kit."
After seeing the GWH sprues at the Mosonshow, I was hooked on this kit and the livery of this limited edition was the final blow.
2 19 July, 09:49
Thanks mates, I like the cockpit too ... but now another disaster! I was probably afraid of the clear parts for a reason.
The front side windows should be coloured slightly yellow. So I diluted MRP Clear Yellow even further and sprayed it on. And bang - once too much of the thin colour and I got splatters. Oh well, I thought, I'll just wipe it off and try again. Yes, the colour stayed in the cotton bud, but the MRP thinner left the clear part dull!
As I don't expect to be able to get new clear parts from GWH, I'm now trying to get the windows clear again with the Tamiya Polishing Compaounds Coarse/Fine/Finish. To be on the safe side, I'll use cotton buds by hand. Alexander would certainly manage that ...
Would I be on the safe side with the Gunze Levelling Thinner/Gunze Clear Yellow (if another attempt were possible)?
1 20 July, 13:40
Would Tamiya clear yellow + thinner be out of the question? The alcohol based solvent doesn't attack plastic. I realize the thinner doesn't level as well but this is a small area and should be manageable.
2 20 July, 14:08
I used Gunze Leveling Thinner a few times to wash off the gray Gunze H95 Smoke. I never damaged the clear part of the cockpit cover.
However, I recommend testing on a piece of clear tree beforehand just to be safe.
1 20 July, 14:19
Thanks for the hints! Ben, the advantage of the Gunze Clear Yellow is, that this is in my stash - Tamiya unfortunately not.
Sure, that was a rookie mistake. But I really didn't expect the thinner to attack the plastic. 🙁
20 July, 14:27
Even an experienced modeller sometimes makes mistakes. I hope you can fix it.
Tinting transparent parts with heavily diluted paint is tricky. It's tempting to spray a thick layer because the tinting effect is not immediately visible. However, if you spray too thick a layer, the paint runs off and damages the result. I have found that it works well to spray as thin a layer of diluted paint as possible and let it dry. After the paint dries, I spray another thin layer and let it dry again. I continue adding layers in this way until I reach the desired saturation of the paint.
4 20 July, 14:46
I have not found Mr. Levelling Thinner to damage clear parts at all. Clear parts dipped in Future on the other hand... 🙁
1 20 July, 16:18
Ok, I will give the Mr. Leveling thinner a try.
Dipping in Future would be possible, but brings up new questions, as only the side windows needs a yellow tint.
1. At first Gunze H91 Clear Yellow/Leveling Thinner. Then Future. Does the Future dissolve the Clear Yellow? What about masking on top of both?
2. At first dipping in Future. Then mask the middle window. Airbrush Clear Yellow. Mask all windows for frame.
I heard that masking on top of Future is risky, so I want to avoid another risky step.
So way 1. or 2. ?
For now I try to finish the polishing.
20 July, 16:40
First, congratulations on the great save. Second, I would stay the hell away with any kind of lacquers from clear parts. Only alcohol based paint, e.g. Tamiya X/XF of Gunze H series.
Future and the aforementioned alcohol based paints are mixable and doing great with each other
What do you need Leveling Thinner for exactly? I would say it is too risky for clear parts. Why not use "normal" thinner?
I`ve masked on Future before (my blue Su-27) did not encounter any problems. Let it dry properly obviously. In any case if you mess up with future you can bathe the clear parth in Ethanol and try again, the clear parts won't take any damage
In any case your suggested nr. 2 order of operations sound absolutely reasonable and I would do it exactly like that 👍
1 20 July, 16:57
Thanks for your very helpful answer!
I have also the normal thinner for the Gunze H paints.
20 July, 17:11
It looks very shiny.
How was it polished? By hand or machine? What was used to rub the polishing paste into the plastic? Cloth, cotton swab, or paper towel?
1 20 July, 17:47
I have done it by hand because I was not sure how deep it was dissolved. I don't want to break it with a rotary tool.
So I used mainly cotton buds, and "coarse" -> "fine" -> "finish". But after I was not happy I restarted multiple times back with coarse.
After it was hard to get in the recess to the frame around I used then also cotton (old T-shirt) around a flat little screw driver to do the grooves.
With the naked eye it was not so prominent but after the macro picture 88 I found out that the wood of a toothpick also works with the compounds so I improved the grooves around once more.
1 20 July, 18:29
Well done mate.
Calling it dirt is for average modellers like me.
What you do isn't average at all.
1 20 July, 18:34
Thanks, but now I need a red-face-smily!
I easily spent three hours rubbing on it. That wouldn't have been necessary if I had used the right paint.
20 July, 18:53
Do have some of those pointy cotton swabs, like the modeling-specific ones Tamiya sells? Maybe they might be suitable to get into the corners (if you are willing to spend more time on this..)
In any case, the results looks great! 👍 I have actually also had a similar problem tinting my A-10 canopy - not as bad as in your case it seems, but I still need to do some touch-ups. I might give your approach with the Tamiya polishing compounds a try.
1 20 July, 19:18
That seems to be a good idea but I don't have such cotton swabs. I need to put them on my shopping list.
In meantime it looks even better now - I think good enough for the naked eye.
Sorry Alexander that you have a similar problem. I was so angry at my own stupidity that I didn't take a picture of the ruined canopy.
20 July, 19:29
Tamiya has a whole palette of different swabs, small, pointy, round, flat in different sizes for different applications. Very useful
1 20 July, 21:03
I second Alexander and Alexander. The pointy Tamiya swabs are a very useful addition to the drug store cotton buds as the reach well into corners, nooks and crannies and as they are very tightly rolled they do not disintegrate easily. You might shed a tear on the price, though 😉
1 20 July, 21:21
One of my favourite planes, being built by one of my idols on SCM. I'm in!
1 21 July, 15:50
Welcome Spanjaard and Martin!
Martin, thank you very much, but such praise 😳 This puts me under pressure - now I need to take even more care to get a nice result 😉
21 July, 17:44

Some new pictures added, with gun and more.
A dip in Future was successful, it is dry now after 24h. But I will wail longer before I add masking on top of the Future. And try then again a yellow tint.
In meantime I will continue to experiment with the HUD. What do you think about the polarization?
25 July, 18:44
HUD looks very nice now with one sheet.
Perhaps you could dry-fit the second sheet and see how it works for you.
1 26 July, 13:14
Alexander, such word coming from a modeler like you means a lot for me!
Thank you gorby and Timmie! As long as the transparent parts smell so strongly of Future, I can put off masking and do other things.
26 July, 15:44
GWH offers us a great kit, but there is always room for improvement. So, after checking my references, I scratched another little detail : the ram air duct of the ECU on the back.
Happy modeling!
26 July, 16:23
After 6 days, I dared to mask over the Future and tint the side windows again. I only left the ASK masks on for a very short time.
In the meantime, I also received a warning from a friend who had given up using Future because it always caused problems with masking afterwards.
2 29 July, 20:28
Future is cheap, but it sure isn't X-22. Future also yellows with age (maybe what you want here, lol)
2 29 July, 21:33
Future is OK and had no issues with Tamiya tape. BUT it doesn't react well, with anything. I got some panel liner and/or mineral-spirits based wash on the edge of the mask and it slipped under and marred the Future so I wouldn't worry about the masking as long as nothing gets under the mask and contacts the Future.
1 29 July, 21:52
My first HUD V1 looks nice, but I was not happy with it due to the size 🙁
Now I made a new try and created a HUD V2. This one is much closer to the original and I'm happy now. If you see pic 122 the difference in size is massive. Once I know such error I can't live with it and need to fix it!
1 2 August, 21:07
Thank you! I have built the second version the same way, so it should look the same in identical light conditions.
3 August, 12:51
I waited quite a long time until the Future was no longer noticeably odorous. The yellow tinting was also completed a few days ago, so I decided to mask the canopies and paint them immediately. Afterwards, I removed the masks immediately for safety reasons.
I will only attach them to the model permanently after painting. Fortunately, the windscreen can be folded up exactly at the dividing line, so it is realistic that a little line will remain there.
Thanks you very much for all the hints and discussion regarding the Future! This way it worked 🙂
1 3 August, 13:28
The fit seems to be very good - very useful to keep the clear parts away from all the paint for as long as possible.
And great job on the HUD! From where is the V2? The V1 was from Eduard, right?
3 August, 15:19
Yes Alexander, the V1 is form the PE for this kit 491458 from Eduard.
I searched then through the Eduard site as there are much more A-10 sets in 1:48 (Academy, Tamiya, Italeri, hobby Boss and this in variants for A and C) and measured the HUDs against the "Eduard" lettering on the frame assuming that the size is somehow consistent. I checked then what is available for a good price on ebay end used at the end a set for a Hobby Boss kit 49395. But even here is a error: the manual is wrong regarding the clear HUD foil, but I know how it should look like - and the size of the foil was correct for my usage 🙂
I do not understand such mistakes: they have done it right already in older sets, and the kit they designing the set for has also a bigger part. Why this is at the end such small? May be it is overtaken form a PE set for Academy - that seems also very small (may be for space reasons in that kit).
3 August, 15:42
I don't own a 3D printer, otherwise that could also be an option to print a new HUD frame. I have not checked if there are print files around.
3 August, 16:01
Thank you for the explanation. I think 3D printing would be a bit too thick, but I am also not informed how thin the technology allows printing right now.
I have an Aires cockpit set for my build. I will check later whether the dimensions there are correct - otherwise I will buy your mentioned PE set too 😄
1 3 August, 19:36
After priming I started the paint job - that was really a job on this huge bird! My airbrush cabin is a little small for it and it needs a huge amount of paint, compared to my usual models in same scale. The MRP Gunship Grey FS36118 is applied.
Next step after some drying time is masking and NATO Black.
1 5 August, 17:23
Some progress with painting (not completely satisfied because no competition quality) and the first decals are applied.
The snake on the head is really not an easy to apply decal! I suggest to add the front sensors after the decal and cut away the front part of the decal to apply it in multiple steps.
But I also have another problem! My wife told me it's ugly. My other models are nice and allowed to live here. You know the wife is always right so I don't know about the future of this warthog.
8 August, 17:49
Soeren, thanks you! And sorry I have overlooked your post as I typed in parallel.
It is a great kit, clever engineered. I only need a very little putty. I had some trouble on the engines, but that was my own problem. If you take not enough care in on step this brings you in trouble later. You need to be careful on the back part of the fuselage, because you cannot sand there without lost details. The the clever part split helps.
The decals (printed in China) are wonderful to work with but not error free. It is helpful to check reference photos for placement as the manual is also not perfect. Or there were two versions of this livre, but I have some doubts.
1 8 August, 18:06
As I build more and more I fill up my cabinets. So if someone says "hey I like that model!" I always ask if they'd like to take it home. Frees up a little space.
2 8 August, 18:49
It's fascinating to me, bughunter, how briskly you move forward with the build while maintaining exceptional model quality and crispness. Hats off to you!
1 8 August, 20:37

Great! I'm surprised that the edges are so sharp despite the masking-clay.
1 9 August, 07:35
Zbynek, I'm a slow builder, but invested here a huge amount of time.
Erik, that's because I'm not very experienced, as I've rarely used such masking.
9 August, 12:39
When using soft masking clay the trick is not to spay into the "corner" if you want to achieve a soft edge. Don't aim at the point where the clay meets the surface, spray from the outside, from the side of the masked area over the clay "sausage", I hope that makes sense.
2 9 August, 12:54
Bughunter, you're a slow builder… good joke! 🤣🤣🤣
I have some idea what a slow builder is.🧐 But you can't seem to fit into it... 😁
1 9 August, 13:08
Fank, if you call yourself a slow builder, I really don't know what to call myself anymore. 😄
Great and fast progress, I really like your work. 👍
2 9 August, 21:04
Ah, one of my most favorite jets!! Just caught up on the build log. And I love that you're doing one of our own Blacksnakes. It's a definite possibility that I've seen this aircraft fly over my house. You've done some magnificent work so far, my friend, as always. Great job overcoming the issues with the HUD and the canopy and your details look wonderful. Always loved this commemorative paint scheme too. Great choice!! It's turning into a beauty.
1 10 August, 08:29
Thank you very much for your feedback mates!
Kyle, welcome! It must be impressive to have it over your house, even without the typical "Brrrrt!" sound!
I'm back from holiday, earlier then expected but we had to cancel it 🙁 For you, this means that you may see progress sooner.
1 19 August, 15:26
The kit provides a little decal for the inside of the ladder door, but I have not found a single reference photo for that one. But many photos of a snake "Black Mamba", also a big one good enough for a decal print.
After discussion with Spanjaard he points out that the red circle is tricky (better to print on white decal paper) or to get the right grey without raster. So I had the idea to remove the grey from the picture (transparent background, not possible with jpeg but png), print it on clear decal paper and cut a mask to get a white background for the snake and red circle. So the usual grey could be airbrushed.
The decal is very small and my printer was the limit here, but I'm happy with the final look.
1 19 August, 19:02
Thx mates!
Alexander, that was the reason I made this detailed explanation - that is may be useful in other situations too. And since I control my cutting plotter via an Inkscape plugin, it was easy to draw the mask in another layer, as I also printed the decal with Inkscape (a powerful open source vector drawing program, see inkscape.org/ ).
20 August, 11:34
Thank you for your kind words Zbynek but I'm not completely happy with it.
Some small things cannot be fixed anymore. And, of course, I only show the model's best side in the photos 🙂 We have in German language a nice expression for that: chocolate side.
Some other things I will fix!
1 20 August, 20:09
Absolute perfection does not exist. There is always room for improvement.
Frank, we all use the "chocolate page" to a greater or lesser extent. I don't know of any modeler who would boast about their failures and be 100% satisfied with their model.
2 21 August, 07:42
Thanks a lot!
gorby, the decal could be even better on a modern printer with 1200x1200dpi resolution, but my old color laser is limited to 600dpi.
Yes Ludvík, and since there is always room for improvement we have the motivation to learn and do the next model better. As this one will be also not perfect we have an endless recursion and stick to this hobby 🙂
21 August, 12:42
Frank, the terminus technicus "chocolate side" is very charming indeed. I also have a bit of a tendency to approach the presentation this way, but I'll eventually fight myself to show the "other side" of the model. Because there's always a flaw. 😁
1 21 August, 13:14
Thx and welcome Guy!
The two large decals with the snake head have now been removed. I was not happy with the look.
My plan is to try again using the aftermarket decal set. Here the same graphic elements are done with 8 individual decals so it should be easier to apply them to the conical shape of the nose. But there is some risk as this set is designed for the Academy kit.
Keep your fingers crossed that it works out better. Of course, I don't have a second set of kit decals as a fallback solution either. If you want to use the decals from the kit, I strongly recommend dividing the snake head into smaller pieces!
22 August, 16:25
Der helle Wahnsinn..... 🙂
and I'm sure you'll manage the decals just fine, I wish you all the success!
1 22 August, 16:59
It might be a good idea to scan the decals before applying them. That way if they don't work out you can have a third try. Good luck.
2 22 August, 17:59
That is a damn good idea Skyhiker, even if my self printed details not on the same level. Aftermarket decals have the big advantage that you can buy a second sheet what I would do if still available. I bought also decals from Revell (the famous X department), but I guess from GWH it could be problematic.
More pics soon 🙂
1 22 August, 18:28
Now I am satisfied with the appearance of the snake's head and tongue.
I have still some decals on the sheet but those are for the undercarriage and the positioning stripes related to that.
Some decals needs a little torture with decal softener but then I can protect them with another clear coat layer.
22 August, 19:23
Thanks! It is not a flying manual like the Phantom but yes with all the details and decals it starts to look nice. There are still many small things that need to be added or painted.
22 August, 21:12
You are right Timmie! I think I'm done now with the decals. For the last little stripes there was nothing on the manual, but they are related to the undercarriage. So I had to do the legs first to see where I need to apply decals on the fuselage/wings. Will that explain later with pictures.
1 24 August, 11:36
Thx Neil! What a feedback!
I checked reviews the original release and found missing decals on that sheet, e.g. the plates for the main gear legs B37. On the new Limited Edition a new number 140 is assigned, but missing on the decal sheet. B30 is missing too.
No, I will not buy the original release too to get that fixed - I used a generic sheet from Tom Anyz.
24 August, 13:42
Now the beautiful and impressive undercarriage made by Detail&Wonder is finished. After priming and painting I applied the kit details, some missing ones added too, and painted the details with a brush. That is all so fine and complex so that the detail painting is not easy. And the end I made a pin wash but removed a lot of the wash as I want to have a very clean aircraft.
Because the legs are angled, the tires should only be attached to the model after the legs have been mounted so that the flattened part is actually on the ground.
24 August, 17:49
Very nice progress Frank!! That undercarriage is lovely!! They've done a great job with that at Detail&Wonder and you did a great job with it too
1 24 August, 20:05
Thank you Kyle and Kai!
Oh yes, with such accessories like this Detail&Wonder kit we live in Golden Times 🙂
24 August, 20:21
Great progress! And a clear indication that the subject does not need two wings and rigging for you to make it an awesome build 👍
1 25 August, 12:28
Thank you, Alec, for your wonderful words that make me smile 🙂
I hope that no further accidents will halt this project and turn it into another shelf queen! A minor accident has already occurred - some of the pylons fell off the bench, but only a few sway braces broke off. I can replace them with spares.
25 August, 19:51
The build so far is awesome, i love the hud. It came out awesome. To Bad that such a expensive kit has so much problems.
1 25 August, 22:33
Thank you Ludvík, you are so kind!
I uploaded a new batch of pictures. I'm very happy about the progress after many things are done.
25 August, 22:35
That looked really close with the tailsitting, let's hope it will be good when finished!
I just checked your build again and the GWH weight is 61 g as you wrote - and still not enough?
Will be good to know especially when adding a bunch of resin armament 😄
1 25 August, 23:21
Just remove the plugs from the engine intakes, and the plane will stand upright. They were made of lead, right? 😉
Joking aside, it's a shame when such nasty surprises happen.
1 26 August, 05:23
wow what a bummer, even after you put in extra weight, it's a tailsitter.
Do you attach the centerline tank? maybe you could incorperate some extra front weight with that.
1 26 August, 08:52
Wow, thank you mates for taking your time to leave a feedback!
@DuperScale Welcome! I overlooked your post as we typed in parallel 🙂
As you can see on the next pic 188 after the tail sitter pic it can stand correctly on the nose! Interestingly it "snaps" into the two positions so I fooled you "halfway".
I filled the front nose with Liquid Gravity (Deluxe Materials BD38, No) completely (secured with white glue).
I think it is enough now as the flattened wheels will move the rotation point a little bit backwards and I have to add cockpit parts (long lever).
@Alexander A bunch of resin load will help. If you see in side view the pylons are in front of the main wheels, so all mass in front of the wheels will help.
My guess is that GWH made the weight heavy enough to keep the node down, but not much more to avoid too much stress on the front gear.
It gets only a tail sitter if you move the nose up, so part of the model weight rotates around the long main legs -> only then it snaps to the tail.
@BAT21 Good joke 👍
@Timmie The kit do not provide a center tank but two travel pods (for the personal things of the pilot). But I will not mount those.
@Alexander Grivonev I'm glad you like it! It is a bit effort to try to take pictures and process those, but such build logs is also good for me to see after a long time what I have done.
")
1 26 August, 10:06
Pfeew, glad it didn't turn out to be a tailsitter, it would be a shame after all that hard graft you have put in to it.
The engines at the rear make these kits tail happy, I've built the 1/72 trumpeter kit and put a lot of weight in the nose, and it still tilted to the back.
1 26 August, 14:31
Thx Jan!
Today I mounted the tires and then I have done a test. If I lift up the front wheel by 2cm then it starts to flip over to the tail. Below the 2cm it falls back to normal position.
1 26 August, 16:16
I believe gold is heavier than lead and would be better for models such as these.
26 August, 16:22
I word of advice is to avoid white glue when fixing lead in place. Use thin CA instead. The reason is thaqt the water in the PVA glue can start oxidation in the lead.
1 26 August, 16:24
Ben, you made me smile 😎
Thank you for the clarification Urban! I was told or read somewhere that CA should avoided? May be that was wrong or I remembered it wrongly 🙁
On the "Liquid Gravity" bottle is stated "non-toxic" so this is no lead. And I checked the bottle now and some cyano glues are mentioned. I should have read that! I had glued the large steel weight with two-component epoxy.
Now I just hope that it was dry enough before closing and the nose doesn't blow off at some point!
26 August, 16:45
Beim Anblick von Bild 187 und dem Lesen des Textes dachte ich "Was eine Scheiße"
Bild 188 "Da hat wohl jemand einen Clown gefrühstückt"
Uns so zu veräppeln - Ne Ne Ne 🙂
1 26 August, 17:46
Lead shot is also very useful as ballast. The pellets can be basically "poured" into the most inconvenient of pockets and places and fixed with a couple of droplets of super glue or epoxy. Sold by the pound or KG on eBay relatively cheap. I use 1-1,5mm diameter
1 26 August, 17:49
Kyle, that lovely paint scheme was to reason for me to buy this kit 🙂
I hope to have more pictures later the day of the next finished details - stay tuned!
1 27 August, 09:54
Regarding gluing lead weight: I also recall someone reporting that their cyano-glued lead weight ripped their model apart. I use epoxy myself. But, it sounds like Liquid Gravity is not lead based 👍
1 27 August, 11:43
Alec, so my memory wasn't deceiving me after all.
I found now a review linked on the SM product page, and there it is stated that this is steel shot used for abrasive blasting - high priced in a small bottle. I hope it is at least rust-proof steel!
1 27 August, 11:57
For the same reason you should avoid using "old" lead such as wheel balancing weights that's been exposed to weather and wind as the oxidation have already started even if you can't see it right away. "Old" lead should therefore be resmelt before considering to use it again for our purposes. It's a shame when a nice model gets torn apart from the inside by oxidating lead a couple of years after completing it.
1 27 August, 15:18
I always use 'old' lead and by coincidence I've just dismantled a ten year old model with a lead nose weight today. It doesn't look changed at all and the Araldite (two part epoxy) held well.
3 27 August, 15:44
I am no expert on this subject but I am familiar in chemistry. Oxidising lead is very predictable. Because leadoxide is self limiting in the thickness of the oxide layer like aluminumoxide when exposed to air. Why do you think lead exposed to the air is not changing over time? I mean over hundreds of years it doesn't change. It becomes brittle but does not expand. The problem is not formation of PbO (leadoxide) but PbO2 (leaddioxide). PbO2 has a autocatalytic effect and the likely case of the increase in volume observed by some when using lead weights. PbO2 forms in water with chlorine present. So it is better to prevent use of water based glue(s) when fixing lead weight(s) since there is no way knowing for sure (bar chemical analysis) it doesn't contain chlorides. Cyanoacrylate glue (super glue) on the other hand does not have this issue. In many years of modeling I always used superglue for nose weights and I have never encountered lead expanding and causing issues. And I will use it again on my next build that requires nose weight. In general avoiding water based glues will minimise the risks. And I use gloves when handling (old) lead since leadoxides are toxic. And using gloves prevents chlorides (read sweat) being in contact with the old lead. The same applies to iron based weights unless they are high quality stainless steel.
8 27 August, 19:17
A new batch of pictures of added details was uploaded. That means the underside is done, may be I will paint one or another antenna in another color.
Some additional teaser pics are uploaded too, as I like the Blacksnake already.
1 27 August, 21:32
Wow mates, thank you very much for your answers and also for the _100_ Likes 👍
@Zbynek The documentation is a bit effort, but it is a good task at the end of the day with music in background!. May be it is helpful for the 300 kits (+ 600 on wishlist!) here on Scalemates of the GHW A-10.
@Skyhiker You mean that this project is (in terms of money and time) the opposite of your scratched Sputnik project? 🙂
@Alexander Sorry, but I fear this take a while as I have still ideas and many things on the ToDo list. And I need to think about final pictures as this special bird is too big for my light tent!
And I want to send a special thanks to Len acting as technical support hotline in the background 👍
3 28 August, 09:16
Sometimes I'm a little envious when people have a great foundation to start with. Your experience and talent coupled with the better quality kits, 3d prints and aftermarket parts really shows that the most amazing results are possible. I'm pretty sure you could open your own museum with your collection. They are definitely in a class of their own. I usually end up spending a lot of time, that could be used more efficiently, scratch building parts for the cheap kits I can afford. My old school efforts have a certain charm but I'd love to get things done a little faster.
1 28 August, 10:35
Holla die Waldfee - what a great amount of feedback! Thank you very much, that is highly appreciated.
This modern GWH kit and the nice accessories invited me also to try this project. My Eduard Camel family was also a very modern tooling, but most of my biplanes projects based on very normal kits.
You are invited to see my collection!
One possibility are exhibitions like the EME next year, but I don't know if you are going to visit it. But there are for sure modelers from Berlin. May you can find a carpool?
Another possibility is a visit in Munich. If you are one day in Bavaria you are invited to visit me. This would have the advantage that you could see more models as I cannot take all with me (but many) to exhibitions. This includes models such as the Wells Fargo Stage Coach | Project by bughunter (1:10) , as my wife has forbidden me to take it to exhibitions. She is concerned about damage during transport.
And of course you don't have to buy a ticket instead you will get a coffee for free!
4 28 August, 11:35
Let's leave the outstanding model aside for a moment — I find it amazing how well everyone here communicates with each other. It's rare to come across hobbies where the atmosphere is so positive.
5 28 August, 12:33
No worries bughunter, I am patiently waiting as long as it takes 🙂
Who knows, maybe I can even continue my A-10 by the time you finish if I'm fast enough 😄
1 28 August, 14:41
Oh Frank, this is looking wonderful. The engines look great after the unmasking as do your teaser photos. Truly outstanding work.
1 28 August, 19:00
I'm glad that you like it Kyle! I started to work on all the lamps and sensors around this bird.
1 28 August, 20:09
There were some questions if I had the antennas right as I had no reference pics of the underside. But with HUGE help here (Have I already mentioned that this is a fantastic community? ) I painted the antennas with AK Real Color markers. Only towards the tail there was more work as this aircraft uses a late configuration. I made a cover for the removed antenna from a piece of brass (PE frame). The Modern Hog Guide book was a good help here.
This books is also a great help for the lamps. I should have done this earlier, but at the beginning I don't have the book.
And finally, I must apologize to DefModel. For some reason, there were no labels or arrows on the radar altimeter on the right rudder. So the decals in the set are sufficient.
1 29 August, 20:05
Wonderful attention to detail, as always. This is such a nice build. A pleasure to follow along with.
30 August, 07:20
Thx Kyle! At least, I try to document any changes I have made, to make it easier for others who also want to build this kit.
30 August, 11:53
Does anyone have any ideas for the seal on the windshield?
I tried cutting decal strips, but couldn't get them thin enough or even.
Tom Anyz has colored stripes down to 0.07mm, but only in white or other too strong colors, no gray or beige. Is there anything comparable from other manufacturers?
Anything other than decals?
The GWH windshield looks already a bit narrow. If I add stripes this impression is even stronger.
31 August, 11:36
have you tried cutting strips of decal paper with the silhouette? using the solid color ones, you can easily cut with the plotter
1 31 August, 11:45
If you can still paint inside the front wind shield: A-10 C Thunderbolt II EXPERT..ks (New Ware NWAM1227, 1:48)
If you can't: try what Spanjaard said
")
1 31 August, 12:08
To display the seal on the transparent cover, I use strips that I make myself from decal paper. First, I spray paint a piece of blank decal paper with a color that matches the color of the seal. When the paint dries, I cut thin strips from the painted decal paper with a sharp knife.
Since it is difficult to transfer a narrow strip directly from the decal paper to the model, I place the strip of the desired length with the painted side on my finger and dip my finger with the strip into water for a moment. After moistening the decal, I carefully remove the decal paper so that the decal strip remains on my finger. I carefully press my finger with the decal onto the cockpit canopy. After transferring the strip to the canopy glass, I shape the strip to fit the cockpit frame and press it down with a soft cloth.
It is important that the finger with the decal and the area to which the decal is being transferred remain moist throughout the transfer process.
Because the strips are very narrow, they can be easily shaped into an arc (if necessary) after being transferred to the cockpit cover.
2 31 August, 12:50
Wow mates, that was quick help! The job is done now 🙂
Yes tyu, masking would be an option. But I wanted to avoid it because of the problems I'd had before and didn't want to risk damaging what had been a nice piece up to that point.
Spanjaard, why is it that sometimes you can't see the obvious? As you know that I own a Silhouette this was the right hint!
I painted a piece of decal paper with MRP linen and cut some stripes of various sizes.
Ludvík, I was able to slide it from the paper the normal way. After the decal stripe was wet, I removed all not needed decals on both side, so only that one I need was on the paper. Then I put it on the part and removed the paper.
Pictures follows soon.
1 31 August, 14:49
Of course, using a plotter to cut decals can greatly simplify and speed up the work. I also thought that a plotter could be used to cut decals, but I haven't tried it yet, so I didn't dare to suggest it.
By the way, I also use thin strips of painted decals to "paint" the cockpit frames, which consist of a large number of small windows. Compared to using masks and spraying paint, the big advantage of this method is that the frames "painted" with strips cut from decals are accurate and there are no problems with paint running under the mask. If you need to paint the cockpit frames from the inside as well, it is easy to correct the position of the strips relative to those on the outside. Finally, if something goes wrong, the decals can be removed relatively easily without damaging the cockpit.
2 31 August, 15:46
Ludvík, until now I have not used the plotter to cut decals. Now I can say it works!
I have just uploaded now pictures.
The jacking points are modified with some scratch work in metal.
And the windshield is equipped with 3D decals, the front shield is sealed with decal stripes.
In case you own a GWH A-10C kit (this one or the normal edition - I checked both manuals) please note pic 231: the PAC switch part N8 should not be mounted on an A-10C.
1 31 August, 16:09
Thanks, everyone, for the nice feedback!
With every added part it looks more and more like a A-10 !
You can find some reference photos and also videos like this one in the internet, but there were also some changes over the time, e.g. the logos on the back below the upper lamps.
Youtube Video
1 31 August, 21:58
Frank, I'm running out of words to express my admiration. I can only agree with gorby, Christoph, and Roland.
1 1 September, 08:06
I'm running also out of words to say thank you for your huge amount of wonderful feedback!
I think you know what an oxymoron is?
The best example do not work in english. In German they are "schwarzer Schimmel" and "weißer Rappe". A Schimmel is a white horse, so a black white horse it not possible. Same with Rappe, which is a black horse. So a white black horse is not possible too.
And now I have a new oxymoron: a "perfect model". That's also completely impossible. A perfect model only exists in our imagination - as soon as you open the box, it's gone.
2 1 September, 16:02
Maybe it's not possible.
But some modellers get closer to it than others 😉
2 1 September, 16:55
Correct, a perfect model is impossible to create. But as Christoph says some builders do come damn near perfection and of those that do, there's still fewer that do it as often as you do mate!
1 1 September, 20:36
Every update better than the last!! I absolutely love the HUD/ IP and the canopy treatments. It all looks spot on to me.
2 1 September, 23:00
Thanks mates! Your comments are highly appreciated!
Now I started to finalize the canopy. I was a little respectful, because it's easy to mess it up.
A self painted and cut decal stripe is applied, followed by the position detection matrix for the helmet.
2 September, 11:51
Und wenn man denkt, da geht nichts mehr, dann kommt noch ein Detail daher. 👍
2 2 September, 18:06
Thanks, Jakub! I'm just wondering what this model would look like if you had painted it...
I just uploaded new pics of a failed experiment. I thought it could provide a fun effect, but it is nor worth the effort. So I cancel the idea.
In case some one is interested: the foil is ORALUX 9300. I paid 3.70€ for an A4 sheet.
1 4 September, 14:23
Another batch of new pictures uploaded.
The Blacksnake is not yet finished. I need to scratch the nav lights on the wings. And during processing of the pictures I noticed that I misses two little kit parts too!
The bird is finished then, but the project not yet.
Oh, and if a 1:32 modeler wants to have the Version 1 of the canopy handles (see pic 244) feel free to ask. Kai, you're reading this, do you want them?
1 4 September, 16:16
Thank you Kenneth (I hope to be able to continue on the Tiger Moth soon), Robert and Guy!
The two tiny sensors that I was afraid of breaking off and then forgot about are now also done - with new photos 🙂
1 4 September, 19:41
What a great ride! How do you do it so you can see it, Frank?
Really incredible work!
1 4 September, 21:26
Thank you Timmie, Zbynek, Daniel and David!
@Zbynek My workbench is located directly under a slanted skylight, so I have plenty of daylight, which is very helpful. I also always try to add handles to the pieces, which makes them easier to handle (and gives the carpet monster no chance 🙂 ).
@Daniel Such word from a jet builder means a lot! This here is only my second jet 😎
1 5 September, 16:35
Another wonderful build Frank. And it was a true pleasure to follow along with, as always. Outstanding work!!
1 5 September, 19:04
I go to the mountains for a few days, and when I come back, I can't believe my eyes. Amazing things are happening here. Fantastic progress. 👍
1 5 September, 20:37
Thanks a lot mates!
@Nate As I wrote before I will use no load. That was the reason to use the new pylons, with a load attached the undetailed lower side would be covered. I thought about two sidewinders on an outer pylon, the sidewinders are included but the sprue with the dual starter is officially not part of this kit edition (but the starter itself is shown in manual 🙁 )
On nearly all pics this bird is without load, or with two travel pods. They are included, but I not not like this loadout.
What do you think about the paint? If I see the "Spanish school" I should have done a lot of preshading below the black and much more of those modern things. But if I see the original aircraft it looks always uniform and very very clean, as it is a demo aircraft. Even in the reference book this is mention: Modelers, please do not weather it! On the other hand it may look like a toy. Hard to decide.
6 September, 16:24
I personally think in this case no weathering or washing does not make it worse since the paintjob (and everything else really) is so good. Perhaps all those little details subconciously make it look less like a toy already.
I would have still used some light, subtle pinwash, but again, not that necessary here.
1 6 September, 16:32
Just some light weathering on wheels, landing gears and gear bays and the ladder should do the trick I think.
1 7 September, 13:38
Hi, @bughunter. That's a normal thing of GWH which their instruction manuals always subpar big contrast with their kits quality. I think your move was right about the loadout of this bird as I haven't seen they loaded anything onto her pylons. Moreover, her colors are catchy enough.
On the paintings, you are right. I think it's very okay to keep it clean or else what I would do is just a little panel lines pin wash in a very limited amount. What I've seen from you so far, they might not even needed. 😉
1 7 September, 15:59
Weathering or not, it is perfect the way it is, Bughunter! The detailing is phenomenal, you're never going to get that on any "toy-looking" build!
I've seen this on an airshow, and it is pristine - so I think the uniform coloring is spot on.
1 7 September, 16:13
I second Urban - you will never get wheels gears and gear bays totally clean
2 7 September, 16:36
Awesome progress! I think some weathering contrasting is needed. I would do panel line wash and some filtering to add highlights, and weather wheels etc. That said, it will be an amazing build in any case 👍
2 8 September, 12:45
Hello mates!
After undergoing surgery on Monday, I was discharged from the hospital today. Everything is fine 👍
I'm still a little worn out and tired, but I'll be back here soon.
11 10 September, 11:07
The end result honestly looks photo realistic! I think I can speak on the behalf of the entirety of scalemates when I say this is incredible!!!
1 10 September, 19:29
Health is more important than building models. I wish you a speedy recovery.
2 10 September, 21:36
Servus Bughunter,
schön zu lesen, daß Deine Op gut verlaufen ist.
2 12 September, 08:59
For the first time in my life, I used violence against a girl. But it had to be done.
She was created for the Academy kit and 3D printed. This allowed me to adjust her slightly with very hot water and force. I also modified the ladder. Now she fits ok.
1 12 September, 17:08
Nice natural pose she fits well. How did get that golden sheen on the canopy?
2 12 September, 17:28
The pilot really finishes it, bringing a sense of scale and life to your superb build.
2 12 September, 17:37
Yes mates, she has very nice details!
@Desert Marlin But in this case, words are of no help. 🙂
@Timmie I nearly ruined the canopy while trying to paint it with Clear Yellow Lacquer, more with the thinner (pic 87/88). Painted then after Future with Clear Yellow from Gunze H series (pic 108/109). Please see discussion around July 20th.
2 12 September, 17:46
The uniform with all the pockets and gear looks fun to paint. I think she will add a lot of interest to the build, and as others have said, a sense of scale.
2 12 September, 18:51
So, the first figure is painted now. It was only my second figure at all. What do you think?
In meantime, while waiting for brush paints, I started the next project. Don't miss it!
1 28 September, 10:46
Oh yes - this turned out outstanding. Frank - no wonder that this build was watched with quite some interest from this community. 👍 Super Resultat!
1 28 September, 12:24
Danke Juergen!
Yes Alec, to fly a A-10C is a serious job 😉
@Ben You were so right! All the different layers of clothing, with the harnesses and everything, are not easy to see and therefore difficult to paint. But I'm working on it step by step.
1 28 September, 16:58
That girl pilot looks very good. I'm curious about the second figure.
2 28 September, 22:22
Just a little bit patience, young man! 😉
My plan is to have is ready for our club meeting next Monday.
29 September, 20:49
Frank, I am flattered that you address me as "young man." 🙂 At my age (65), it has been a long time since anyone has addressed me that way. 🙂
I have no problem with patience and am happy to wait for the result.
2 29 September, 21:58
Now also the second girl is painted. I may still need to resolve an issue here and there, but otherwise I would consider the task complete.
2 1 October, 17:10
Frank, the test of my patience didn't last too long. 😄
The second girl also looks very good. 👍
Looking at your figures, I remembered that female crews and personnel already existed during World War II. The Russian 46th Guards Night Bomber Regiment, which consisted exclusively of women, is very well known. The women flew Polikarpov U-2 biplanes.
German soldiers nicknamed them "night witches" (Nachthexen) because they approached their targets at night and their planes made a supernatural sound, as if they were rushing straight from the sky.
2 2 October, 08:13
I think you can improve the appearance particularly of the second figure by narrowing the white of the eyes. Just overpaint the edges it a little bit with the color of the skin to make them look smaller.
2 2 October, 10:46
I agree with Urban. Don't forget that you are looking at a greatly enlarged photograph. At a scale of 1:48, the height of the entire figure is approximately 35 mm. I'm not saying that narrowing the whites of the eyes is impossible, but it will require very precise work. It is a very small detail, and the question remains whether it is worth it.
1 2 October, 11:18
Thank you mates!
@Ludvík Yes, I remember those female crews too. If you see the linked video above, the show pilot was also a lady, but I must admit with dark hair and looking different to my figure. But at least I tried to use that video as reference regarding the clothes and harness.
And the eyes - thanks for the hint Michael! I tried to fix it with the skin paint. But I have not used white, but Ivory. Yes, the macros shows it much bigger then in real, but it looks better now.
The nav lights are also in place now, so that means this Blacksnake is done! What a journey 🙂 Thank you very much for all your comments, hints and discussions!
3 2 October, 16:36
@Michael Kohl Especially for you, after your first comment in this build, I added a detail made from real wood 🙂
Stay tuned for the final pictures!
1 2 October, 18:26
Now the final pics are done! Don't miss them and jump over to the final album:
The ladies and a Blacksnake | Album by bughunter (1:48)
1 2 October, 20:26
Thank you mate!
Until now I have painted only one figure so I was not well equipped for brush painting. But now I have some AK 3gen and they work fine for me. Of course such paint job can be done better but I'm happy with the outcome.
2 3 October, 17:04
Did you use a wet pallet when you painted the figure? If not I'd say that's about the best tool you can use when it comes to painting of figures.
2 3 October, 18:59
Absolutely. I followed my lower instincts and bought an especially designed one. This is a waste. Take a plastic box with a sealed lid, put a dish cleaning rag on the bottom, water it, put baking paper on top and there you have it: your wet pallet. Tip: press the baking paper into a ball and flatten it out again. It will not curl like this and it creates small indentations that helps prevent color from flowing around.
3 3 October, 19:52
Yes, I used such pallet. With a cover the paints survived some days in the fridge.
1 3 October, 21:07
A figure too? Wow!! Very cool Frank! I shall now travel over and look at the completion photos.
1 4 October, 09:26
Yeah Kyle, two of them 🙂 Thx Kyle!
I have to admit that I did a better job with the lady in the green coverall with sunglasses.
1 4 October, 14:54