

Mi-1M, model conversion by Special Hobby - WIP


Comments
75 15 August 2024, 08:24
I still miss this small helicopter in my collection of flying machines used in Czechoslovakia. The time has come for me to rectify that. 😉
15 August 2024, 09:26
Oh. I built a 1/72 version of the Mi-1M... This should be interesting.
16 August 2024, 15:07
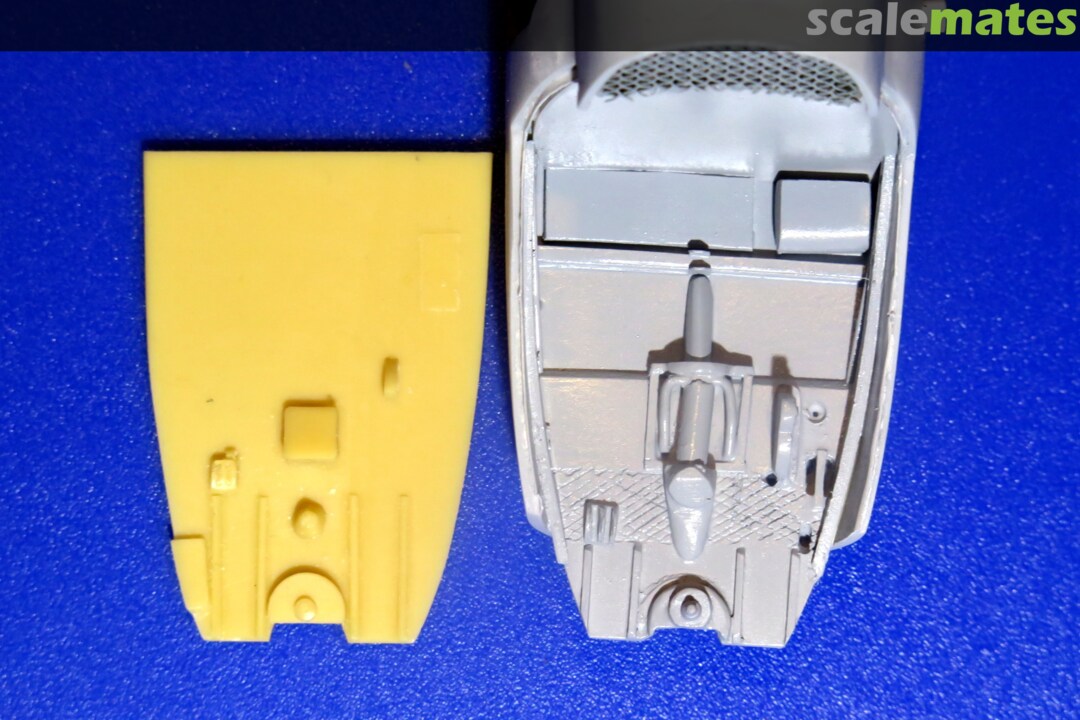
Hello, Greg. I know there's a Mi-1M kit in 1/72nd scale. Unfortunately, only this and a rather old kit from Special Hobby exists in 1/48 scale. In addition, this kit is an older version of the Mi-1A, which is different from the upgraded version of the Mi-1M. It has a different nose shape, different cockpit glazing and other minor changes. And since I decided to build the upgraded version of the Mi-1M, I will not avoid modifications to the kit.
To give you a better idea of the extent of the modifications to the kit, I've included a picture with the differences between the Mi-1A and Mi-1M versions color coded.
16 August 2024, 22:23
Oh, neat! I didn't realize there were so many changes between the versions. This is going to look great!
17 August 2024, 15:09
Greg, thank you for your support.
____________________
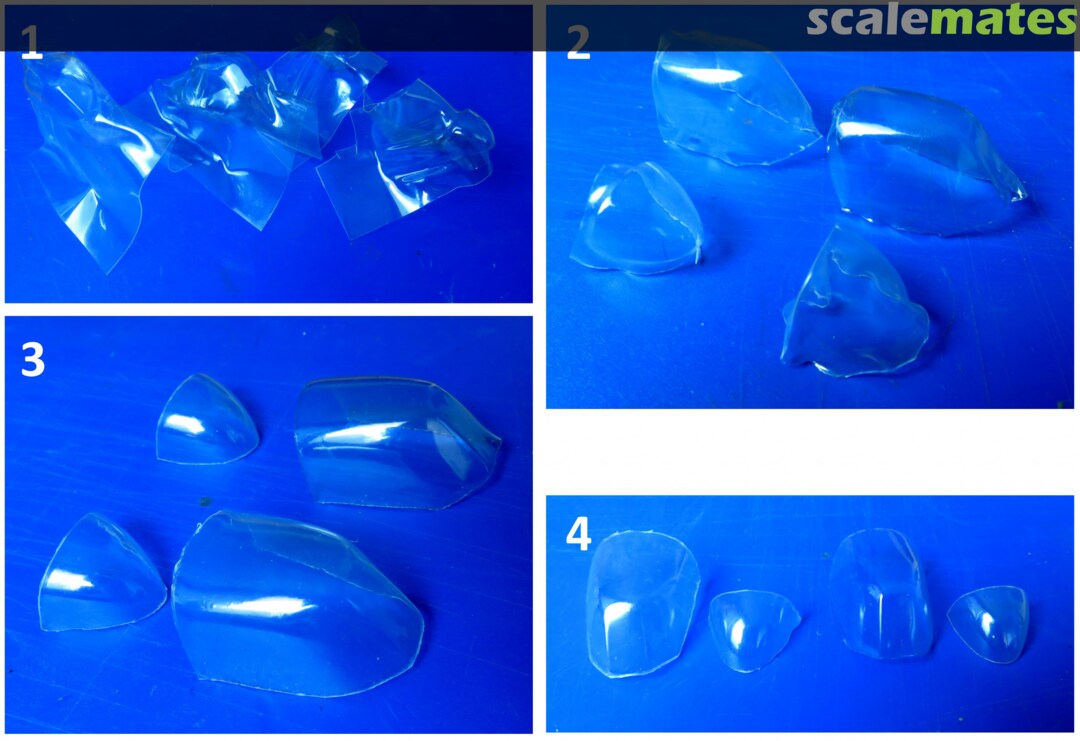
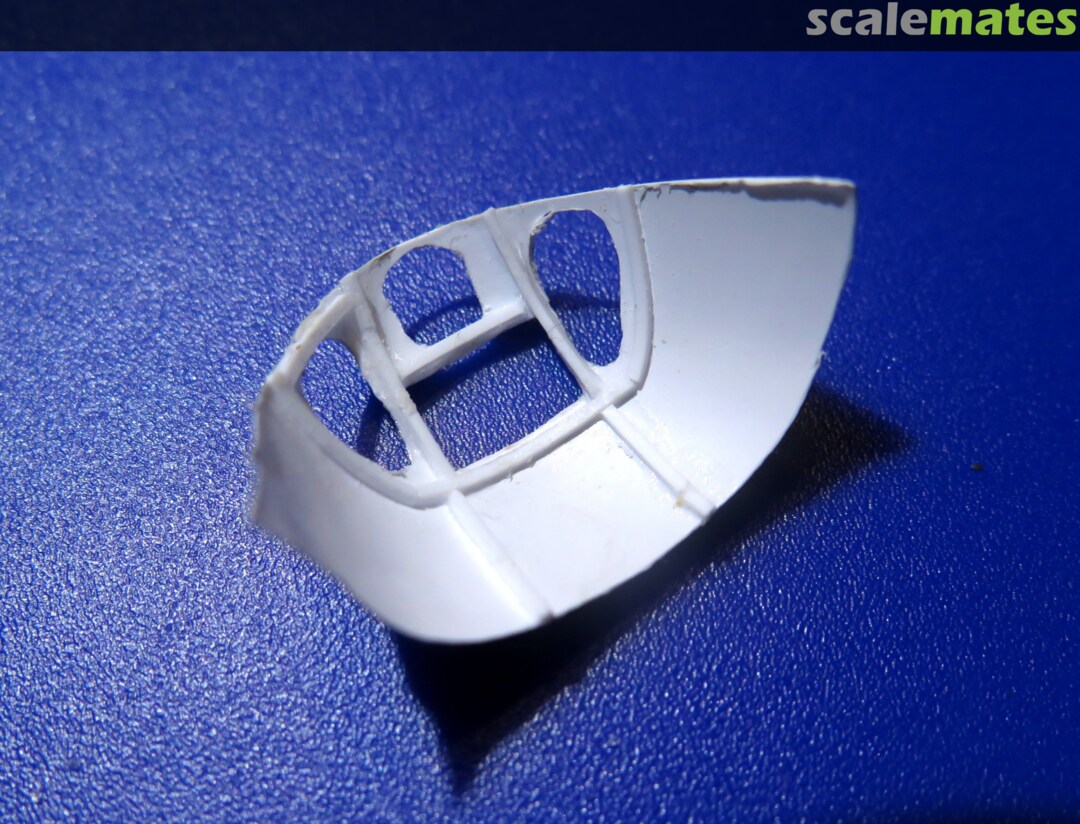
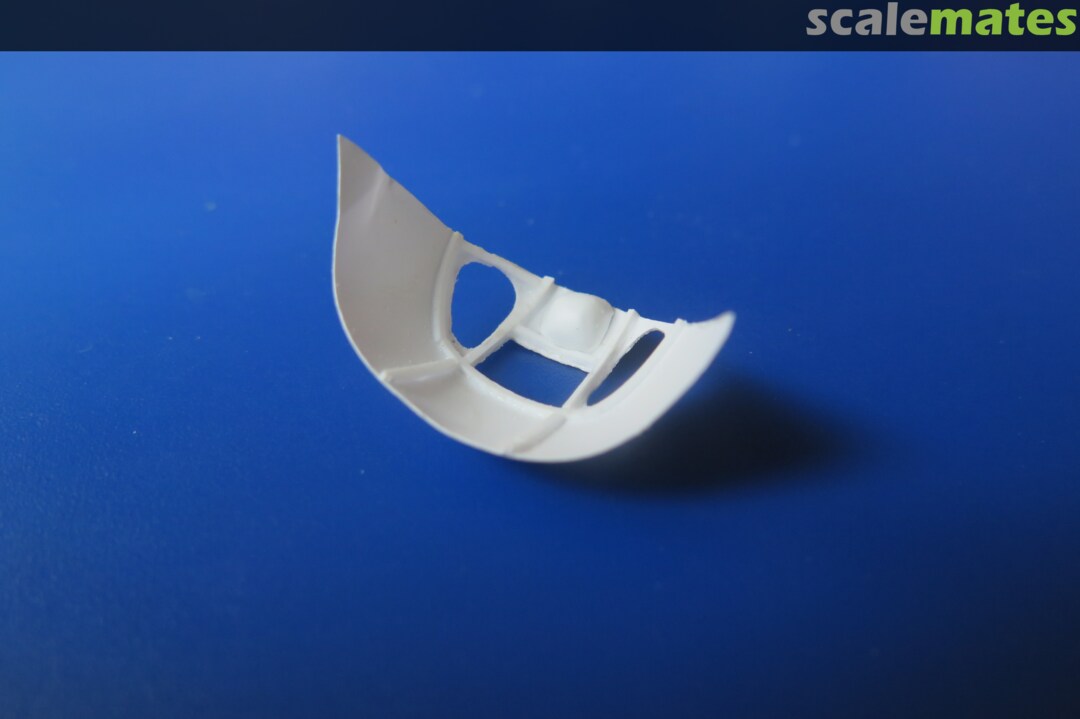
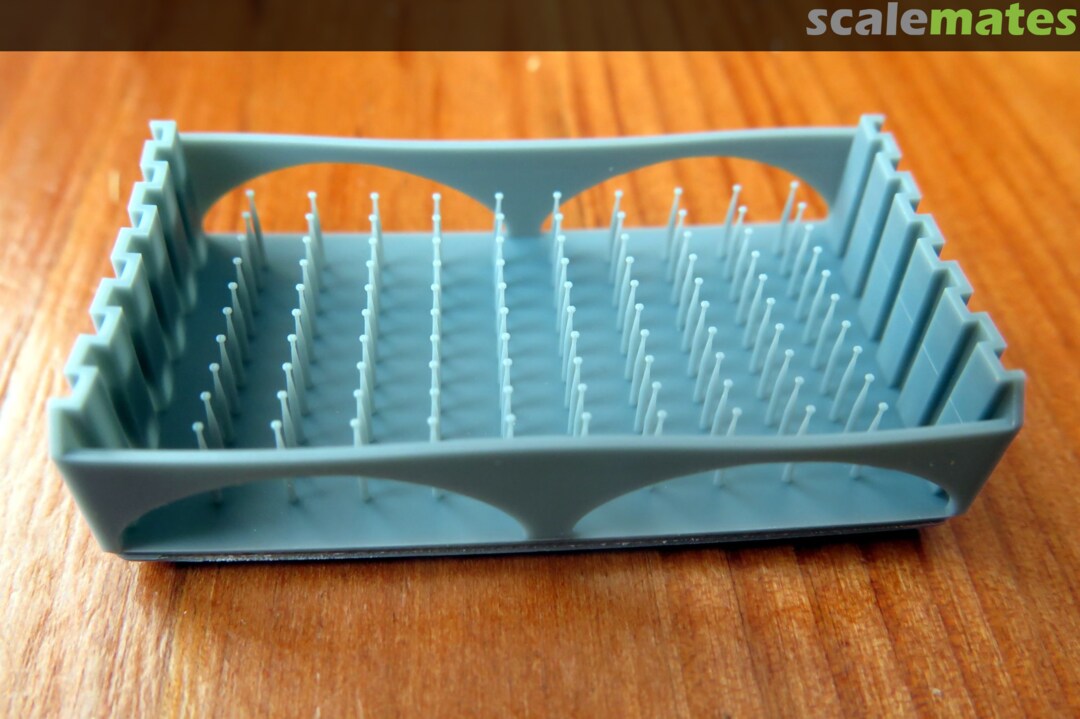
I started building the model by making new transparent parts.
17 August 2024, 22:31
Yeah. Nice work on the heat-n-smash moulding for the clear parts. That can be tricky to do.
18 August 2024, 16:15
@Alec K
I used to buy ABC magazine regularly as a kid and eagerly awaited each new issue 🙂. I assume your mention of ABC magazine refers to the occasional modeling tutorial section.
@gorby, @Greg Baker
It's not too difficult to make new transparent parts by stretching warmed transparent foil over a pre-made template. Preparing the template is the most work. Stretching the warmed foil onto the template is just a routine that anyone can do after a few attempts.
18 August 2024, 22:17
Hello, Robert! Good to see you here. You haven't missed much so far. Up to this point I've been more concerned with preparation than building the model.
28 August 2024, 20:59
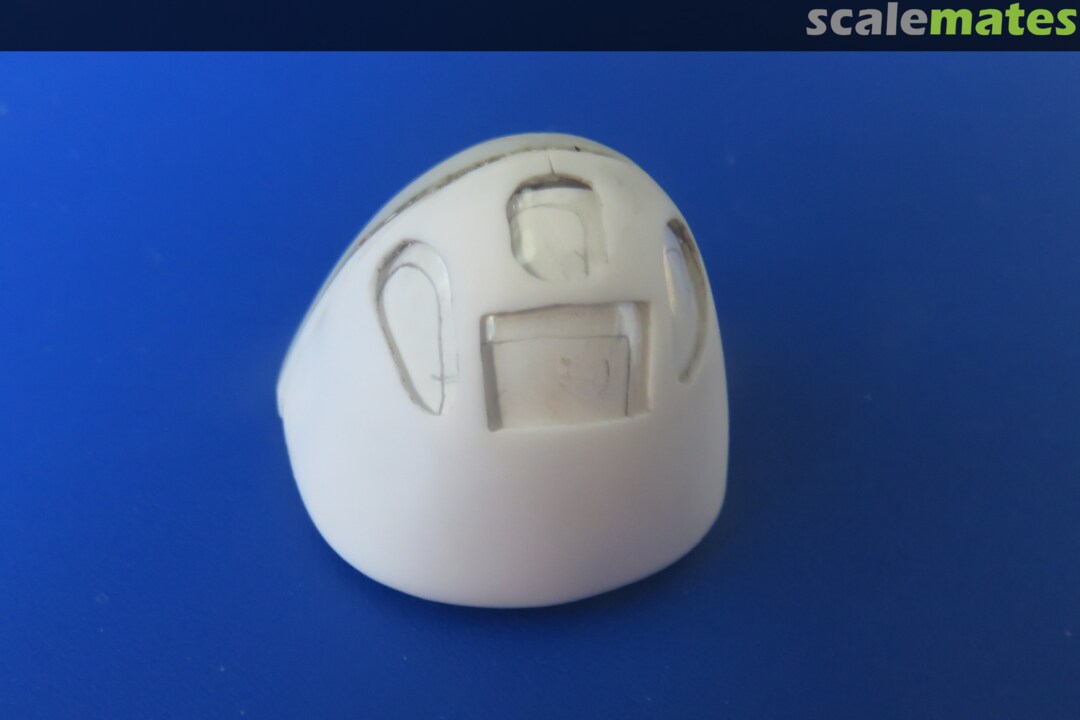
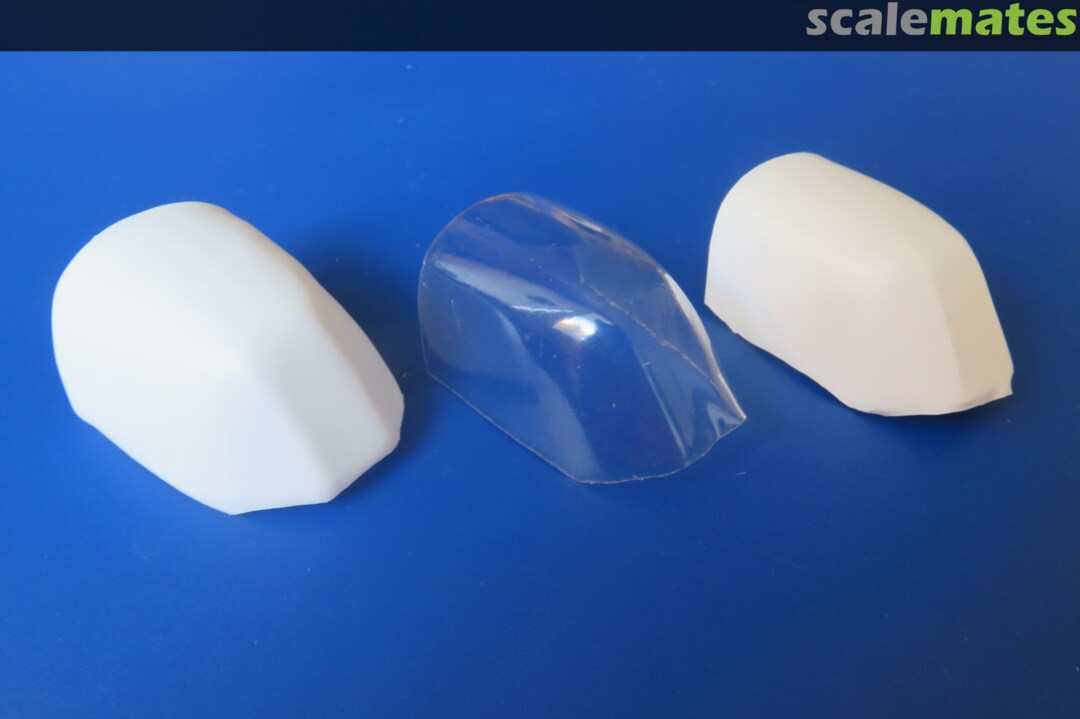
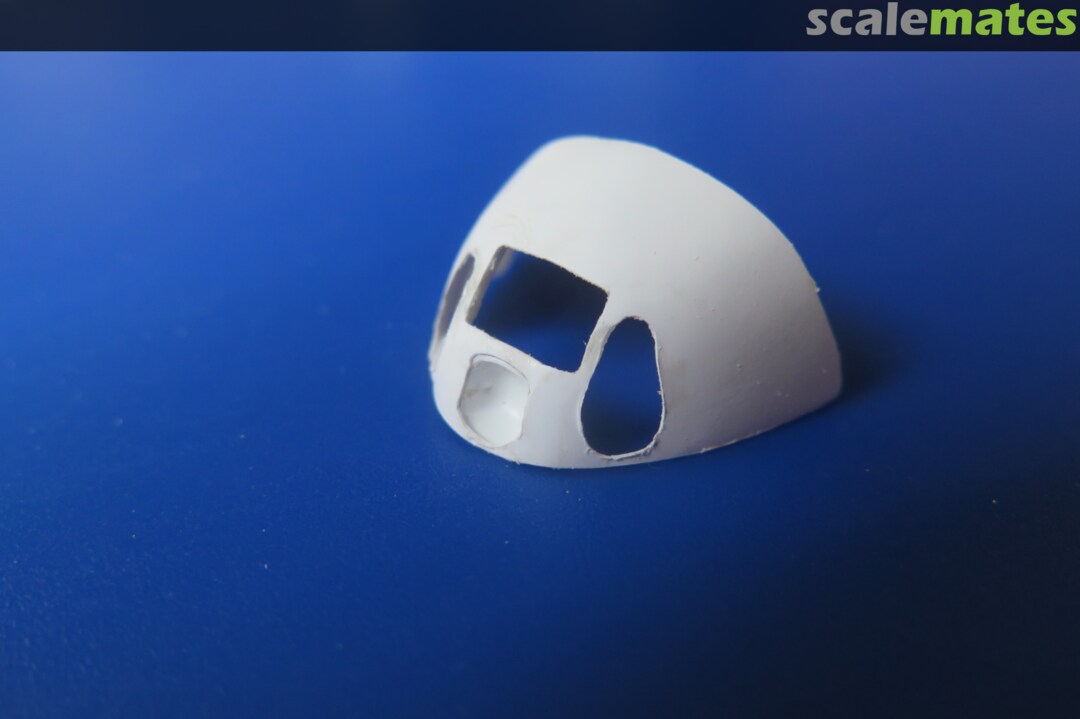
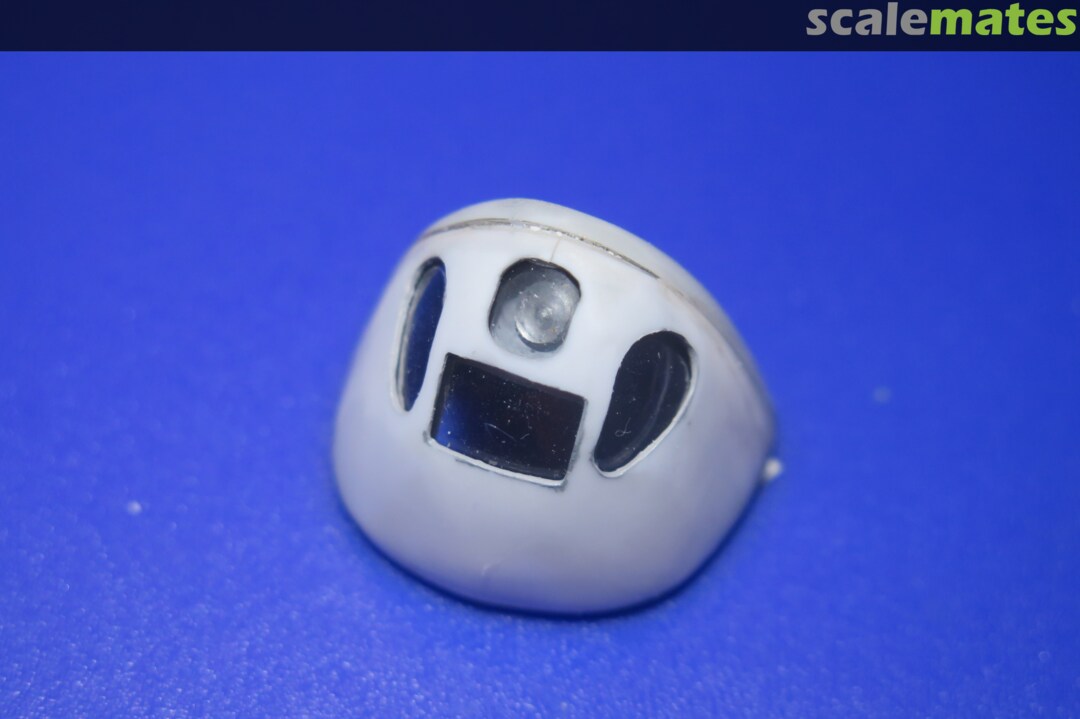
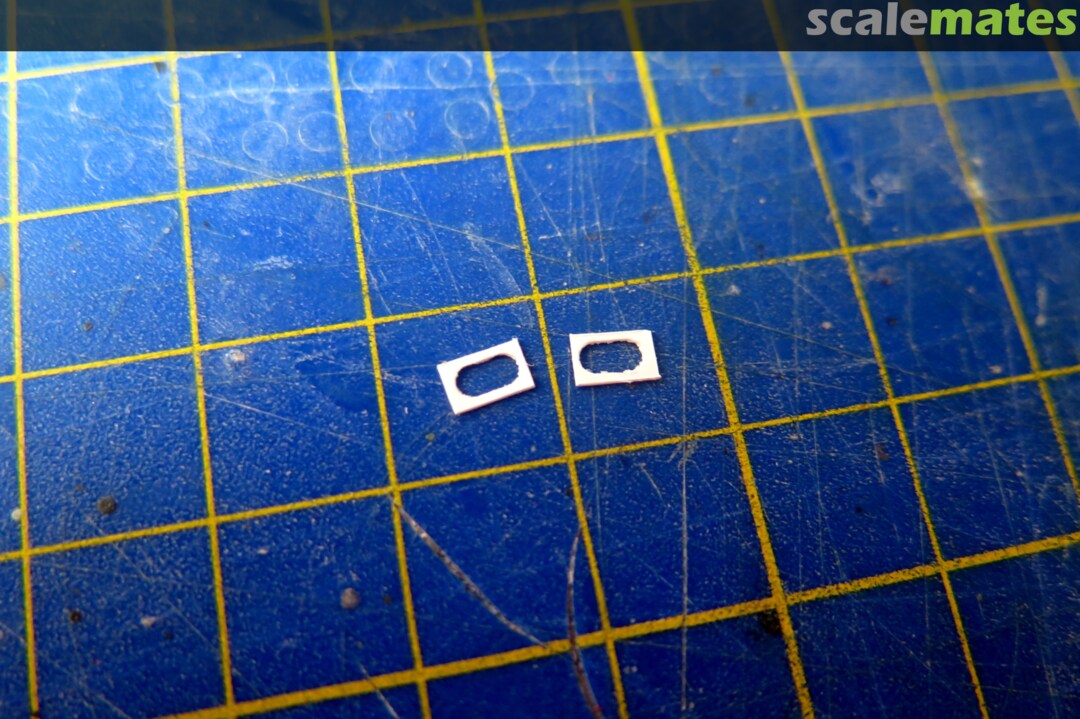
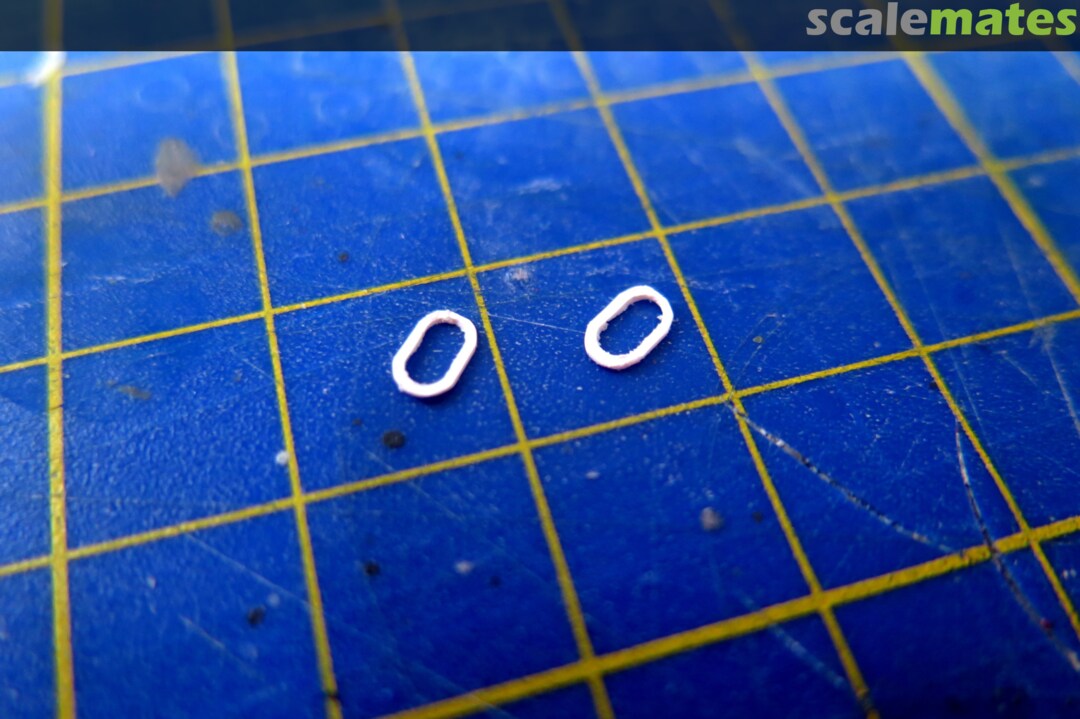
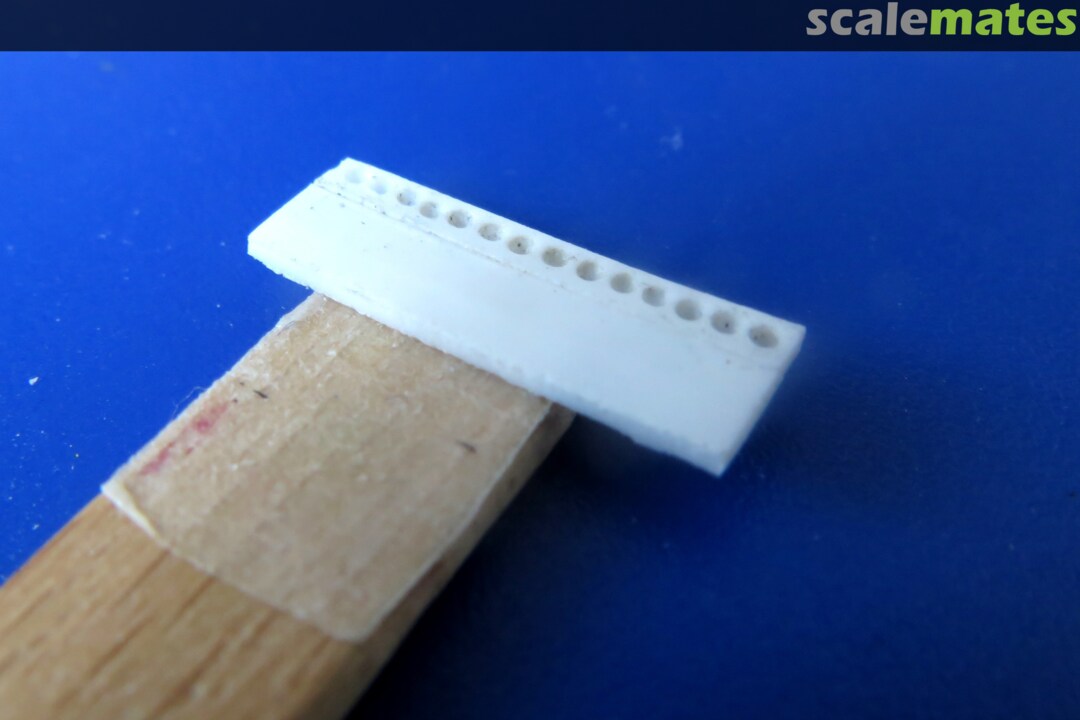
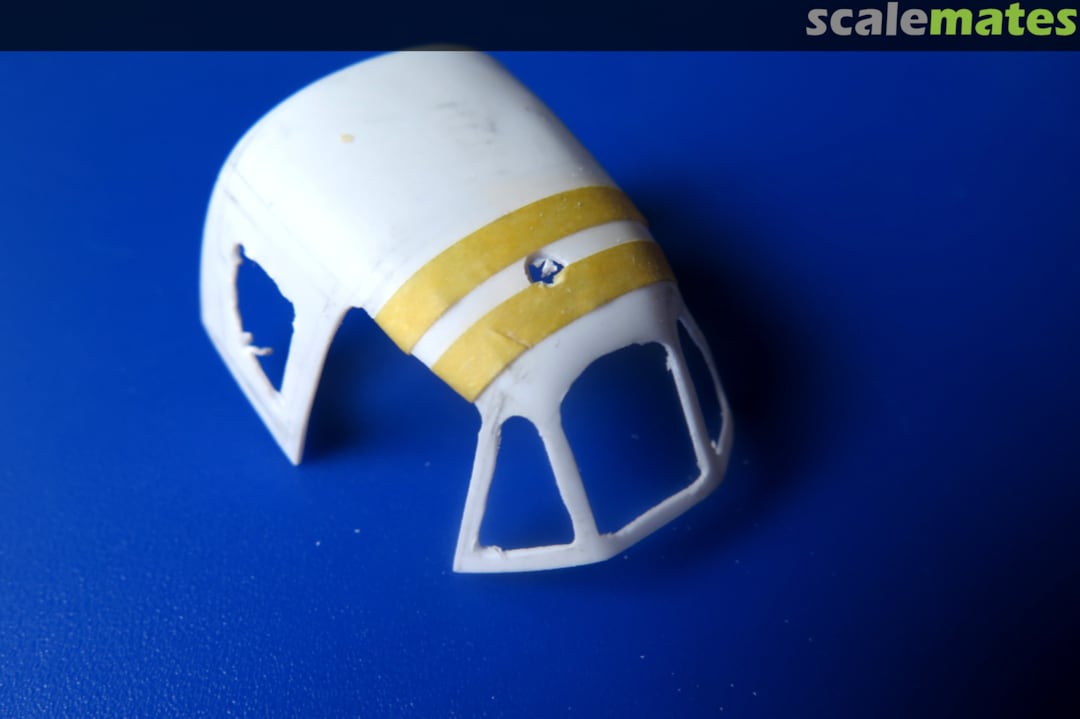
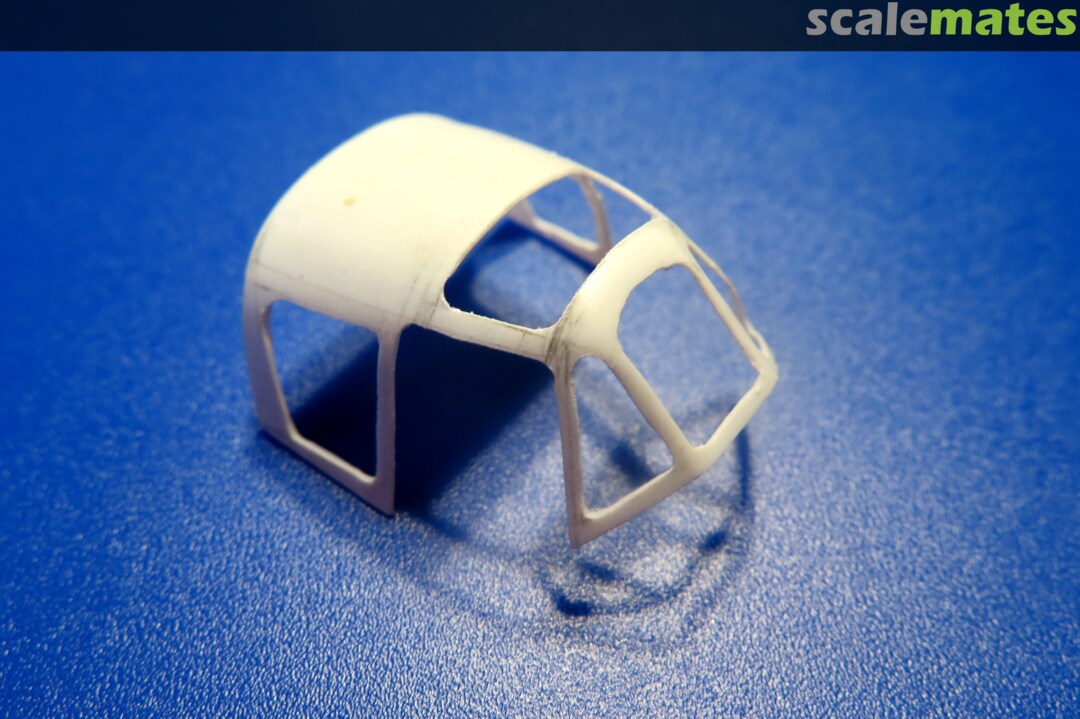
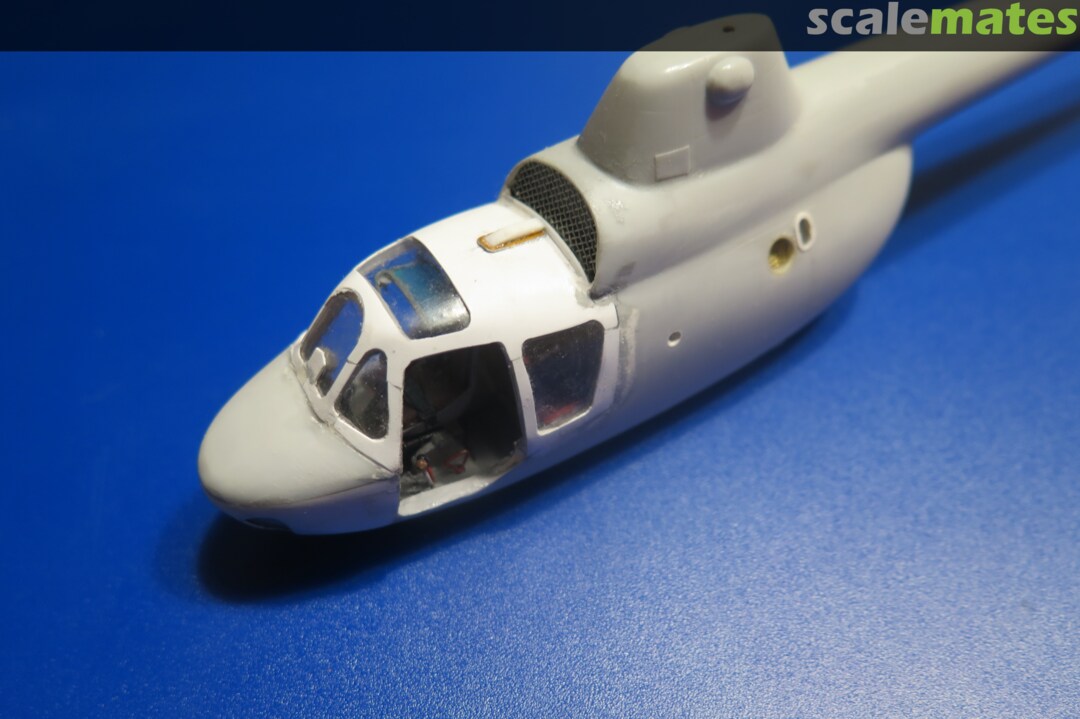
I want to try to use the sandwich construction in the production of new glass parts for the coptics. So I made (using the same process as the transparent parts) parts out of white plastic sheeting. These parts will have holes cut out for the windows. The transparent part will then be inserted between these two parts. The white outer and inner parts will form the embossed framing of the transparent part.
28 August 2024, 21:18
Welcome, Jennifer, we're glad to have you on board and thank you for your goodwill. 🙂
30 August 2024, 09:46
I came back from vacation and it started to rain. Ideal conditions for modelling. 🙂
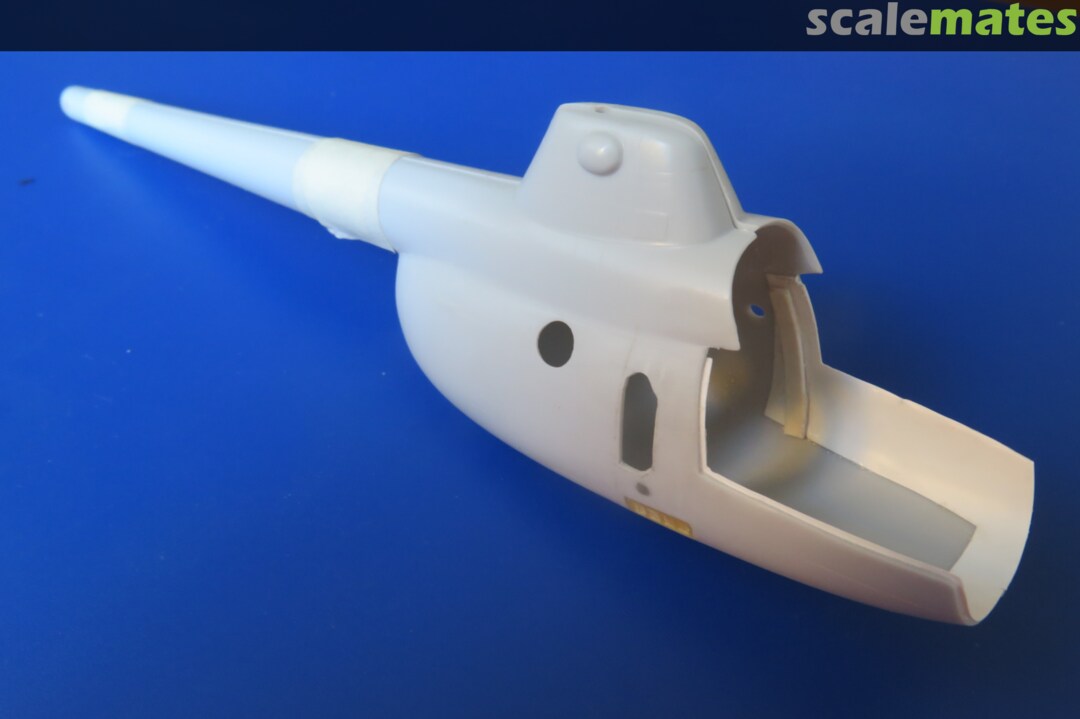
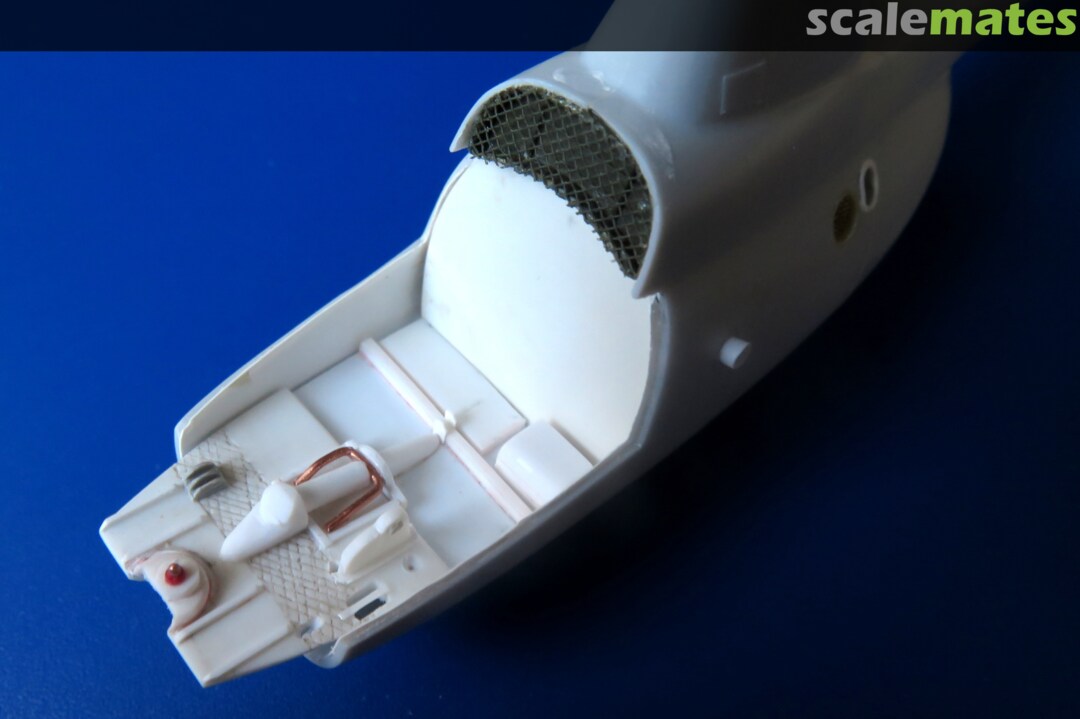
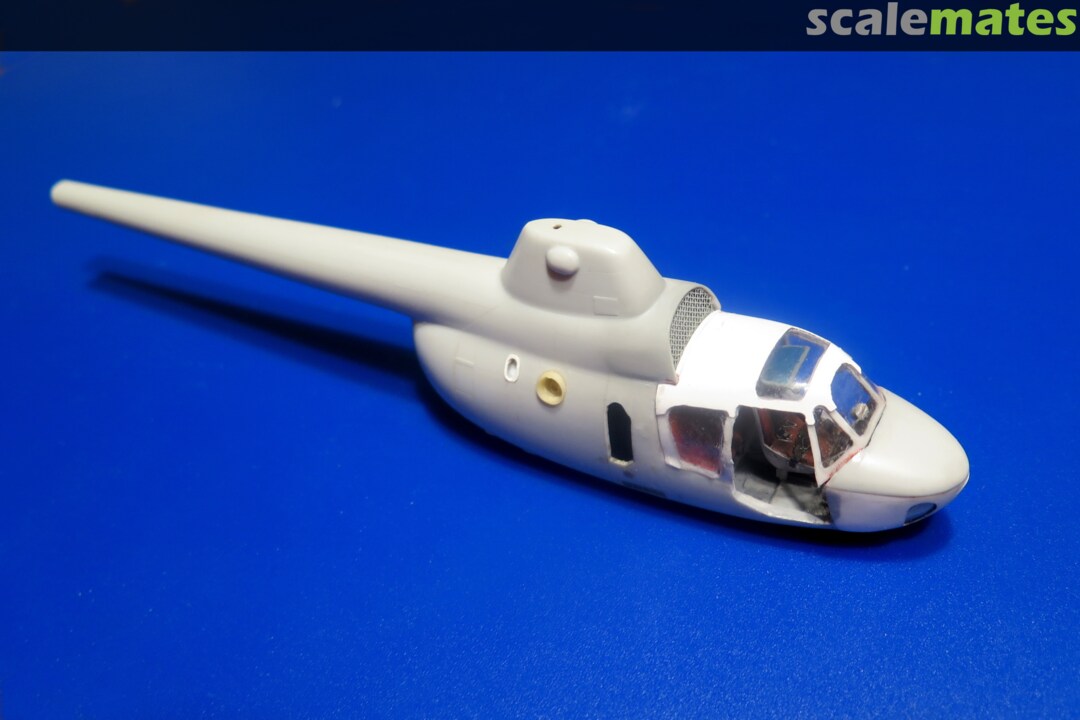
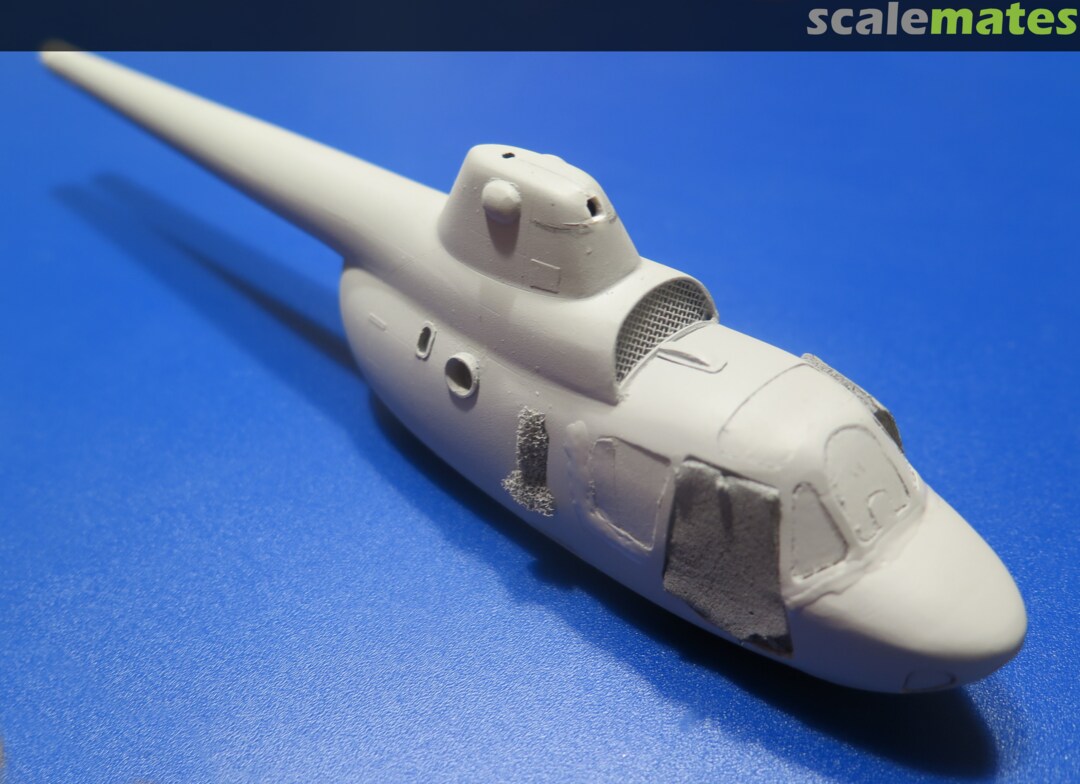
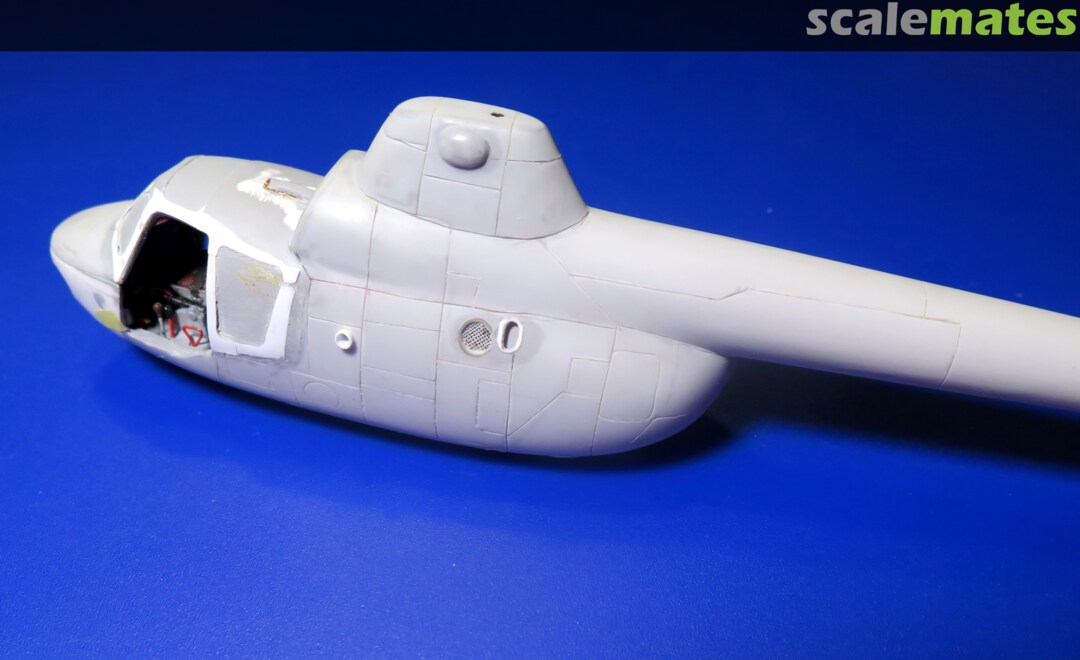
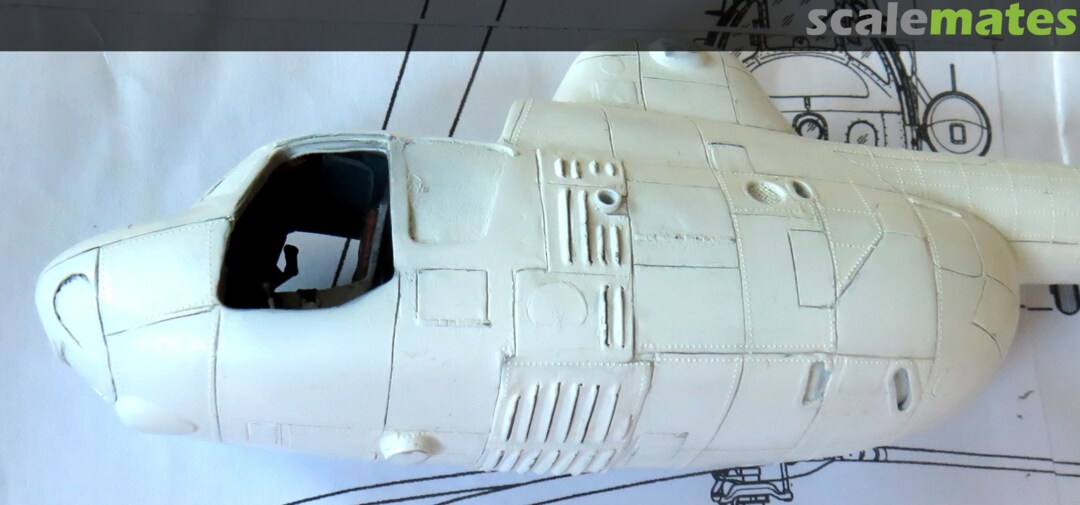
So I'm back and continuing to work on the model. I need to glue the finished nose to the glued fuselage so the cockpit overlay fits exactly. That determines the workflow. First I have to finish the nose and the inside of the fuselage and glue all the parts that need to be glued to the fuselage halves from the inside. After gluing the fuselage halves together, I would no longer be able to get to these parts (or only with great difficulty).
Photos of the work progress will be coming soon.
13 September 2024, 20:42
Oh some modeling for big boys, not glueing perfectly fitting parts together and throwing on some paint! Following 👍
13 September 2024, 22:53
I glued several parts to both halves of the fuselage. These parts are glued from the inside, so they have to be glued before the fuselage is closed.
I also started working on making new parts for the cockpit.
14 September 2024, 21:06
Wow, this is incredible work Ludvik! Thank you for sharing your steps - I've learned a lot from your pictures and descriptions!
14 September 2024, 21:15
@Landlubber Mike
Mike, thank you for your interest. Welcome aboard!
I've had the idea for this rebuild in my head for a few years now. Mainly because I've been waiting to see if anyone would start making 1:48 scale Mi-1M kits. Unfortunately, to this day, no manufacturer has this kit in their lineup. So I decided not to wait any longer and start building a model from what I have available.
My rebuild is just beginning. Most of the work on the model is yet to be done. I'd also like to try some new techniques that came to mind while planning to build this model.
@Villiers
Thank you for the compliment. I appreciate it very much.
15 September 2024, 09:15
I didn't have much time today, so I didn't make much progress on the build. But every little bit of progress counts. 😉
15 September 2024, 20:43
Wow! You don't shy away from challenges! Watchinh with admiration, and hoping to learn lots too. Hoping you are not amongst the floods? Stay safe!
16 September 2024, 12:29
J35J welcome! I hope you like it here.
Bruce, I like a challenge like that. I like to experiment and enjoy thinking of and then implementing ways to improve my model.
I appreciate your concern for my safety. I live in a town in the highlands that wasn't badly affected by the floods. Only the river that runs through our town has increased flow, but it hasn't spilled out of its bed. Moreover, our house is 80 metres above the river, so even if the river had spilled out of its bed, it would certainly not have reached our house.
17 September 2024, 07:08
It sounds an idyllic location.....Opravdu, česka příroda je krasná....
17 September 2024, 13:03
Bruce, thank you for the compliment. I'm sure the nature is beautiful in England too. 😉
18 September 2024, 10:23
Another big bunch of parts, not to mention some kit parts, come together to form one big model! Not to be missed!
I'm late, but I have an excuse. First I was on holiday, and then this stupid C-virus knocked me out.
18 September 2024, 20:29
Alec, thank you for your support and your kind words.
Welcome, Frank. I hope you're okay, and I'm really glad you're one of my guests.
It's definitely not too late. I still have most of my work ahead of me. In fact, you could say I'm just getting started.
18 September 2024, 21:20
Uhhhhhh … this is going to be another good one from you! I'm in 👍
23 September 2024, 04:58
Thomas, welcome. It's good to see you among my guests. 🙂
23 September 2024, 20:44
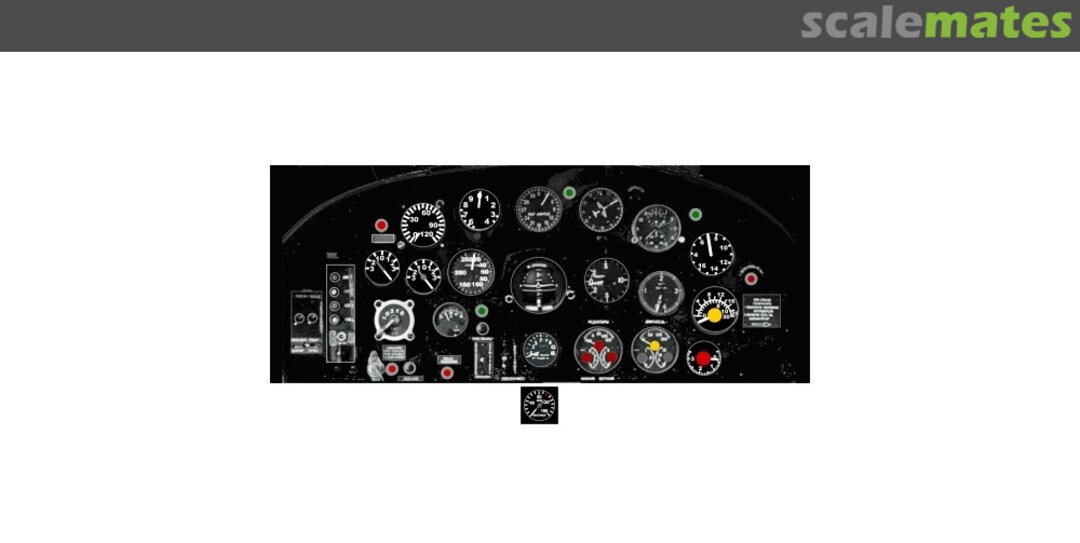
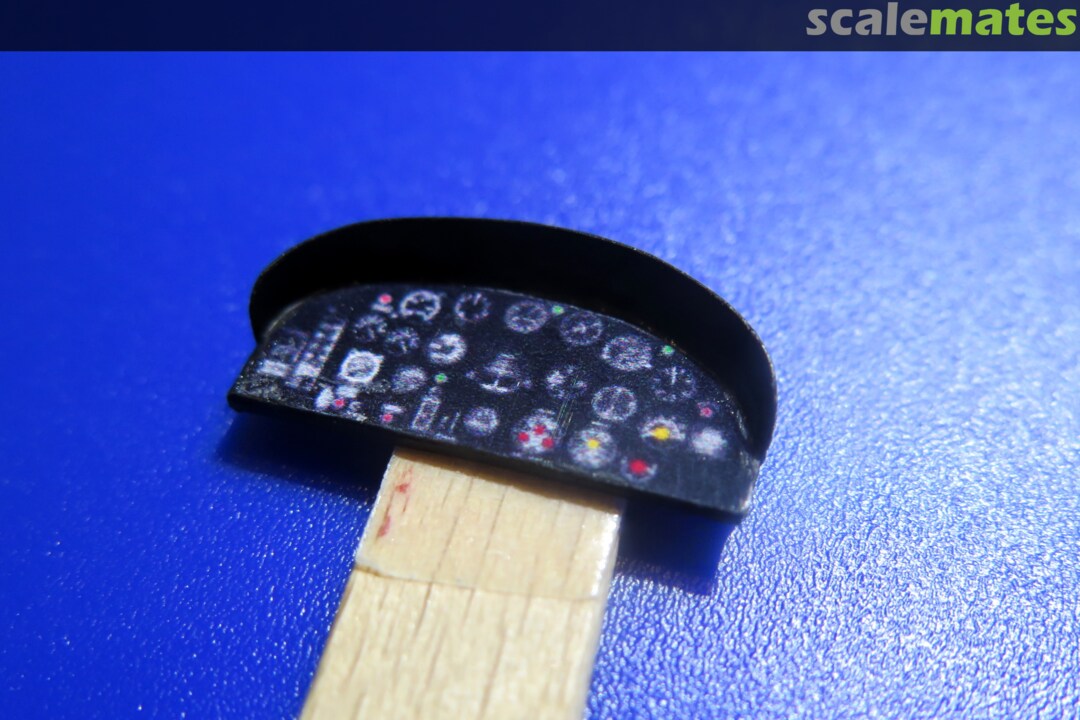
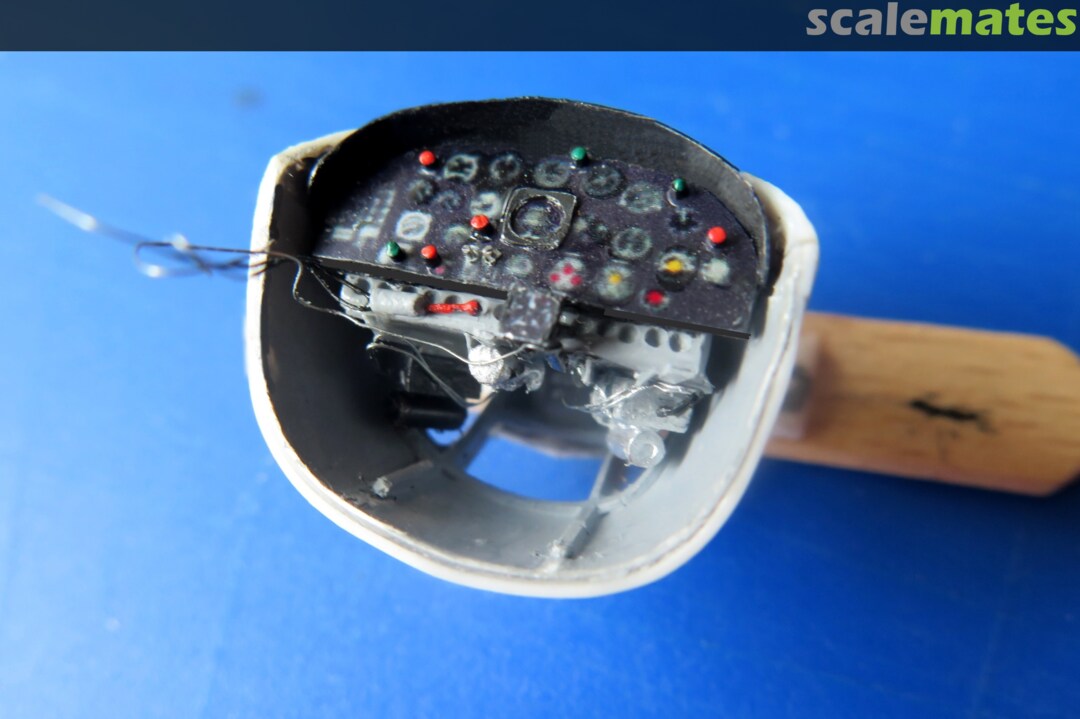
I'm struggling with time rather than the model at the moment. At least I managed to draw a new dashboard. After printing it in scale (1/48) on photo paper I will use it instead of the kit part.
23 September 2024, 23:41
Another Ludvik conversion build with all the accuracy and attention to detail.we've come to expect. It's looking good, can't wait to see the final result! 👍
23 September 2024, 23:42
Welcome, John. Please have a little patience. This project is quite demanding and I will need a lot of time to complete it.
23 September 2024, 23:50
Ok, I aimed that to "I can wait to see the final result" (but I'm still eager) 😉
24 September 2024, 02:03
Wow, the dashboard looks amazing. I can only imagine how much time that took. Really interested how it looks completed 👍
24 September 2024, 14:09
Alec, I drew the dashboard in the evenings for 5 days (about 3 to 4 hours each day). Add to that additional time (about 5 hours) for test printing and subsequent corrections.
I am attaching a photo of a test black and white print of the dashboard after all the modifications are complete. I will print the dashboard for the model in color later.
24 September 2024, 18:34
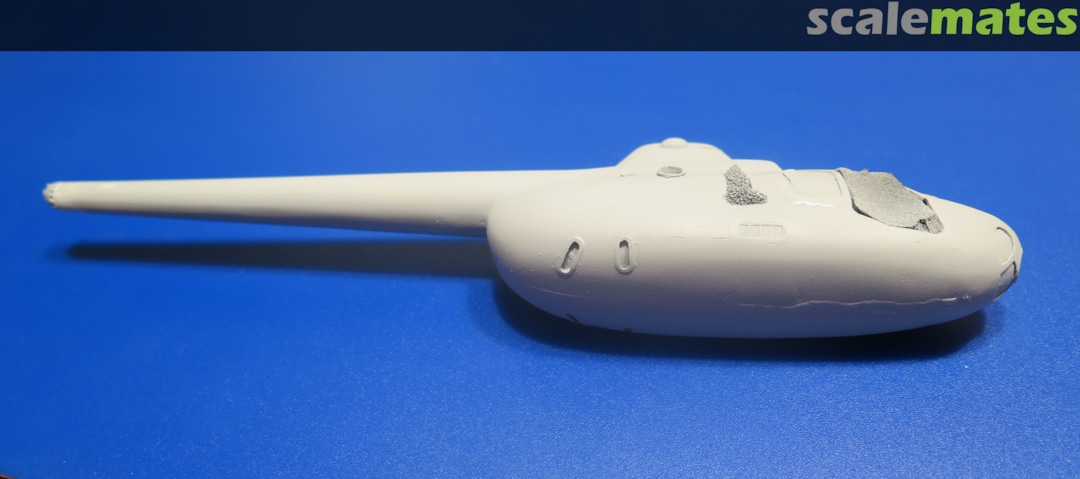
According to the photos I modified the fuselage where the main landing gear is attached to it.
24 September 2024, 20:00
Guy, Jakub and Robert thank you for your comments, it's a nice encouragement for further work.
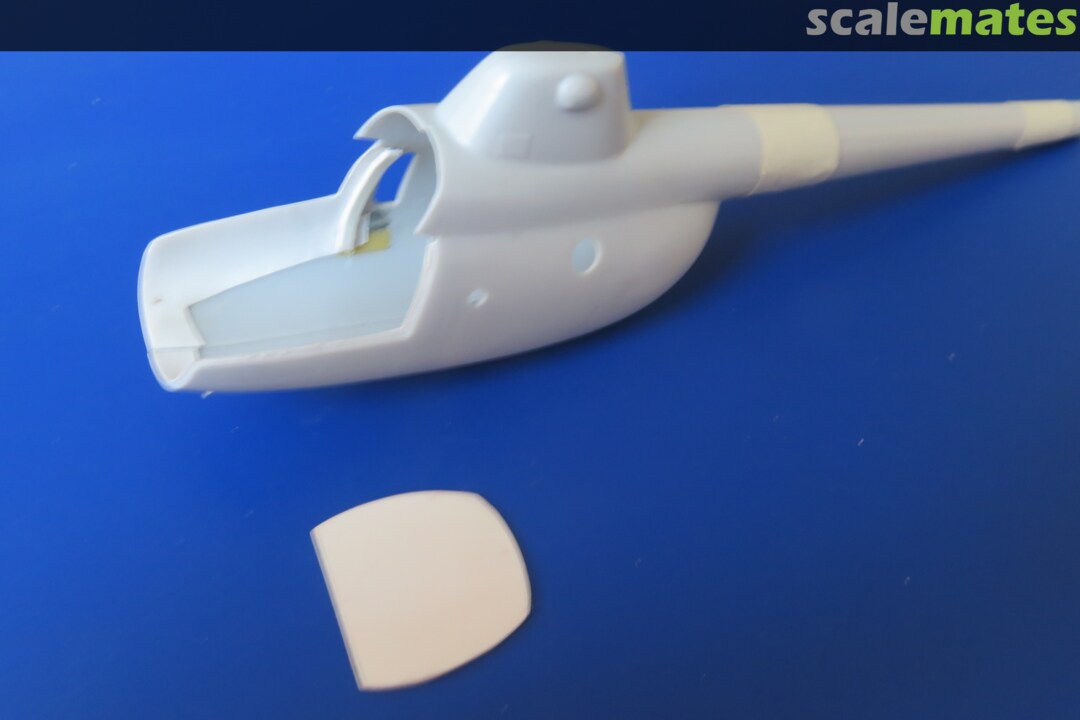
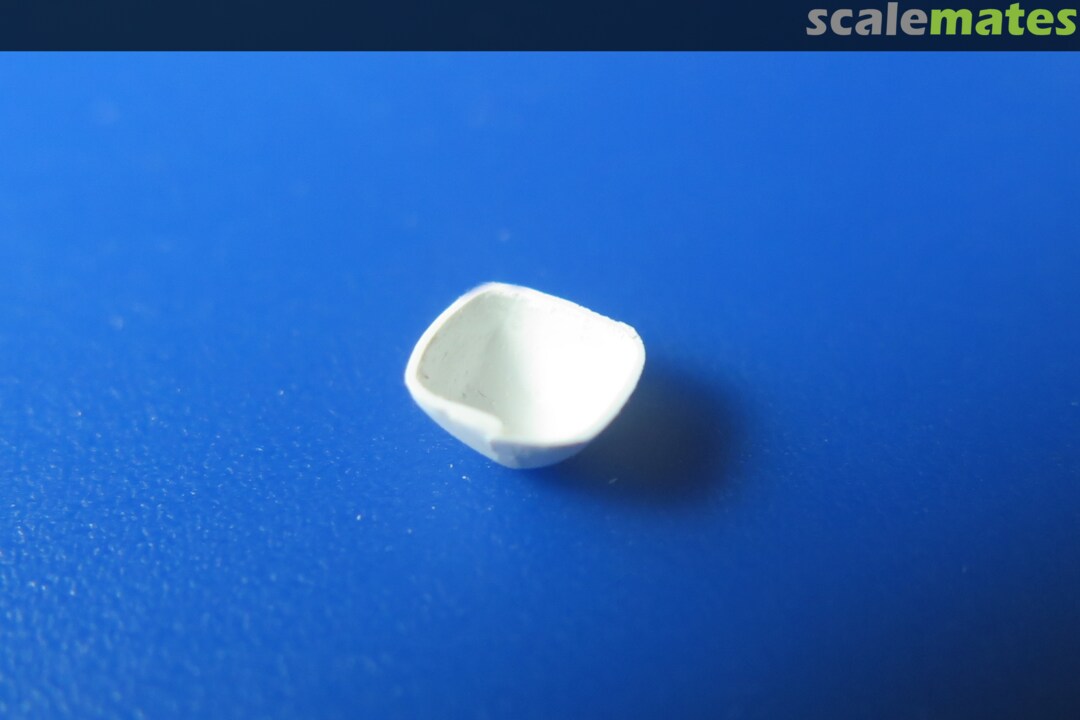
After today, the hull is glued together. Now I'm adjusting the shape of the transparent cockpit cover.
25 September 2024, 21:13
I continue to enjoy seeing this one take shape. Quite the effort to convert it!
25 September 2024, 23:27
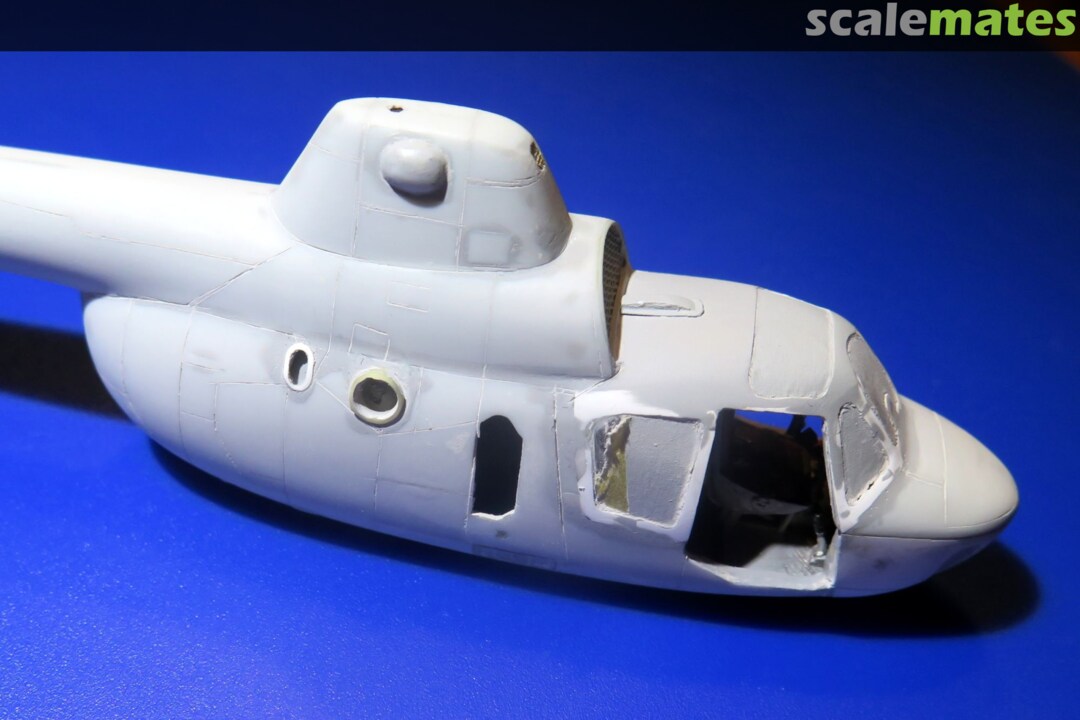
Villiers, the completion of the fuselage is only temporary at this time. It's only to modify the shape of the transparent cockpit cover.
Once the cockpit cover is the correct shape, I will take the fuselage nose down again to continue work on the cockpit interior.
26 September 2024, 10:36
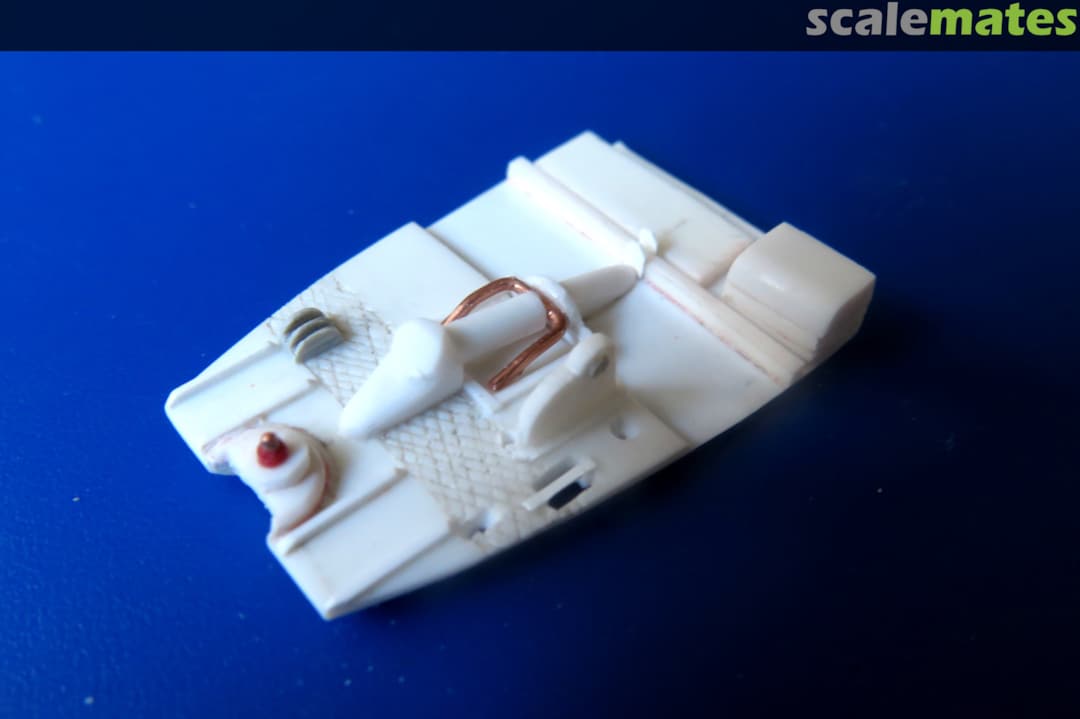
Work on the model continues with the production of the cockpit.
1 October 2024, 17:32
Greg, thank you for the compliment.
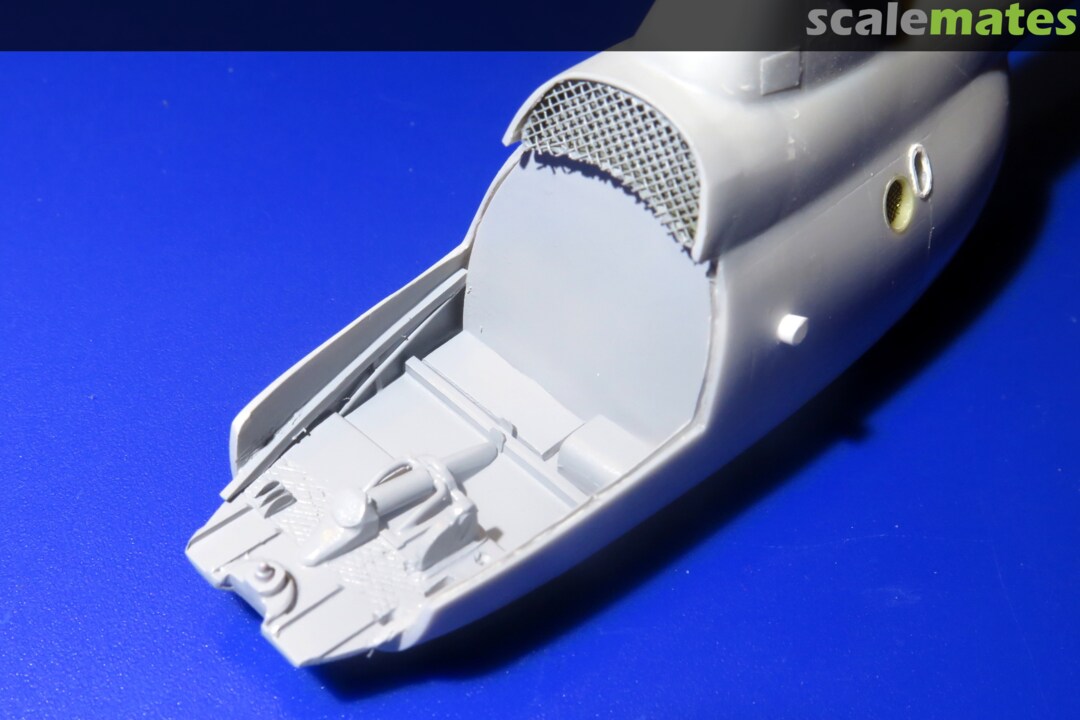
A small shift in the work on the internal equipment of the helicopter's nose.
2 October 2024, 19:36
Ludvik, a modeling god. The detail and scratchbuilding is just otherworldly and I always learn so much from your build logs
4 October 2024, 01:58
Jennifer, thank you for your kind words.
Randa, thank you so much for your contribution. Although I don't consider myself a modeling god, your comment made me very happy. Thank you.
4 October 2024, 19:14
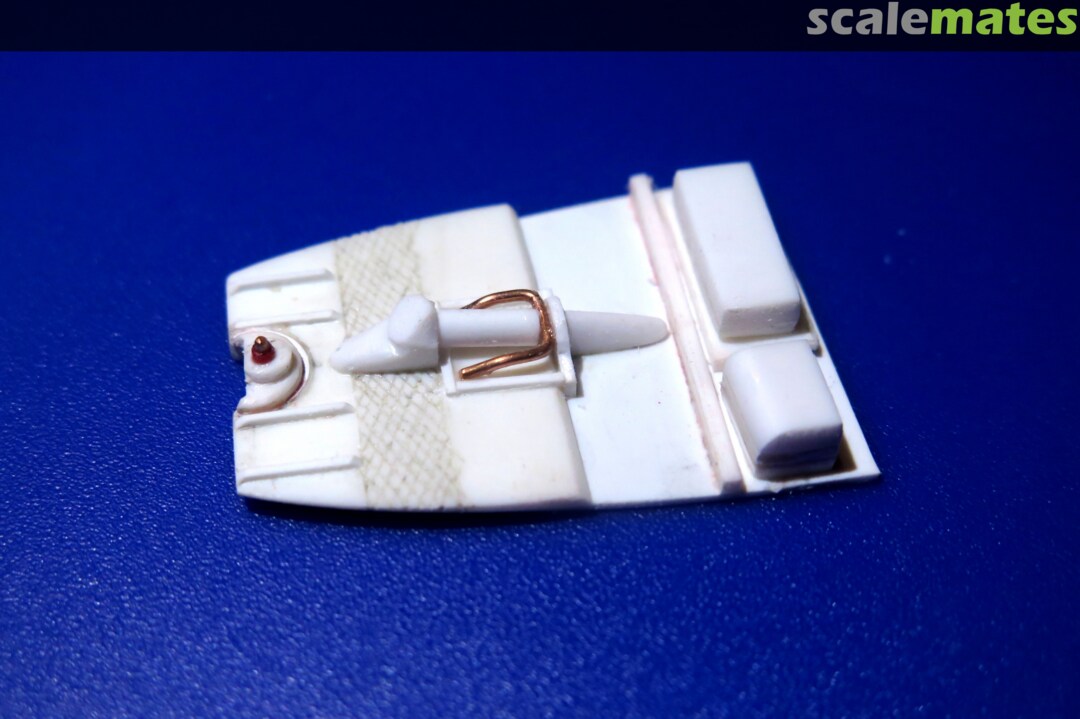
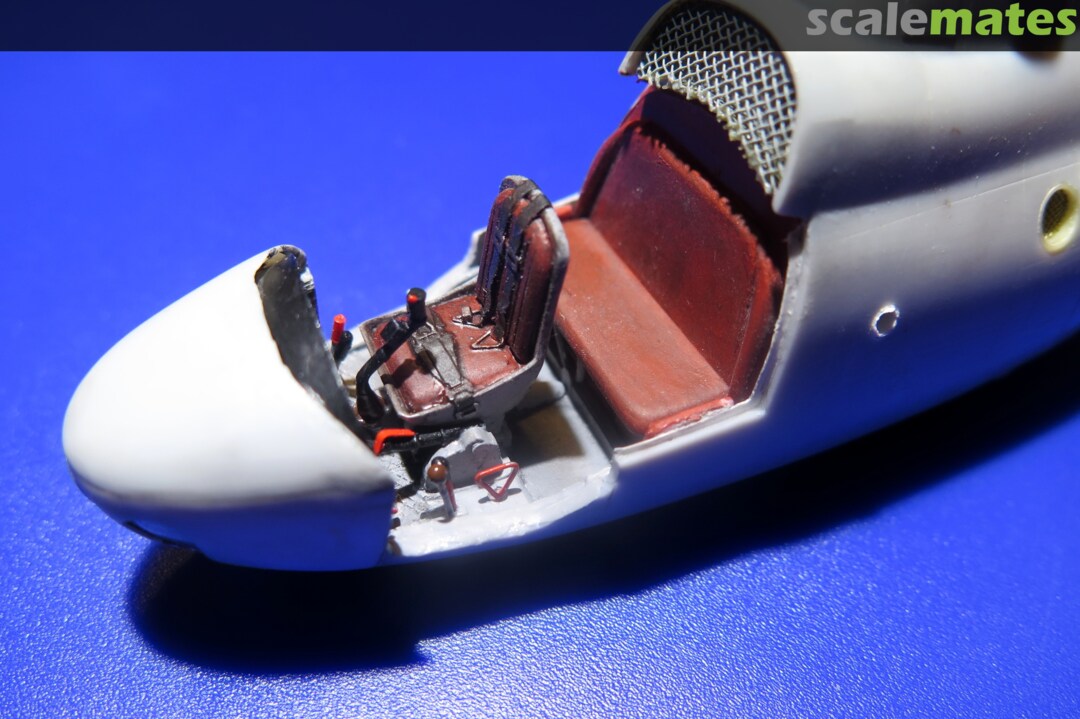
This afternoon I continued making details for the nose of the helicopter.
4 October 2024, 21:17
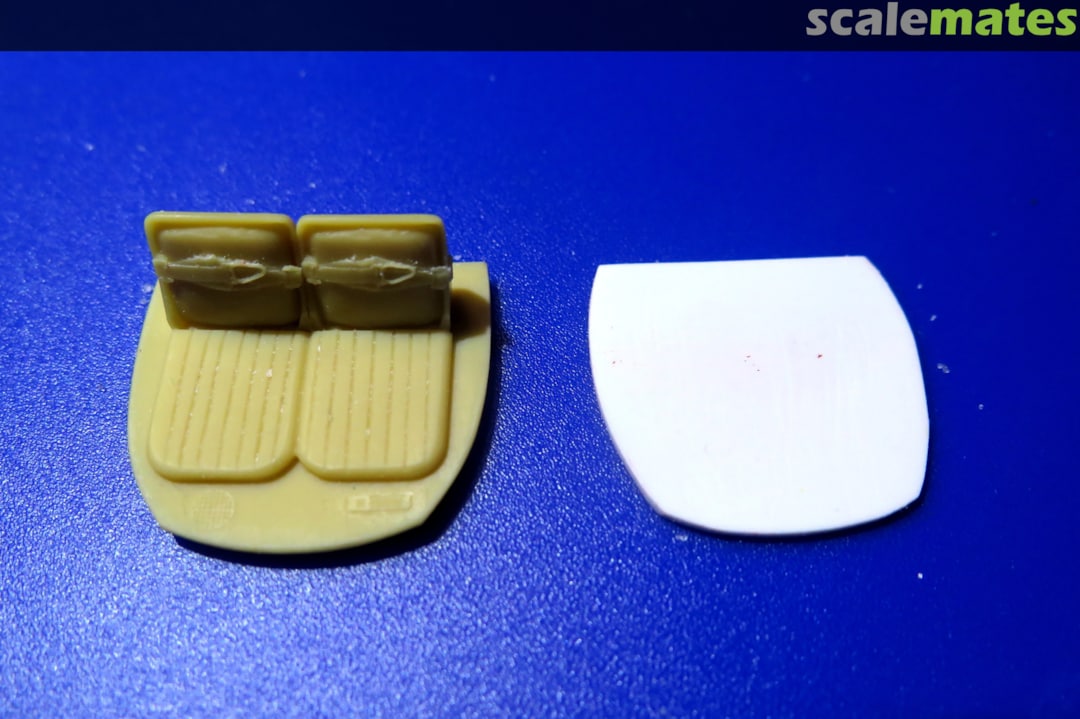
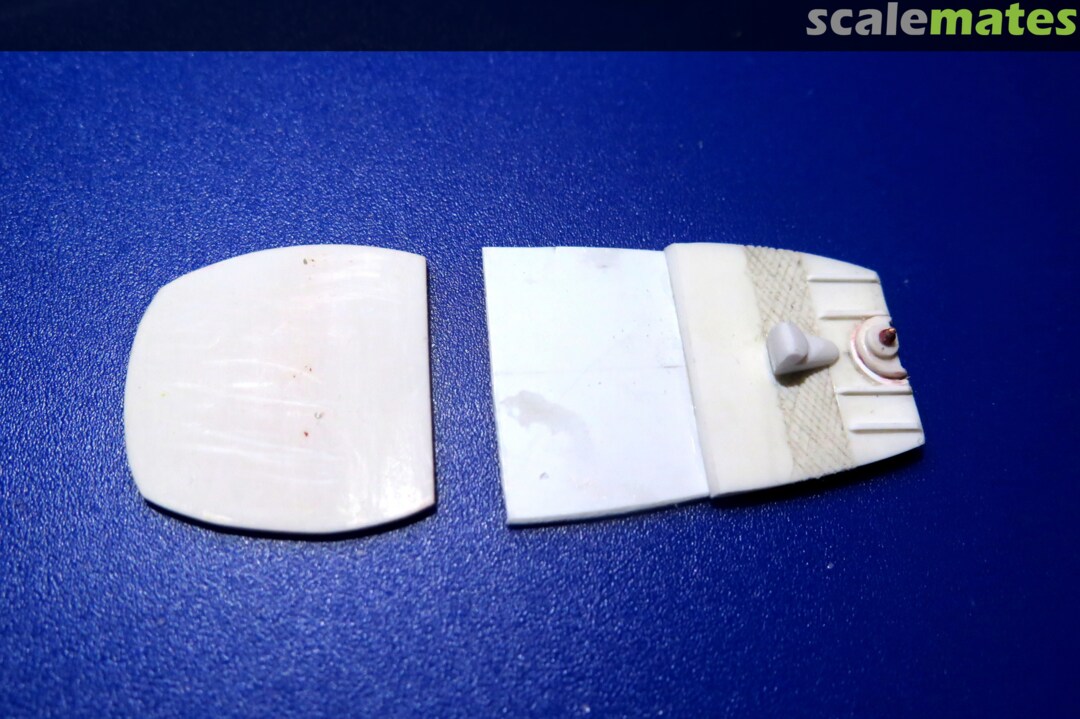
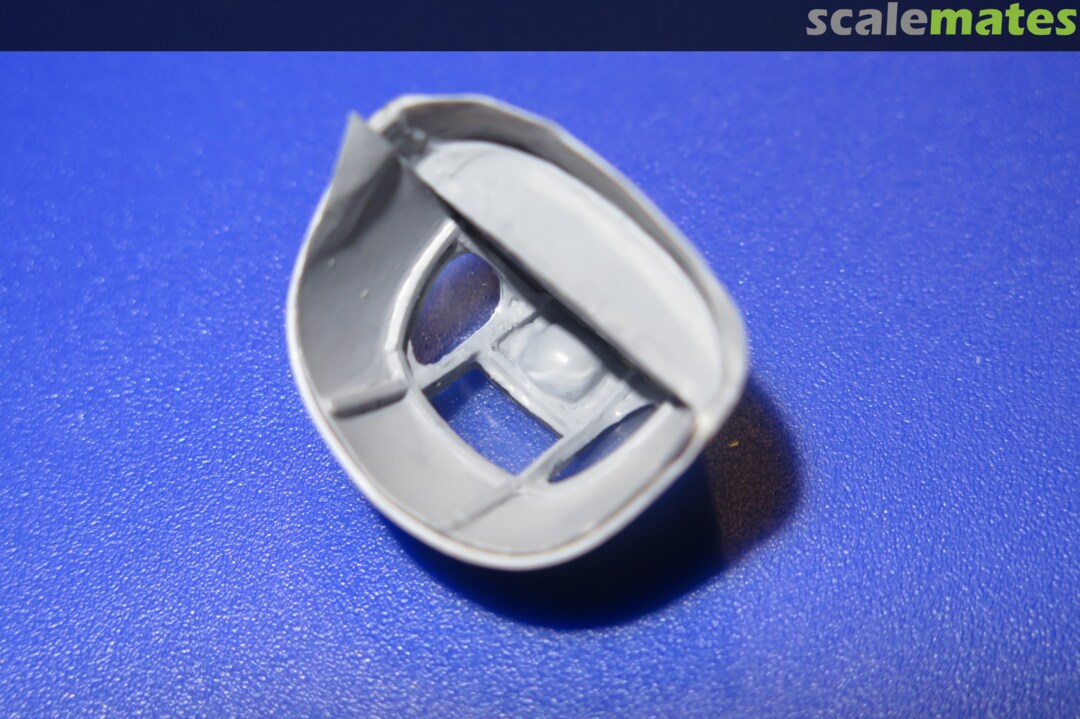
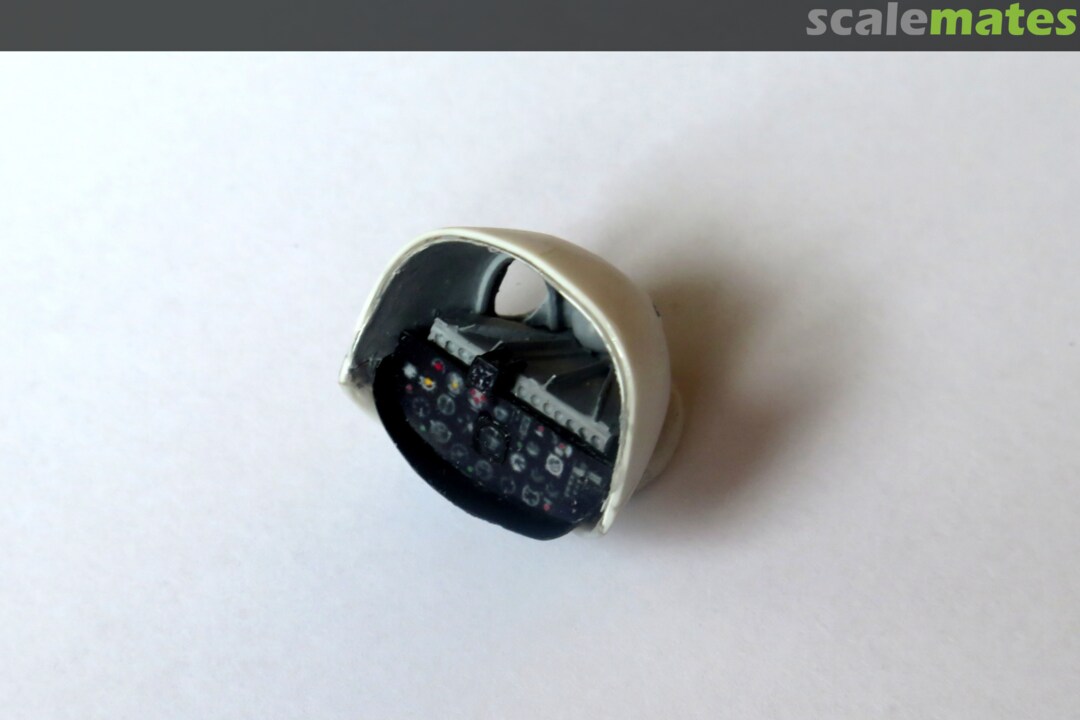
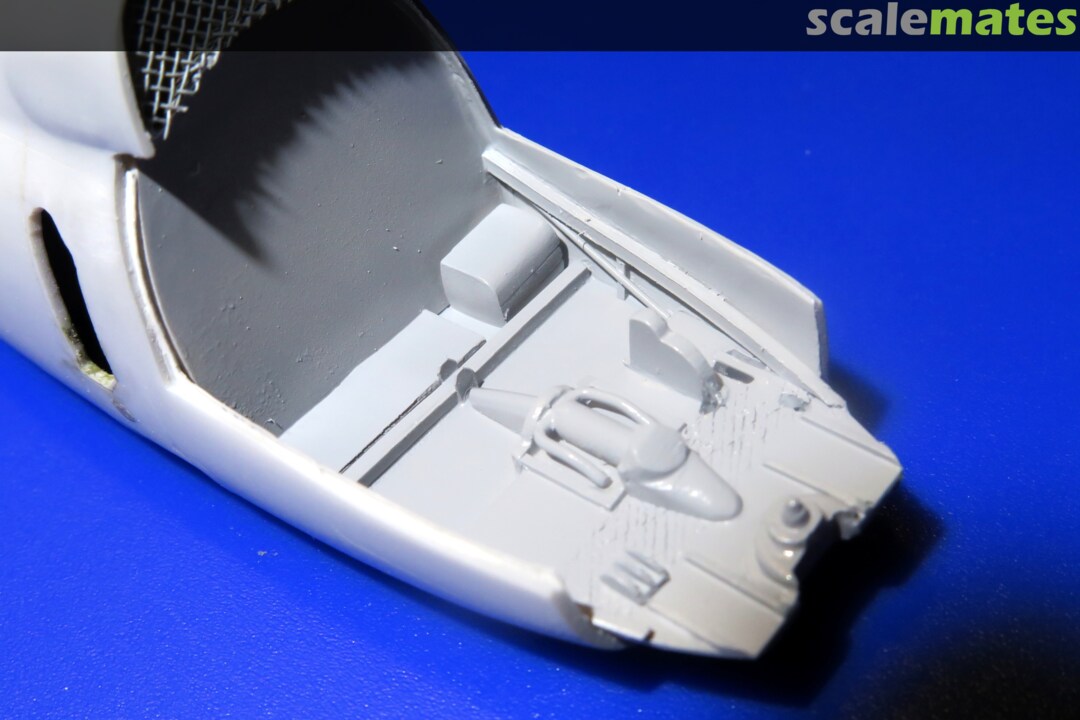
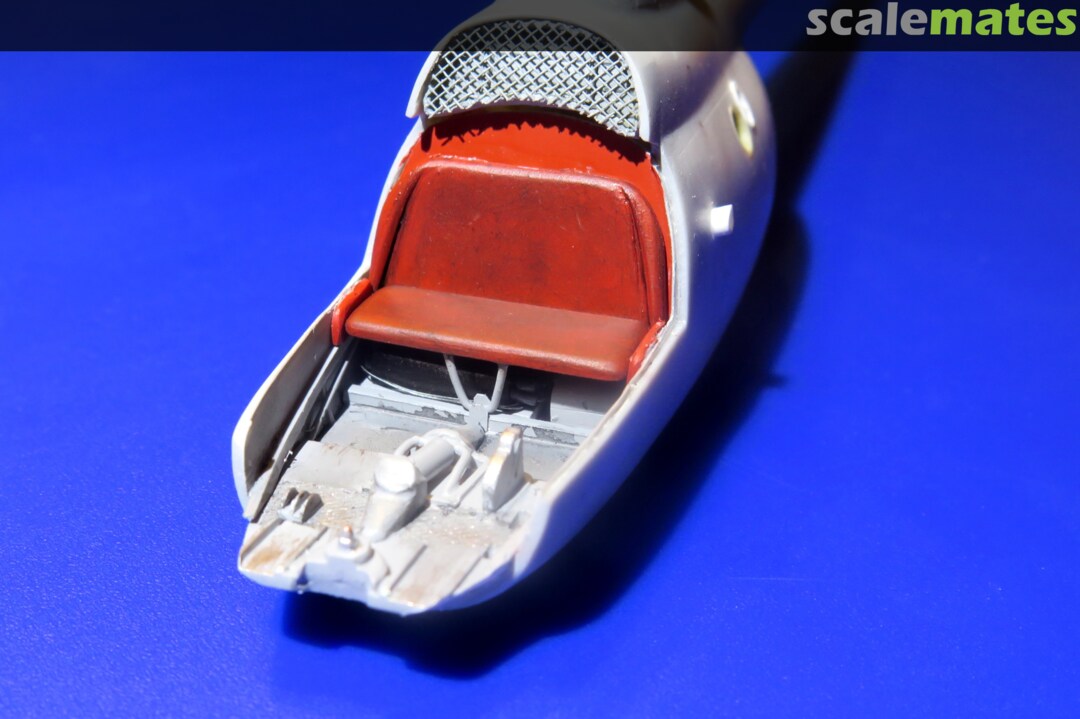
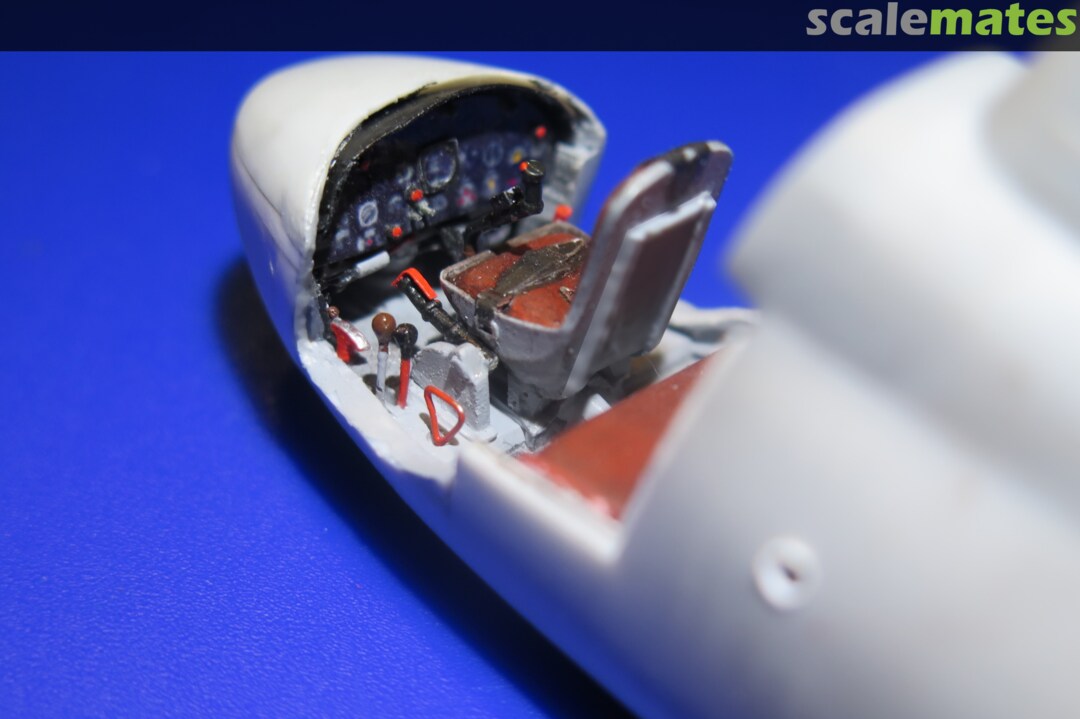
Little progress today. The cockpit got a floor, internal construction and a coat of grey paint. Now I can start to get the cockpit "settled in".
5 October 2024, 19:24
Thanks Alec! The dashboard isn't complete yet. I still need to add a few more details. But I'll add those after gluing the dashboard to the nose of the helicopter, because I would (very likely) break them off while gluing the dashboard to the nose.
8 October 2024, 22:38
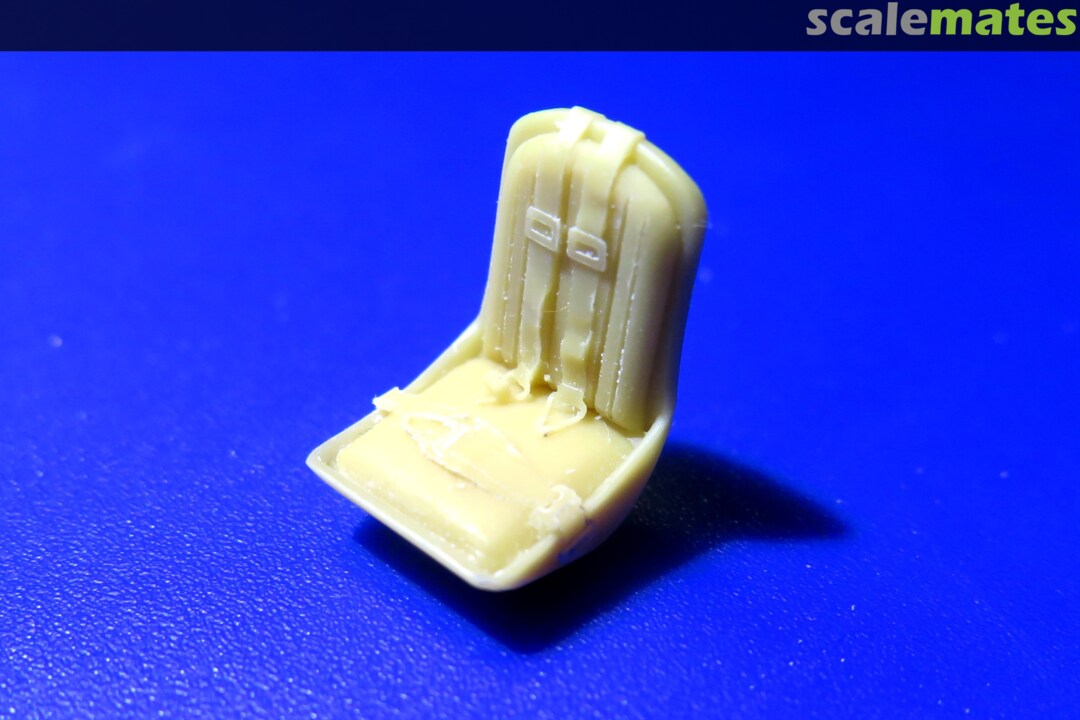
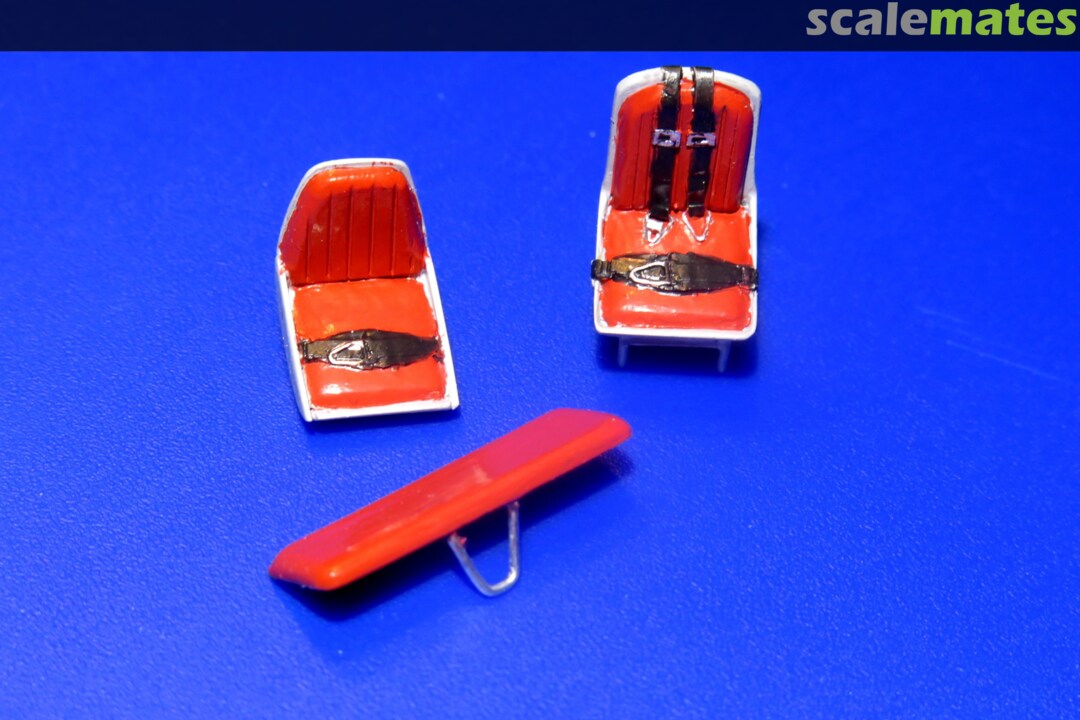
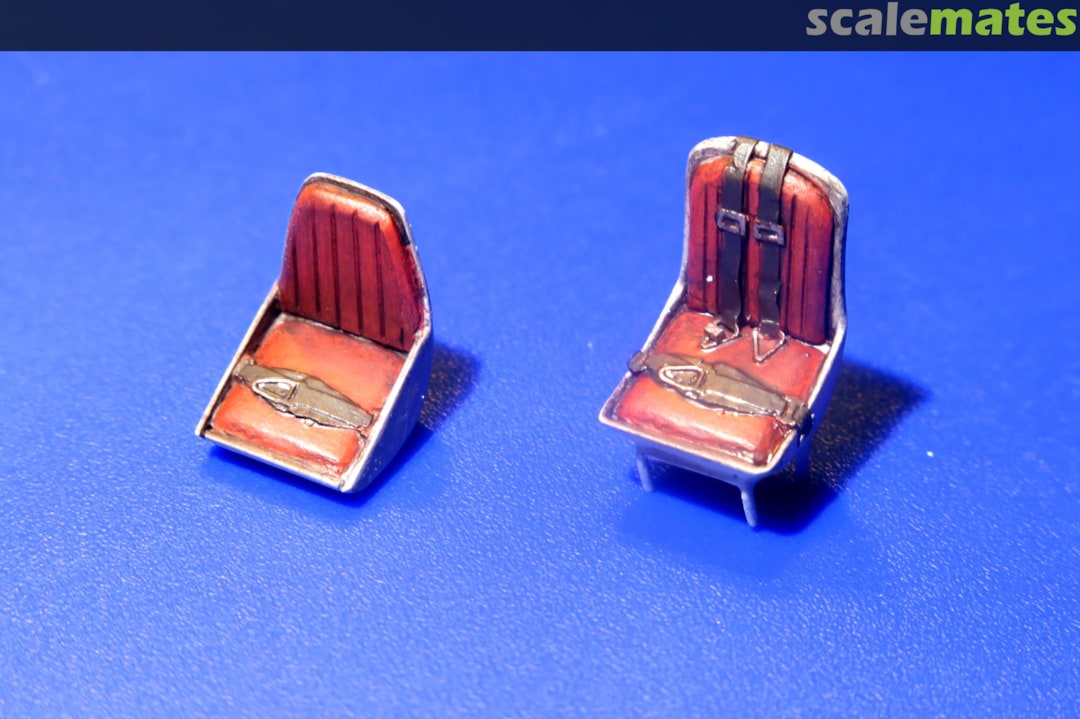
Again, little progress. I'm prepping the seats for the helicopter crew.
8 October 2024, 22:39
The red on the seat and cushion pops, starting to look natural.
8 October 2024, 23:07
This build made me cautiously open the MPM 1/72 version of this chopper. I closed it back up very quickly… 🤣
10 October 2024, 18:11
Alec, I don't blame you for making that decision. The MPM kit isn't very good. To build a nice model out of this kit requires a really large amount of work on virtually all parts of the kit. Plus the plastic the kit is made of is quite hard and cracks easily.
11 October 2024, 13:00
Agreed. The original MPM kits are now almost in the same category as the original KP: collectors' items. To be sighed over, but not disturbed 😁
12 October 2024, 13:25
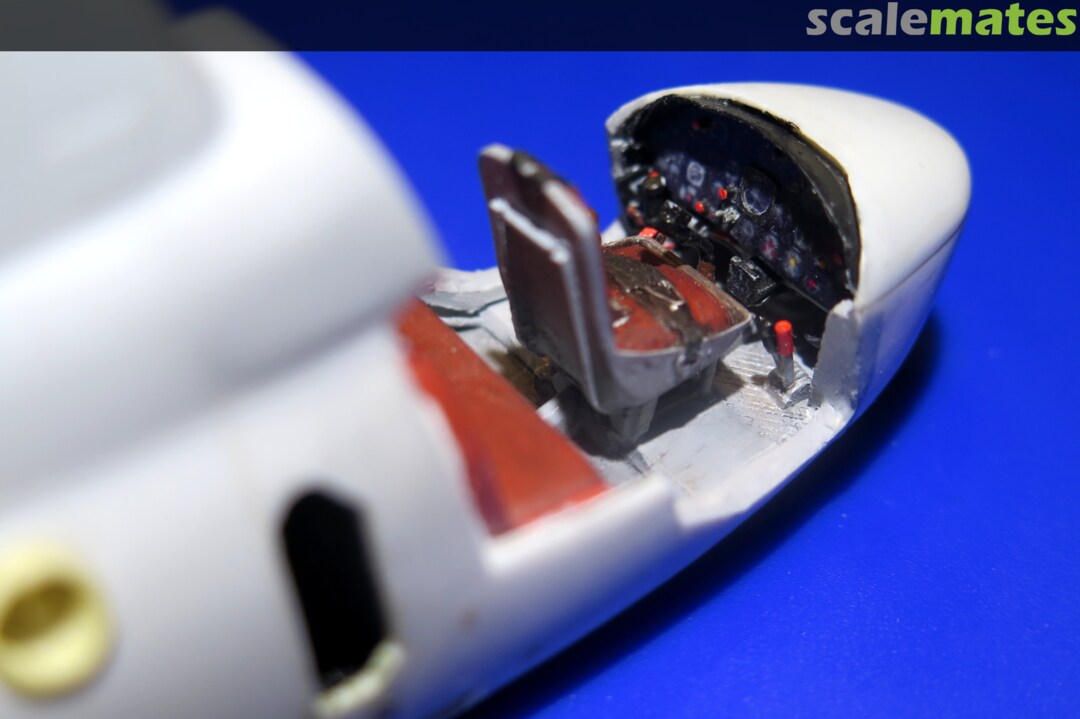
I'm continuing to work on the seats. I finished the backrest of the rear bench and glued the assembled bench into the cockpit.
13 October 2024, 20:50
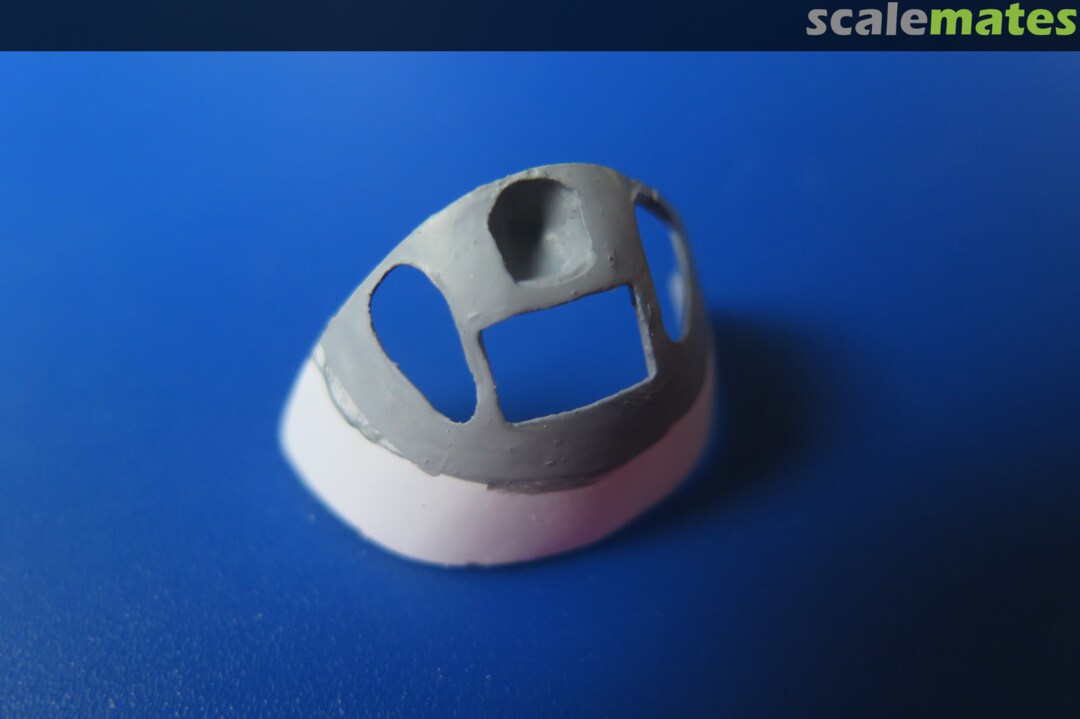
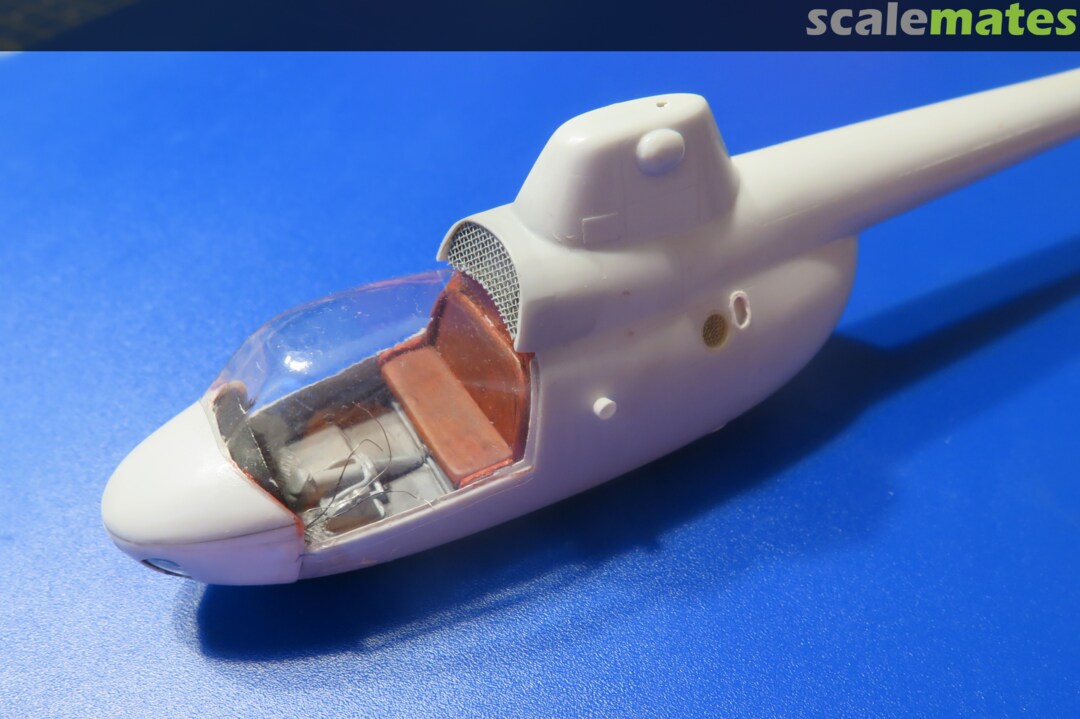
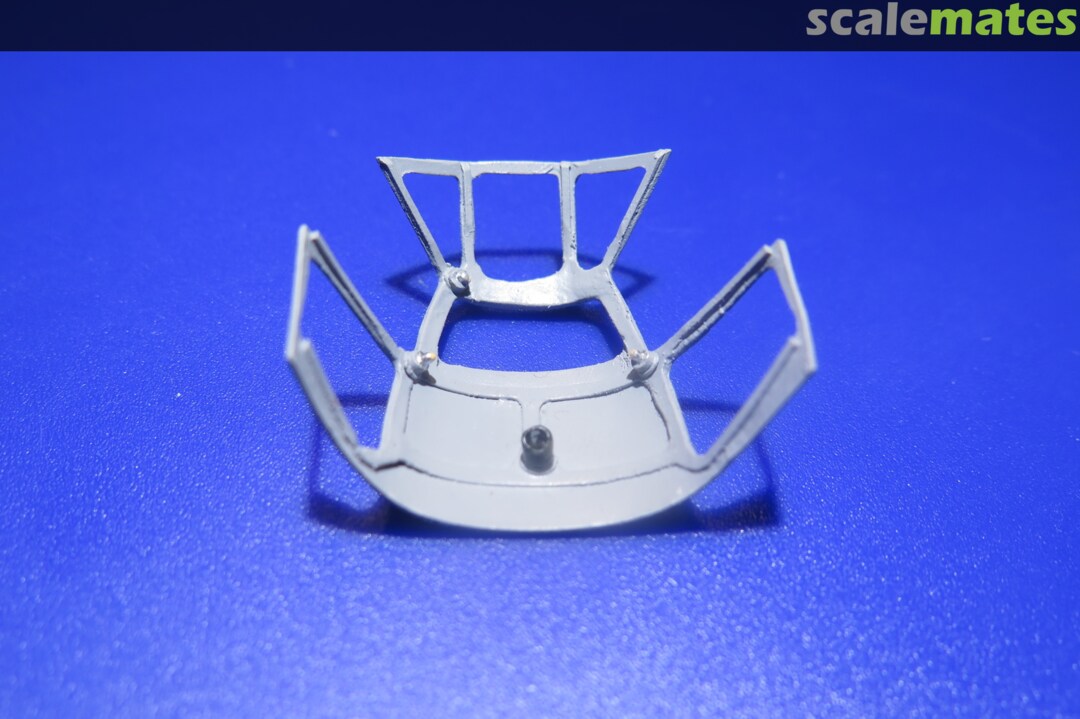
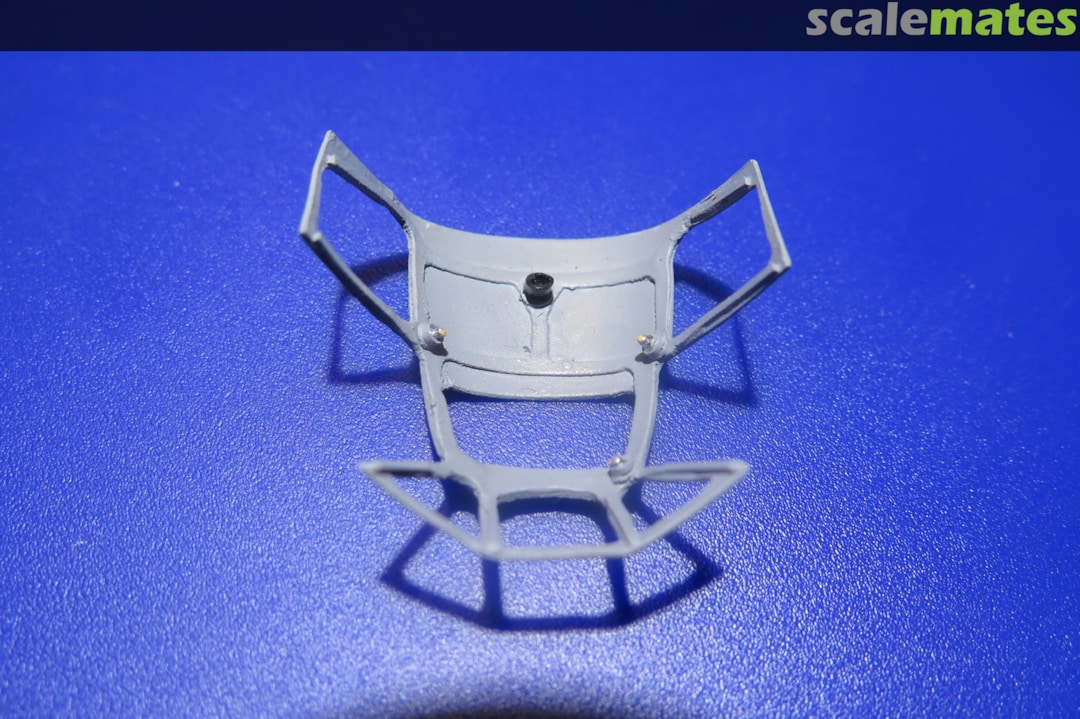
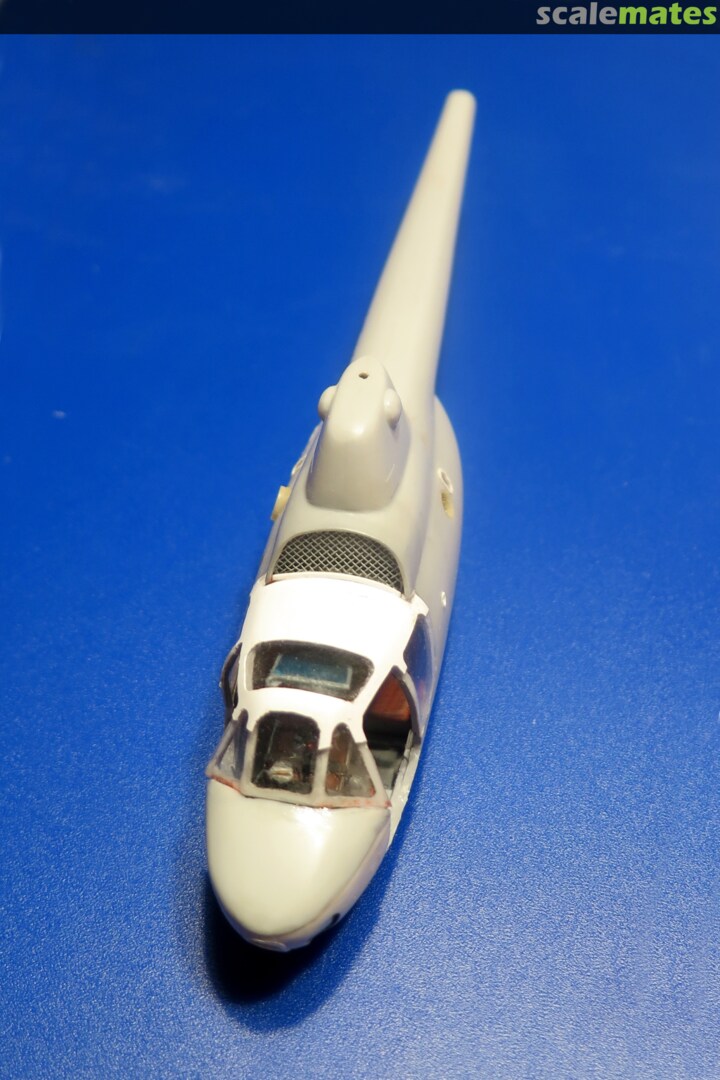
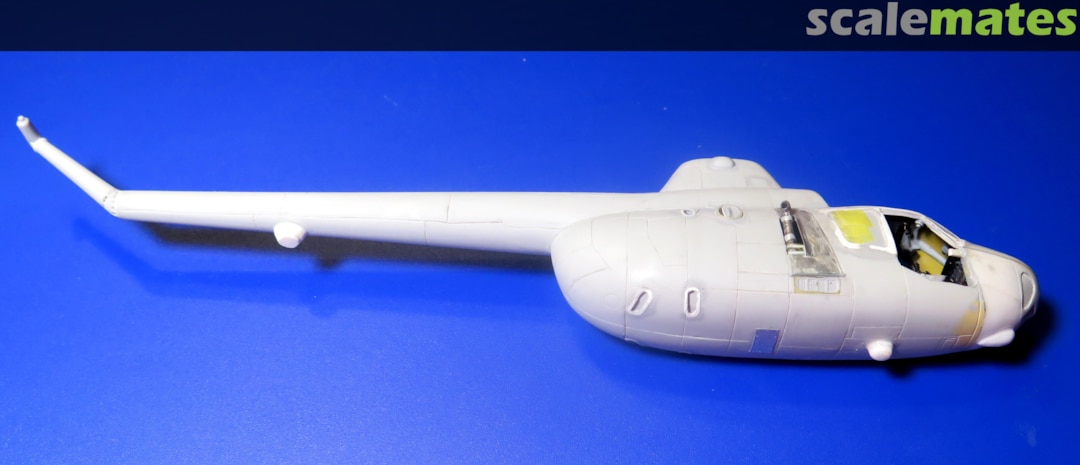
The new cockpit cover is slowly starting to resemble its model. The inner frame inserted into the transparent part of the cockpit and attached to the fuselage already shows the future shape of the cockpit cover.
26 October 2024, 09:28
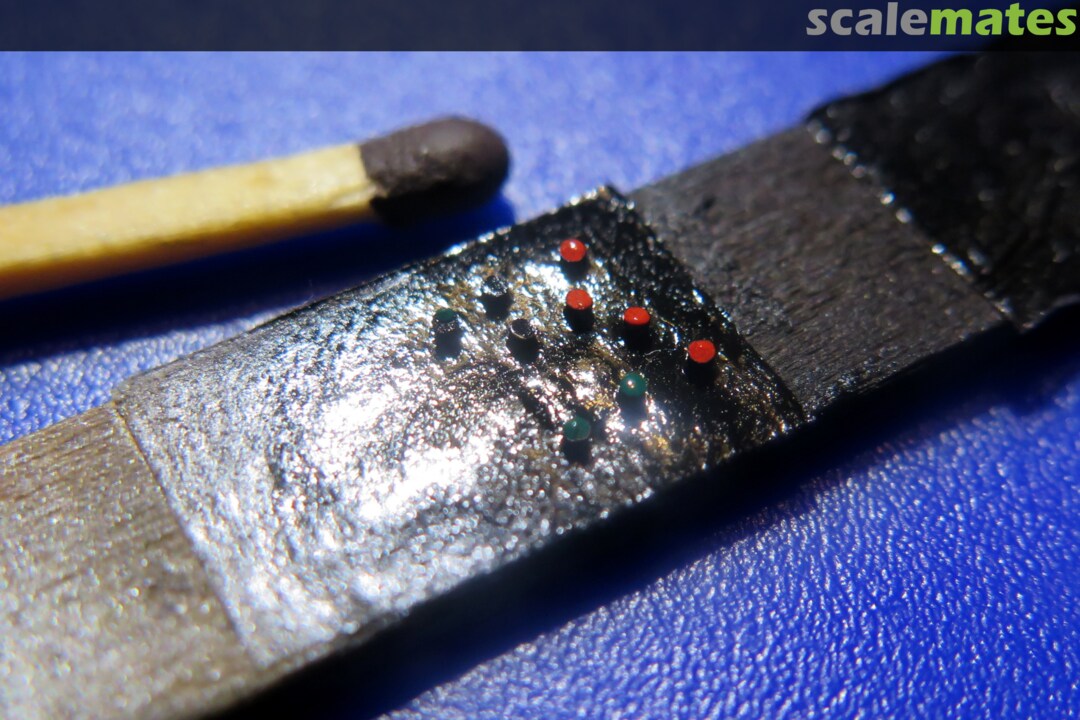
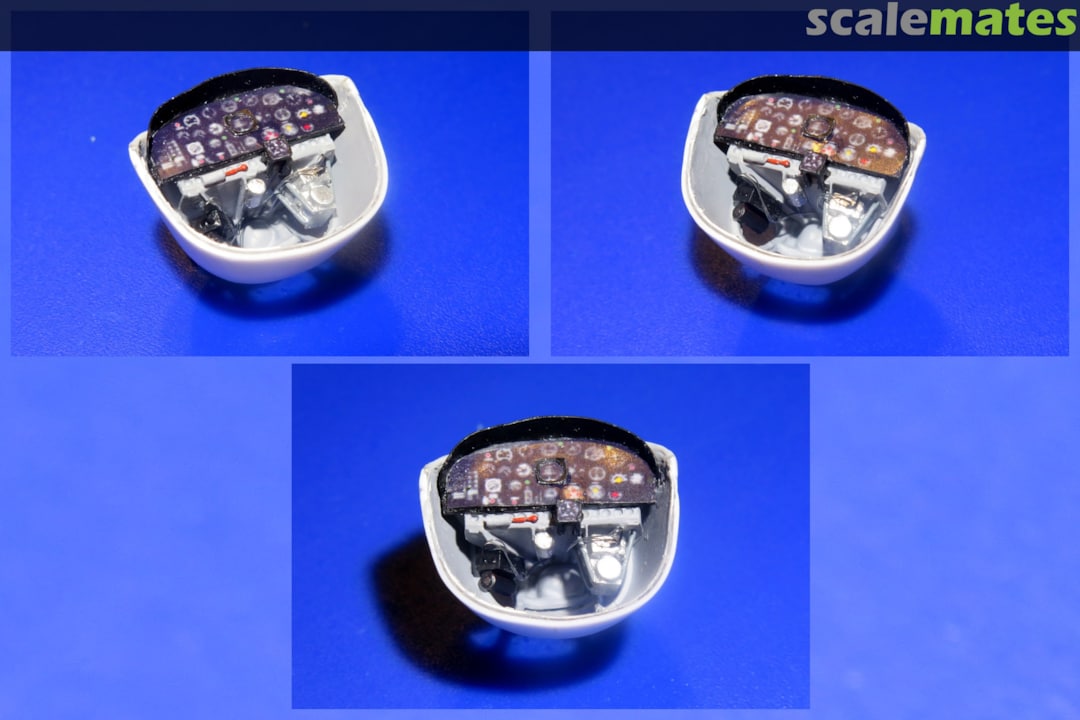
After a short break I continue building the model. I have finished the instruments and controls in the cockpit and am now working on the details located on the inside of the canopy.
6 November 2024, 22:56
Not much of this coarse kits are build. And among those is no model with details like yours! To scratch all little things needs time but is worth the effort. Your hard way to do the canopy frame is a good example.
I think the instrument panel will not very visible at the end but for more contrast individual decals for the instruments are an option. Tom Anyz offers greatly printed universal dials in black and white, e.g. Universal cockpit dials 1.00 mm - 1.80mm (ANYZ AN037, No)
")
12 November 2024, 22:52
Bughunter thank you for the recommendation. Looks like the ANYZ decals are a great idea for simplifying dashboard fabrication.
13 November 2024, 00:05
Yes! And Tom is a modeler too, so he provides things he need for his own models. So from modeler to modeler 🙂
The decals are well designed and printed by Cartograf.
13 November 2024, 09:42
It's always good to have someone who has experience from their own practice.
I had a look at Tom's site and apart from the cockpit decals, I liked the other nifty bits. Looks like I'll do myself a favor and buy some of Tom's accessories. 🙂
13 November 2024, 23:12
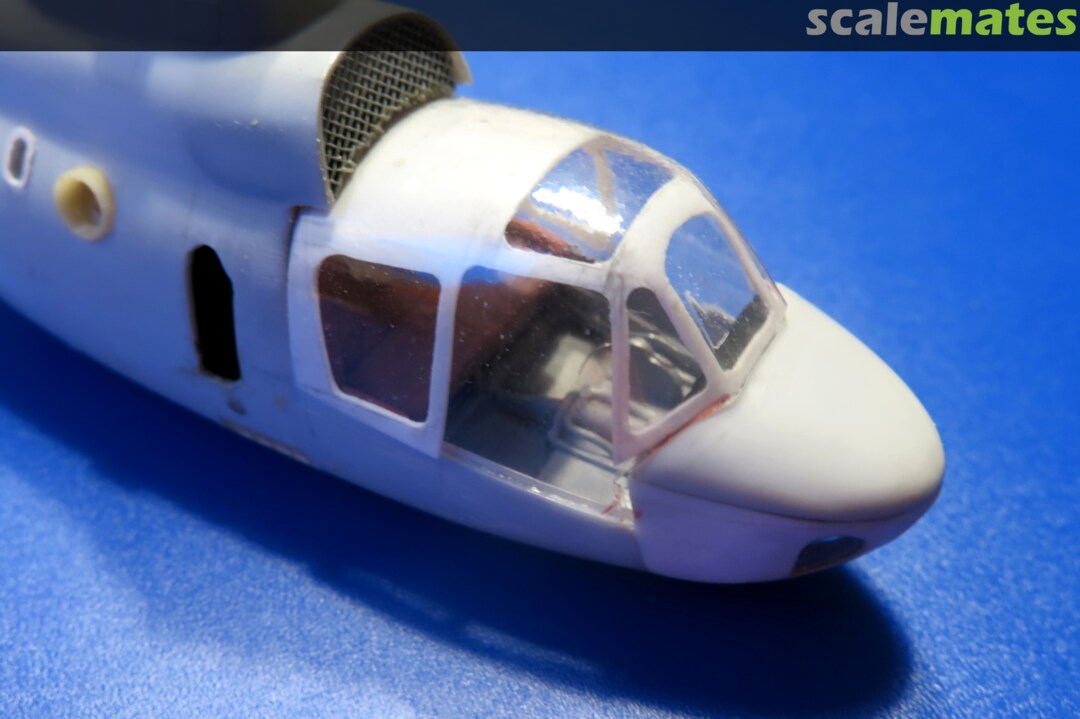
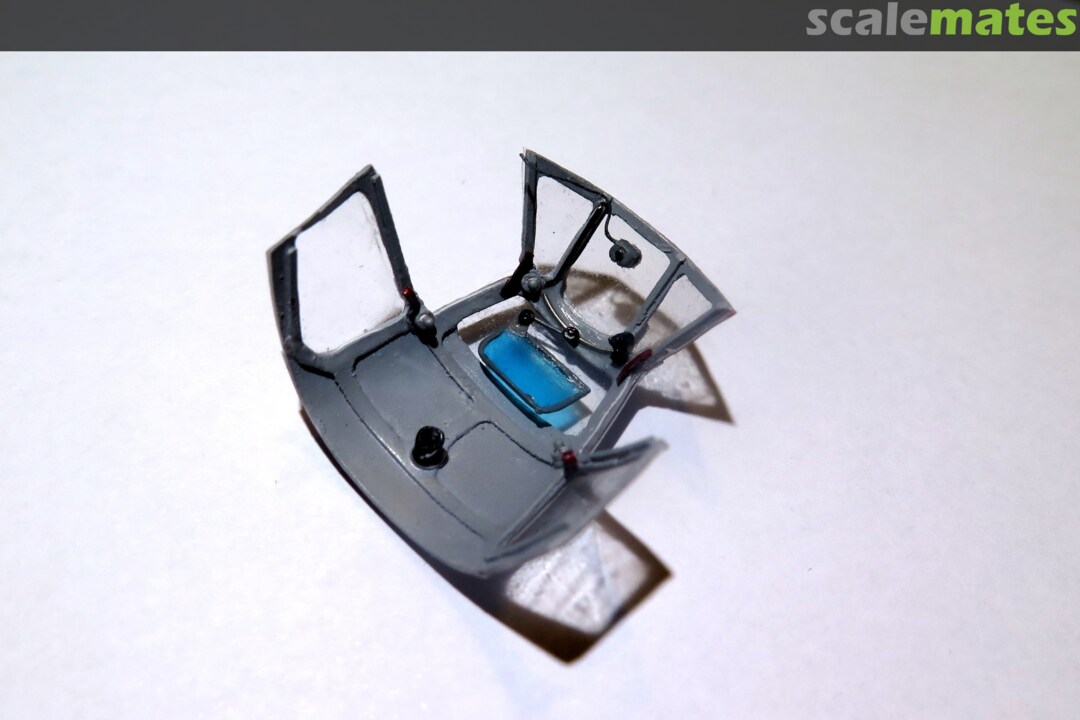
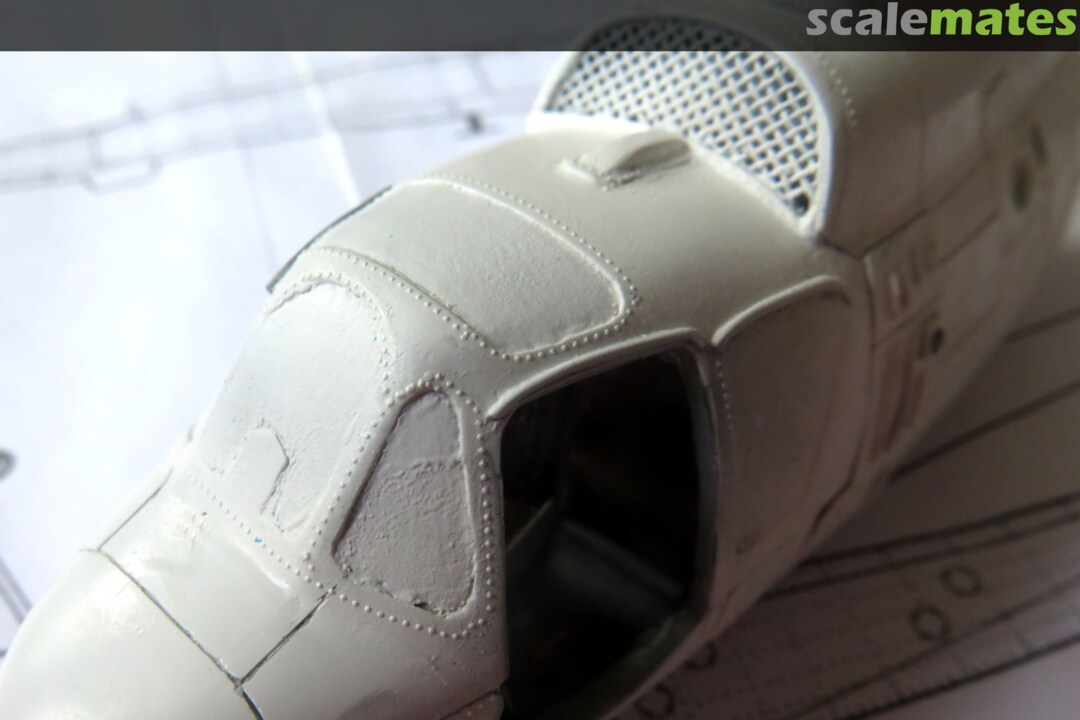
After a short break I am resuming work on the model. I finished the interior and glued the cockpit canopy. Now I have to finish the outer cabin window frames.
19 November 2024, 22:14
Really great bit of scratchbuilding, Ludvik! 👍 cockpit details are fantastic.
19 November 2024, 23:22
The canopy is an impressive masterpiece in itself, Ludviku. Chapeau bas!
20 November 2024, 08:03
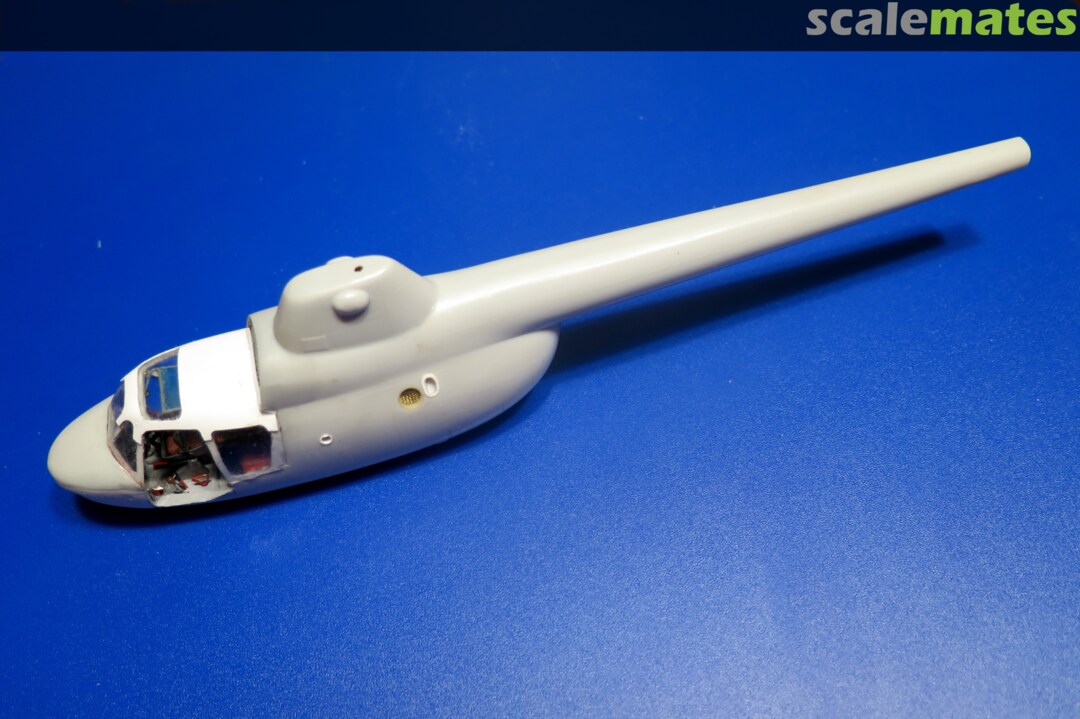
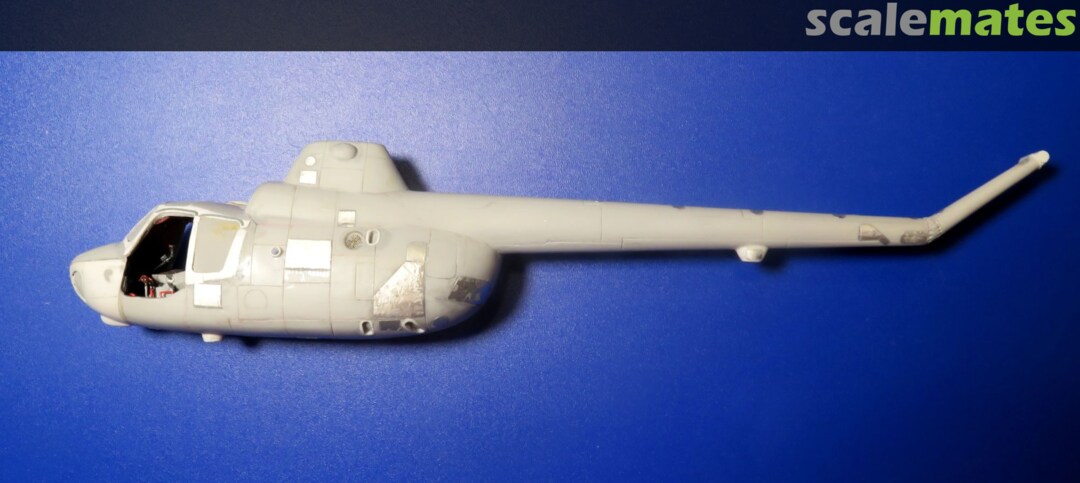
Work on the cabin canopy is complete. The model has been sprayed with surfacer for the first time.
2 9 December 2024, 22:22
Starting to look like a helicopter. It's going to be a true work of art.
1 10 December 2024, 03:38
This sandwich framing of the windows seems to be a lot of work but gives an awesome result 👍
1 10 December 2024, 10:54
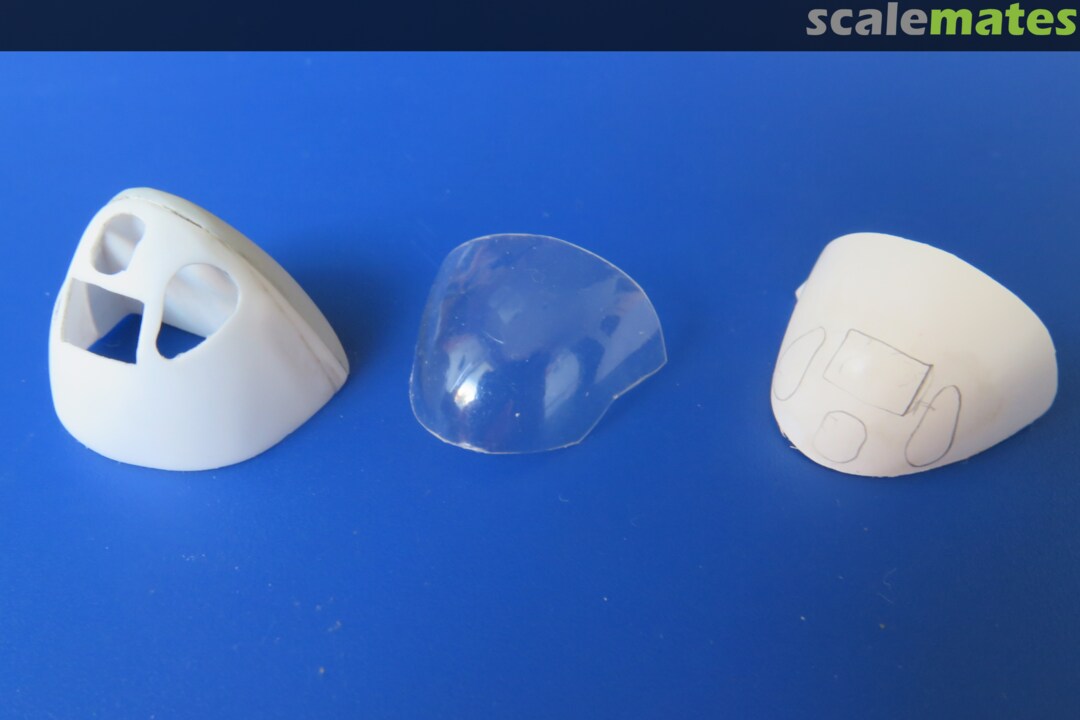
The method of layering multiple layers on top of each other was my first time.
When I was thinking how best to make the new bow and cockpit cover, I thought of making these new parts as a sandwich. It seemed like a good solution and I wanted to give it a try.
Truth be told, the fabrication was more challenging than I had originally imagined. But I'm glad I took the plunge. I'm happy with the result.
3 10 December 2024, 22:08
After a break caused by the Christmas and New Year holidays, I returned to work on MI-1 again. According to the drawing I started to engrave new panel lines on the fuselage.
It's slow going and there's nothing to photograph yet.
4 14 January, 00:09
I've finished the first round of engraving the panel lines. The lines will still need some aftercare to achieve the final look.
14 January, 21:25
Nice work with the rescribing. It couldn't have been easy with such an awkwardly shaped model.
15 January, 07:43
Gorby, you got it exactly right. The shape of the helicopter fuselage with its rounded surfaces and large number of panels and various covers makes it difficult to overwrite the lines.
I found Dymo tape very helpful in transcribing the lines. I use it instead of a ruler when transcribing lines on rounded and complex model shapes. The Dymo tape is flexible yet strong enough. When taped to the model, the tape conforms to the shape of the fuselage and holds well in place (unlike a flexible ruler). And once the line is engraved, the tape can be peeled off easily.
2 15 January, 09:46
I was thinking the same thing. Fine saw blade works for me on curved areas, in conjunction with a good scriber.
2 15 January, 14:56
After a short break I'm going back to work on the model. According to the drawing and photos I started to add details on the fuselage.
1 16 February, 22:34
Ludvik, how are you getting all the details for how the helicopter should look?
17 February, 02:11
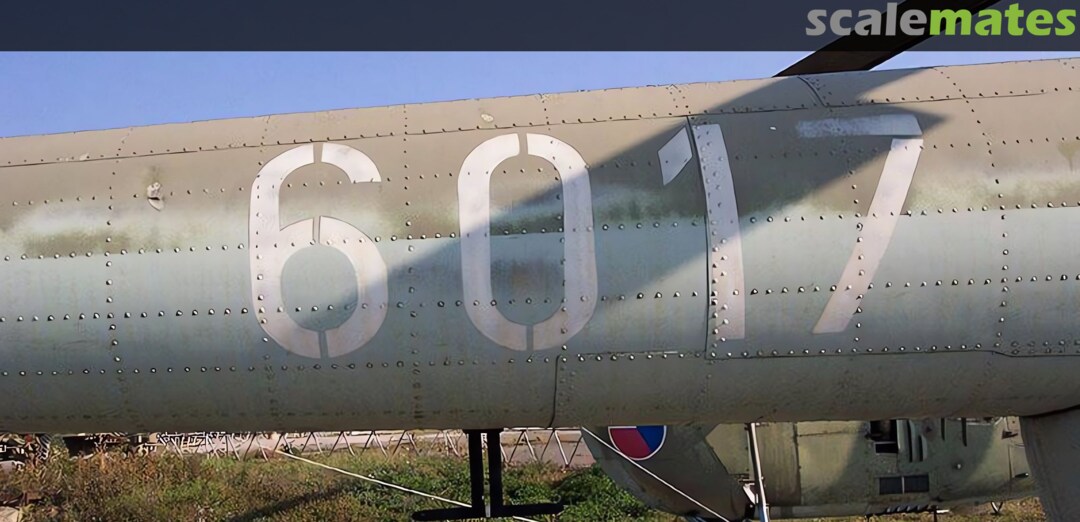
Jennifer, in building this helicopter, I am drawing information from an article on the history of the development of the helicopter, descriptions of the various versions, technical data, a detailed drawing and photos of the actual machine.
Most of the information and photographs I tracked down on the internet, and detailed photos of the interior and various details were provided by a friend who took photos of the helicopter at an aviation museum.
2 17 February, 23:00
Another shift in the work on the model. I've added small covers to the fuselage.
19 February, 00:24
Jennifer, unfortunately I had very little free time lately. But I'm better with time now and can continue building the Mi-1. Look forward to an update soon.
4 9 March, 12:11
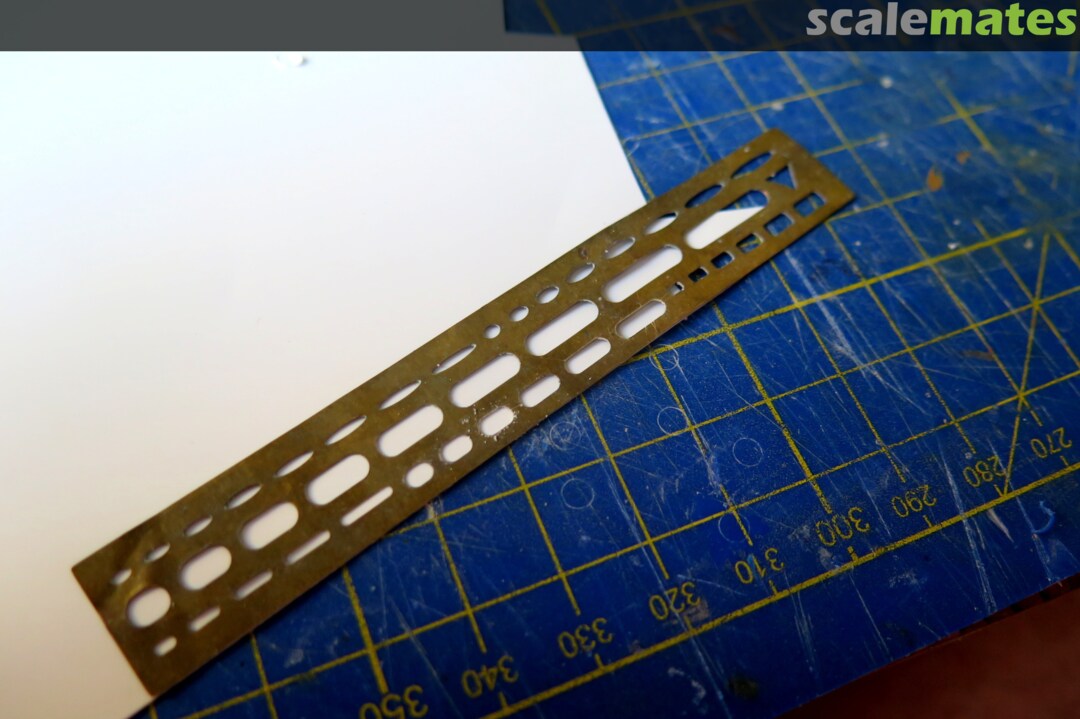
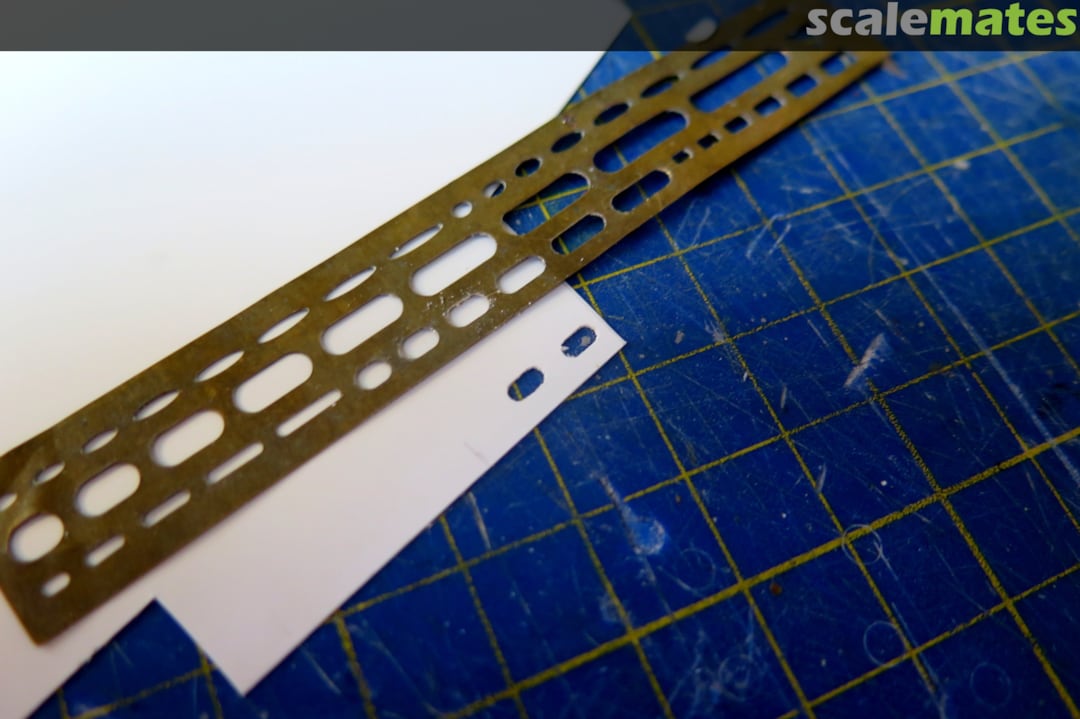
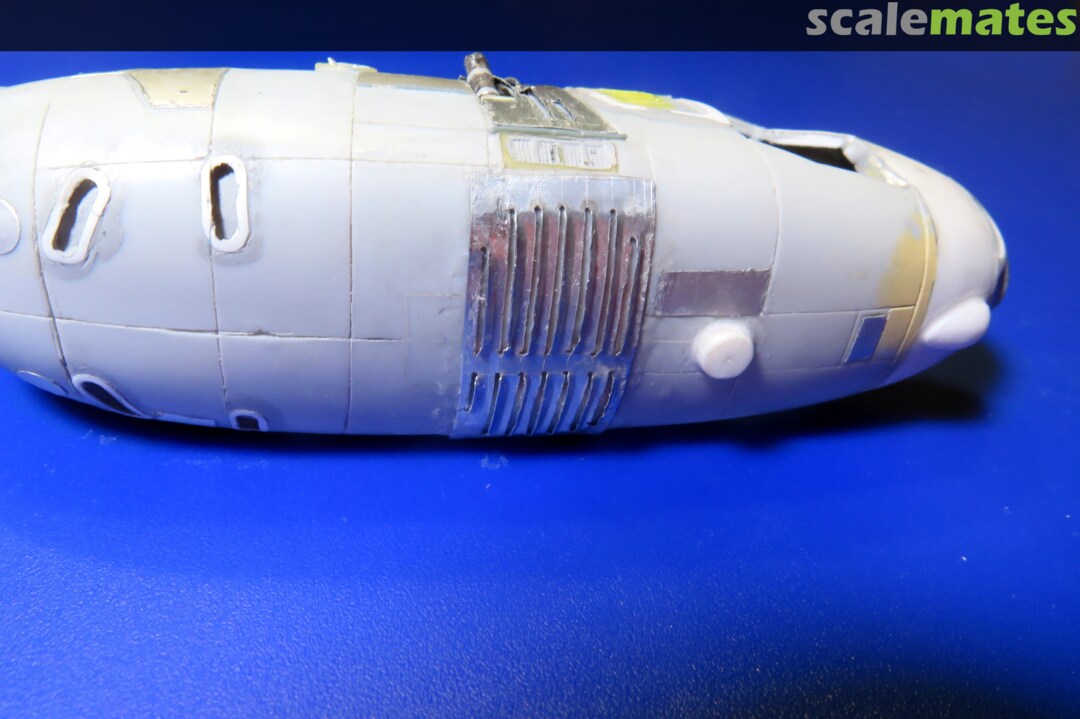
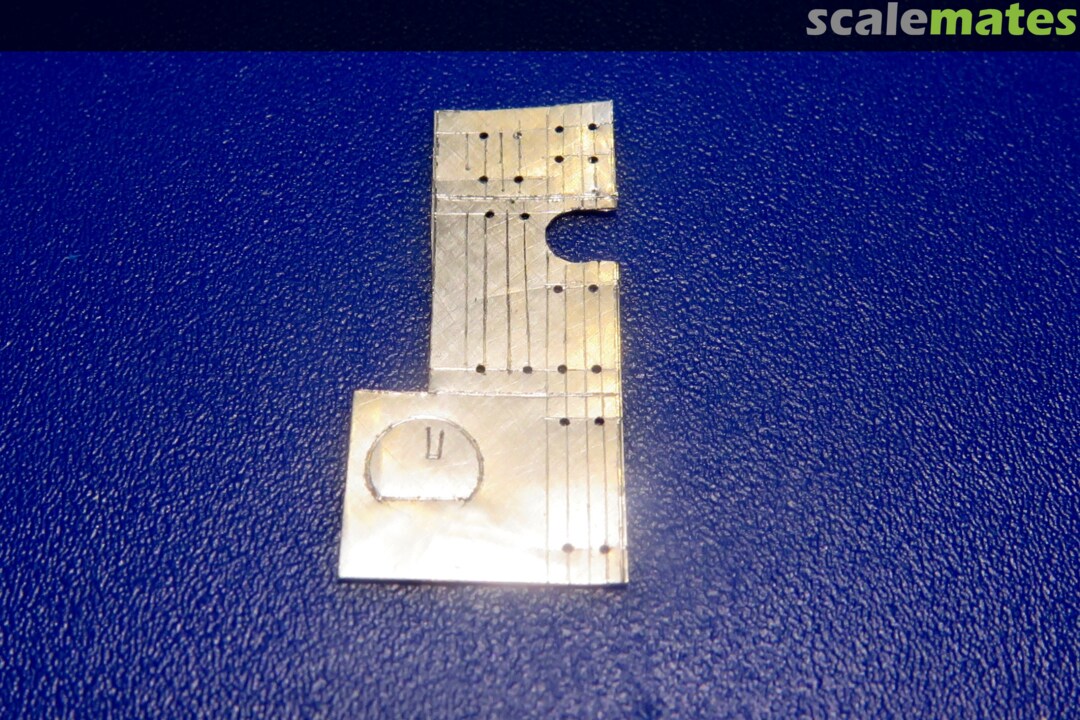
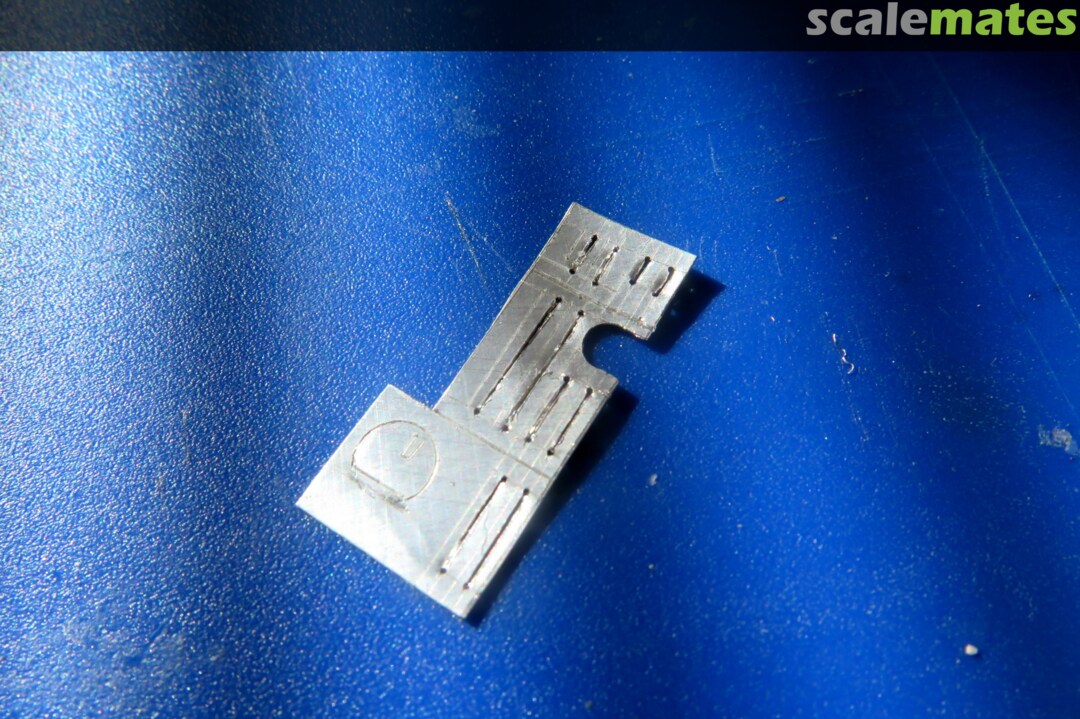
This afternoon I experimented with creating vents on the fuselage of the helicopter.
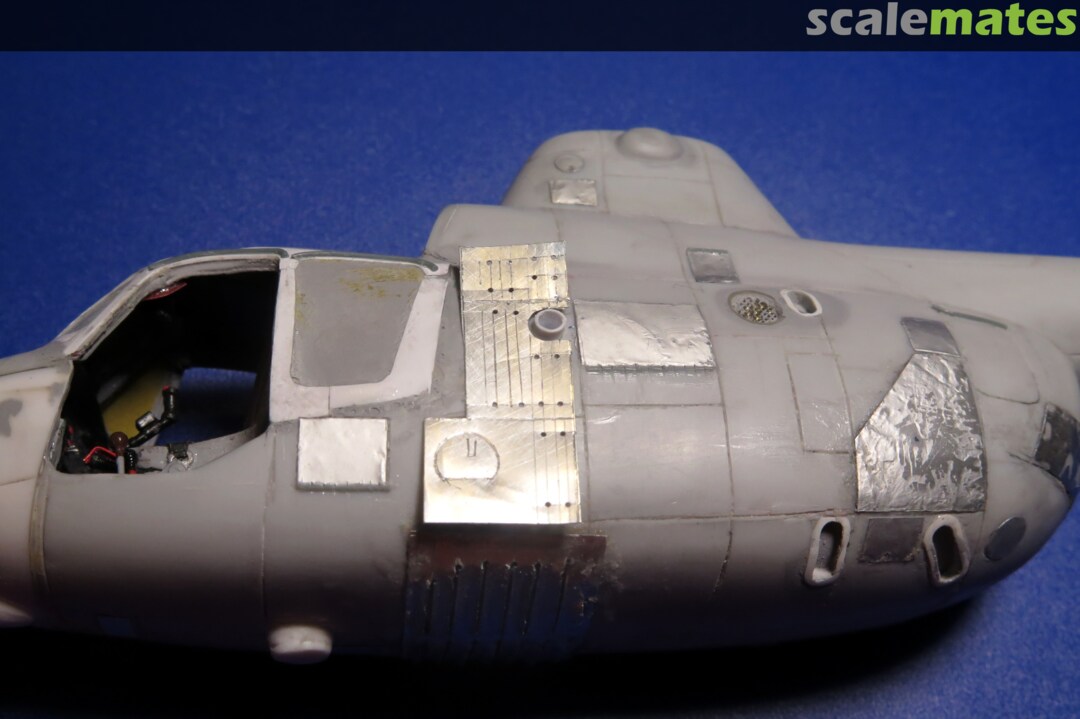
After a few trials and trying different materials, it turned out that the best method for making vents on the fuselage is to make a whole panel with vents out of thin aluminum sheet and create the vents in the panel.
3 9 March, 20:17
Hello, Merlin. 🙂
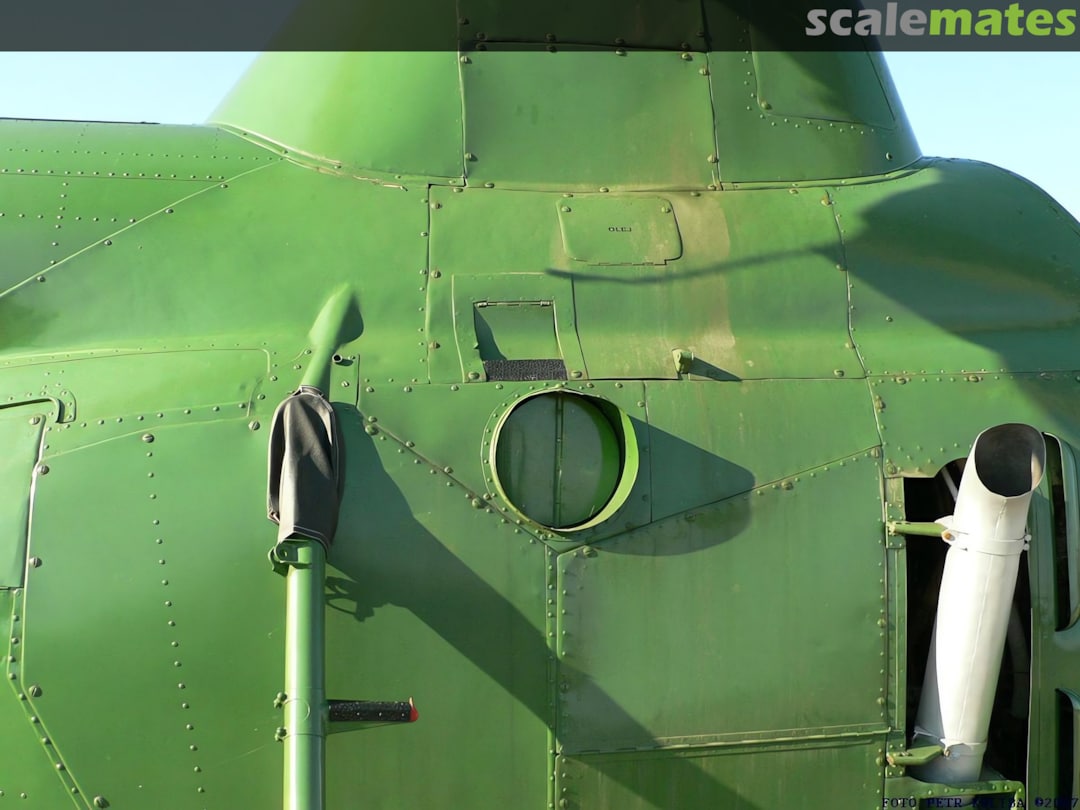
The helicopter is powered by a radial combustion engine that is cooled by airflow. The air for cooling the engine enters the fuselage through an opening above the cabin (the amount of air can be controlled by the air intake louvers). And openings on the bottom and sides of the fuselage serve as its outlets.
3 9 March, 21:20
The attention to detail you put into your projects is exceptional. Do you keep a notebook with all the planned changes and extra work you want done?
10 March, 02:54
Those vents panels are nicely done!
I also have a stalled Ansaldo project where I don't like the way the cooling vents are shown in the plastic. But there are so damn many vents ...
1 10 March, 08:12
@Jennifer
I'm not so consistent that I take notes on model building. Before building a model, I study the materials and photos of the machine I want to build, think about what I'm going to do and how I'm going to do it. I work out the minor details as I build the model.
My notebook is my head 😄
@Frank
Originally I was going to replace the air vent projections with plastic profiles. But I couldn't find any profile with the right shape and size. So I had to find another solution. I basically copied the panel making method for a real helicopter. Only instead of a press I used less sophisticated tools. 🙂
I know your Ansaldo project and I plan to build an Ansaldo too, only it will be a two-seater version. That's why I know that in terms of number of vents, Ansaldo can easily compete with MI-1.
3 10 March, 09:39
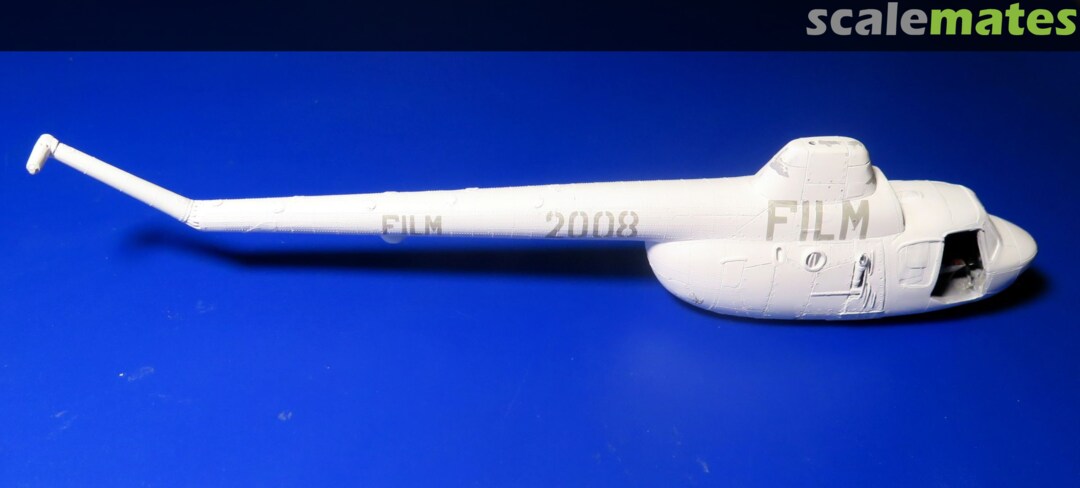
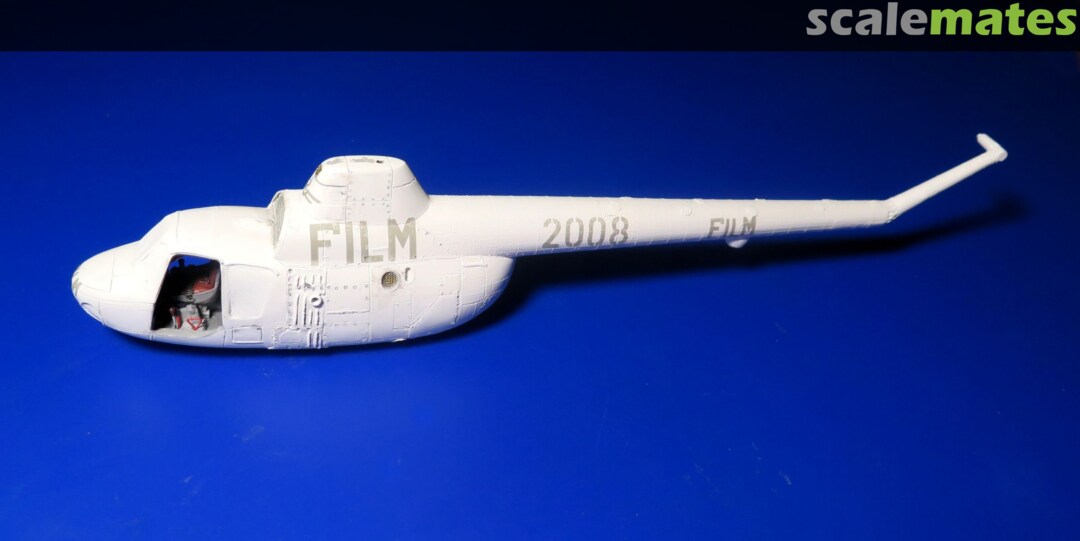
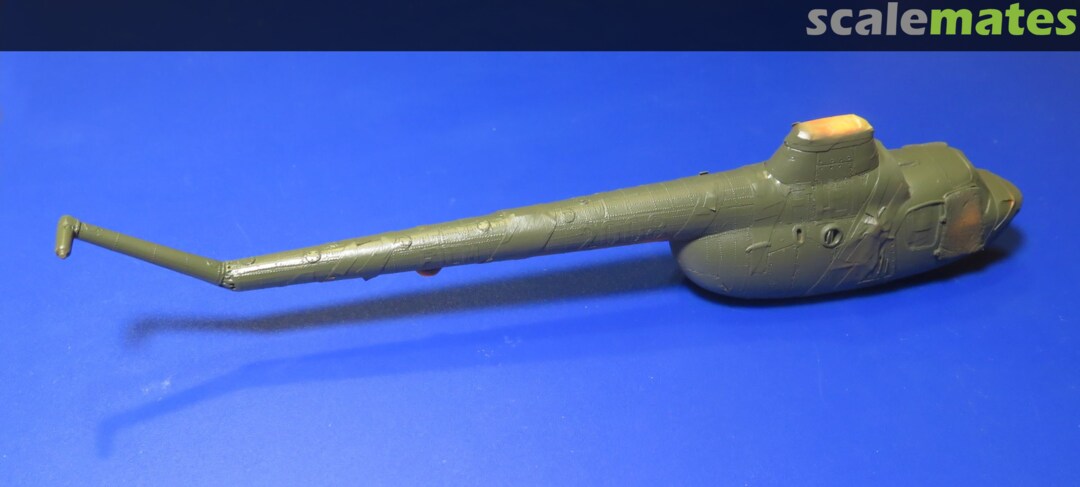
I finished adding details to the fuselage and sprayed the model with surfacer. Surfacer unified the fuselage color and as always pointed out areas that will need to be repaired.
Clearly, sandpaper and putty will keep me company for the next few days.
2 11 March, 23:00
Jennifer, you're basically right. Surfacer and primer are close. Both are used to prepare the surface of the model before applying the paint. But there is a difference between a surfacer and a primer.
SURFACER is a fine putty that is designed to be applied with a spray gun. It prepares the surface of the model for paint application and also covers minor surface damage. Once sprayed on the model surface, surfacer is matte and can be polished with fine sandpaper.
PRIMER is a base paint with high opacity. The primer unifies the colour of the model surface and prepares it for paint application. Unlike surfacer, primer is glossy and does not need to be polished.
2 12 March, 08:10
The production of the ventilation holes is incredible 😳
It goes on with the details, even when you think: More is not possible 👍
1 12 March, 09:41
Jennifer, I can't say which surfacer is the best. I use Surfacer GSI/Gunze. Since I am happy with it, I have no reason to change.
Gunze offers Surfacers in three variations based on grit - Surfacer 500, 1000 and 1500. The higher the number, the finer the Surfacer. I use Surfacer 500.
I wrote that Surfacer can correct minor surface irregularities. That means really fine damage, like hairline scratches. Cracked joints or deeper grooves Surfacer won't fix. You have to use a sealer for that.
2 12 March, 22:12
Do you lose surface details like paneling with the surfacer? Do you then re-scribe all the lines?
1 13 March, 01:11
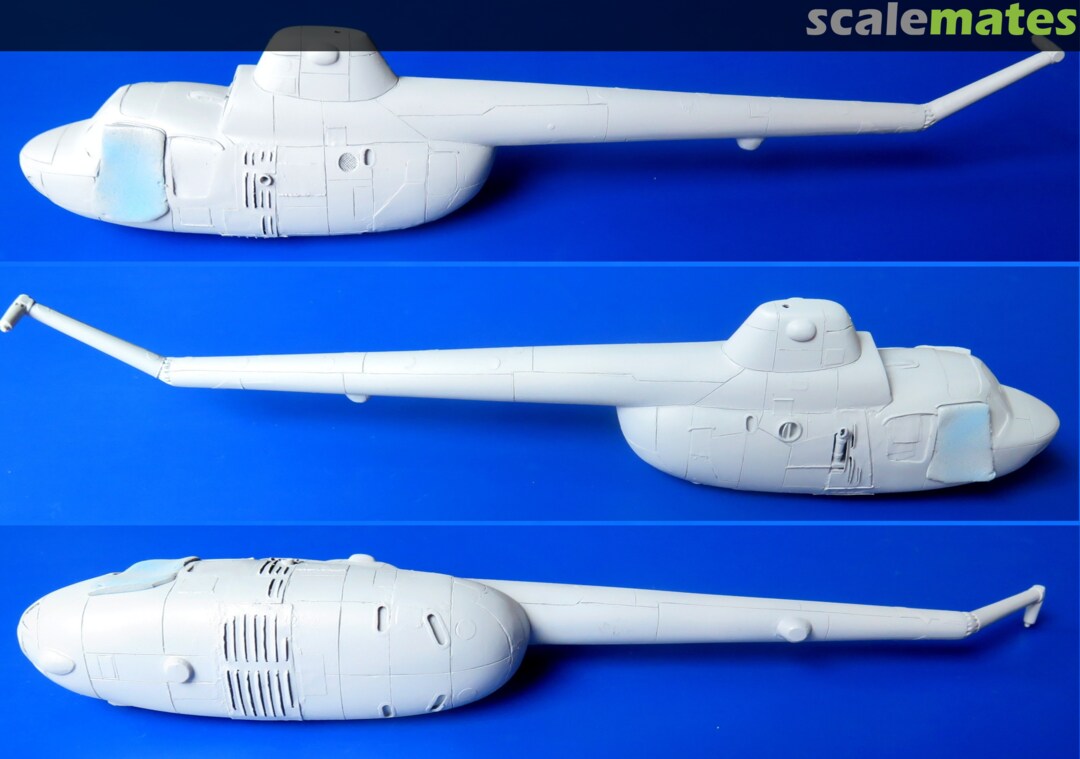
Surfacer is sprayed on the surface of the model in a thin layer and therefore its ability to seal is limited. Surfacer can only repair subtle damage, but more significant damage and detail on the surface of the model, including panel lines, will remain after Surfacer application. The great advantage is that the color uniform and matte finish (after Surfacer application) will reveal all imperfections and flaws. It will show you the areas that deserve repair before you start applying the final paint. You will only need to restore panel lines and small details if there has been a subsequent repair after Surfacer application that has damaged them.
For a better idea of how the model looks after surfacer application, see Figure 99.
3 13 March, 11:45
Thanks to all the summer activities I have no time to build models. The Mi-1 will have to wait a little longer. 🙁
24 July, 17:16
Understandable, I am in a similar boat Ludvíku. It promises to be a great build when it does return to the bench 👍
4 25 July, 10:54
Frank and Alec, thank you for your support 🙂
The only thing I was able to do was sand the hull and after spraying the white base paint, I polished the whole hull.
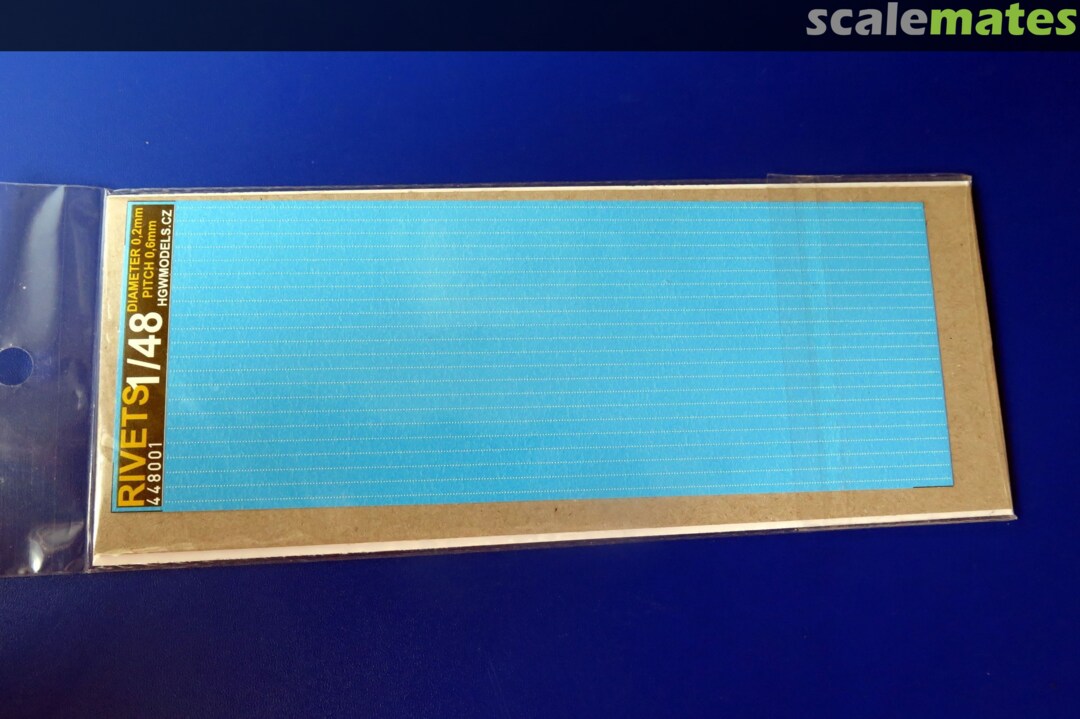
When I get back from vacation, I will apply the decals with positive rivet lines to the prepared fuselage. I've never done this before and am very curious to see how it goes and more importantly how it will look.
4 25 July, 20:07
My curiosity about the appearance of the hull after applying the rivet series decals was so great that I decided to apply the rivet series decals to at least one panel.
I was really very pleasantly surprised by the result.
Tomorrow I leave for a short vacation and a reunion with our friends.
And thanks to today's little experiment, I already know what to look forward to when I return from vacation. 😉
2 27 July, 17:53
Can one call a time where you are not able to build on your models a "vacation?" 😉
2 27 July, 18:03
Ludvík, you are building a Warthog? 😉
John, he is not talking about recreation! "Vacation" comes form "vacant" and this means free, empty, unmanned - so his bench is free, empty .... 🙂
1 27 July, 18:34
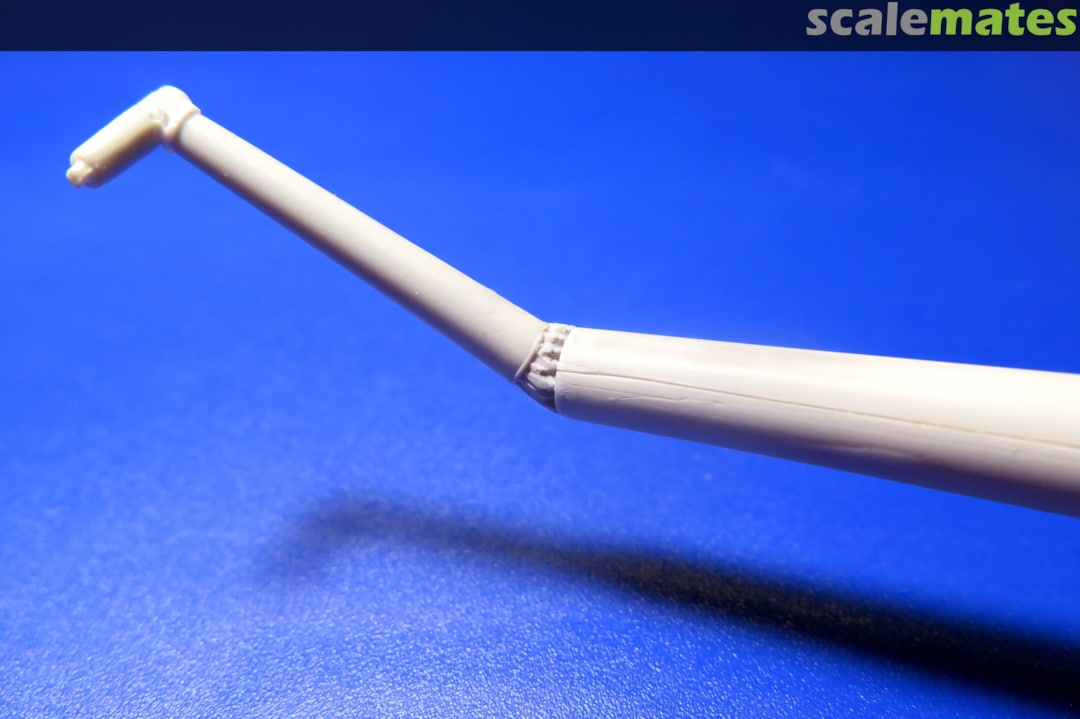
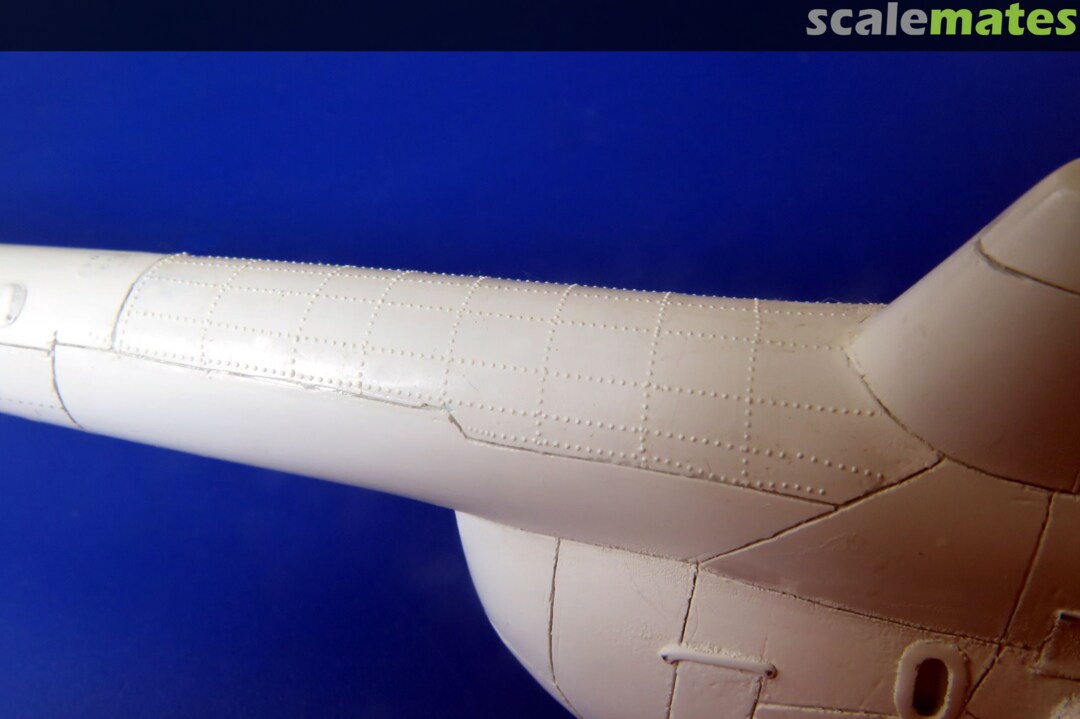
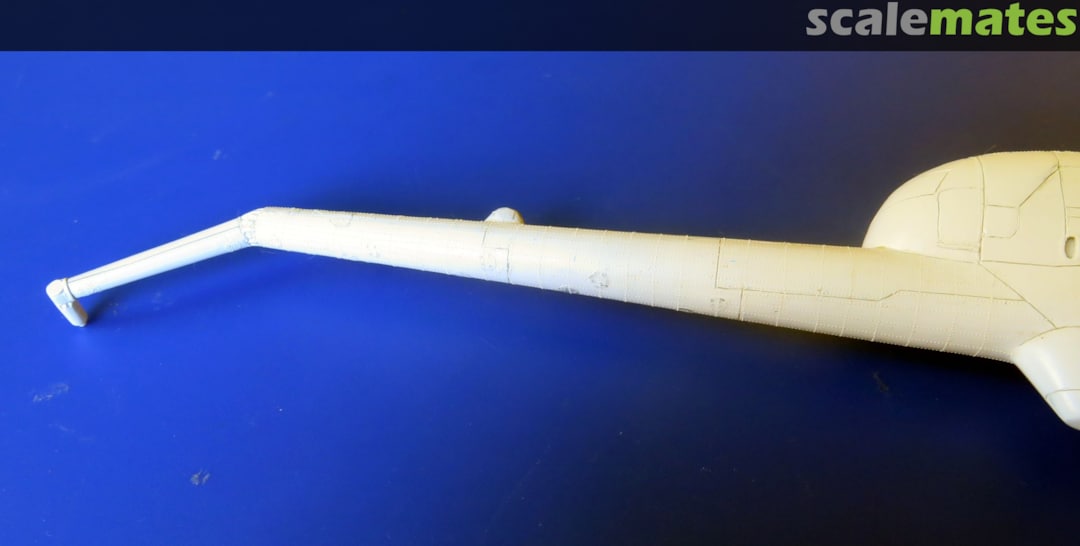
Frank, the protruding hemispherical rivets aren't just on the Warthog. They were quite common on Russian helicopters. I added a photo of a detail of the Mi-1 tail spar to the photo album (fig. 103)
2 27 July, 21:04
Great rivet work! HGW seems to be a real alternative to Eduards offerings. My experience with Eduards rivets is, that their carrier film is much to visible, once applied, even under a layer of coat. I tried Quintas rivets, much better. But I should give HGW a try.
1 28 July, 08:09
@Volker Schaak
I also have Eduard decals for rivet lines, but haven't had a chance to try them yet. I have found several posts on the Czech modelling forum in which modellers complain about the visible carrier film of Eduard decals.
That was the reason why I decided to try HGW decals. After previous experience with their decals, I know that HGW uses a very thin (but durable enough) carrier film for their decals that is not very visible once the decal is applied to the model. This is confirmed by my experiment.
For me HGW rivets are a clear favourite.
2 31 July, 20:59
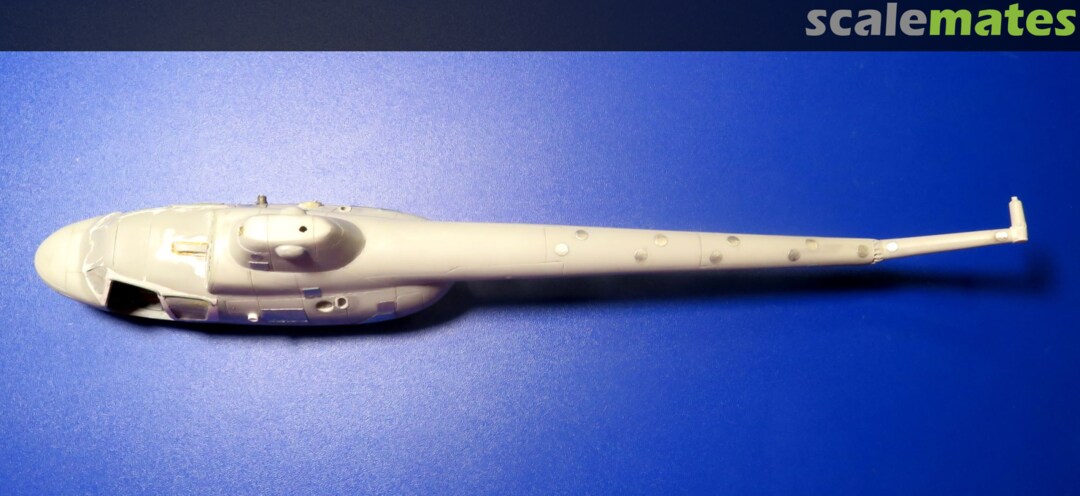
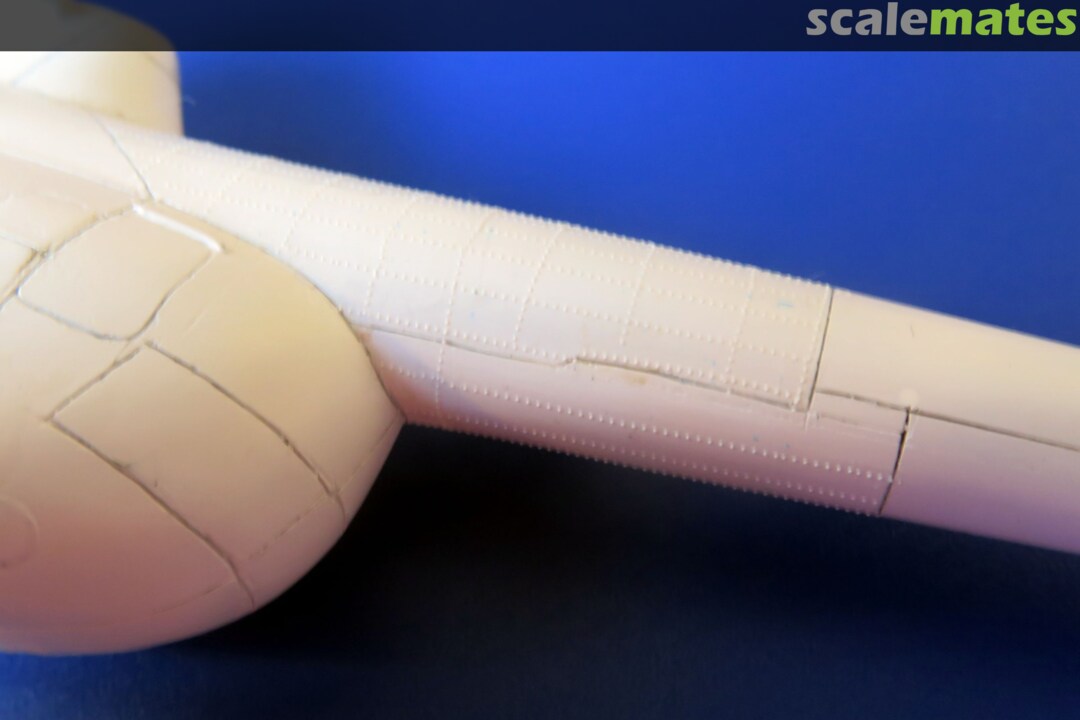
After returning from vacation I continue to glue rivets. And here is the progress for this afternoon.
Gluing white rivets to a white surface is quite a chore, and with my eyes, I can't last long at it. So riveting the whole hull will take me a few days of work.
3 4 August, 20:59
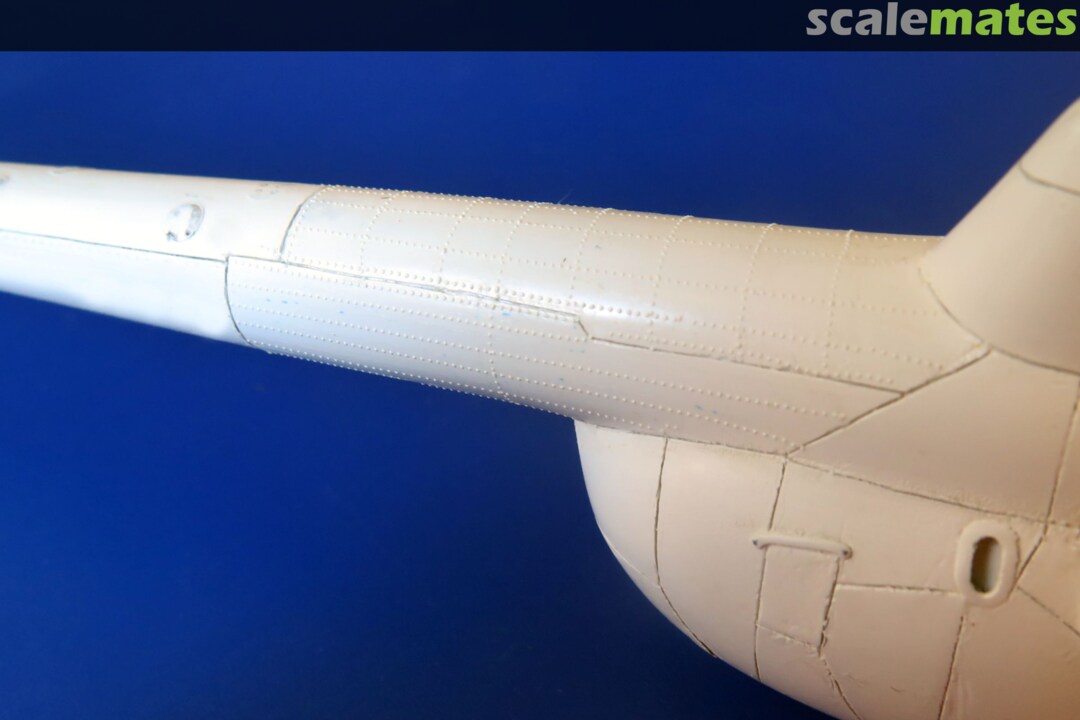
I spent the afternoon gluing decals with rivets to the tail spar and I finished a while ago. I managed to fulfill my resolution and the tail spar now has the rivets complete. If I had glued all the used rivets in one row, the row would have been 3.5 meters long.
I think I'm going to have dreams about rivets today. 😄
I didn't have time to take pictures today. So a pictures next time... and maybe with more progress on the fuselage riveting. 😉
2 10 August, 21:17
I struggle as well with my F-15I. Just a very large kit that take a lot of paint to cover it!
10 August, 22:08
Hello, Marlin. Mi-1 in 1/48 scale is not very big. Still, the rivet consumption is very high. Good thing I'm not building a real helicopter. My hands would fall off while riveting. 😄
2 10 August, 22:38
I have added photos of the tail spar with the riveting completed.
2 12 August, 20:55
Mates, thank you for your kind comments. We are currently experiencing high summer temperatures, so I have put my models aside for now and am spending my free time by the water.
In the meantime, I have purchased a set of screws. I want to use these screws on the removable panels. This will be another experiment on this model. 😉
1 15 August, 10:45
Your superdetailing of such a difficult model is just awesome, Ludviku! I wish I had at least 10% of your skill, dedication, and perseverance...
2 15 August, 12:35
Robert, that's a really big compliment and motivation to continue working on the model. I really appreciate it. But I don't think my abilities are anything special.
The biggest "magic" lies in the fact that I do what I enjoy and try to do it as best I can... and I'm lucky that I can still see (quite well) and my hands don't shake too much.
Nothing more, nothing less. 😉
3 15 August, 13:56
Pool/Lake/Ocean, whatever the location, time at the water will definitely produce a far steadier hand for such ludicrous details!!! 😆👍
1 15 August, 18:46
Marlin, I go to a natural swimming pool about 15 kilometers from where I live. It's a pleasant and peaceful place where I can cool off in the water and relax... I agree with you that it's good to take a break from everything once in a while and "recharge your batteries."
1 17 August, 14:27
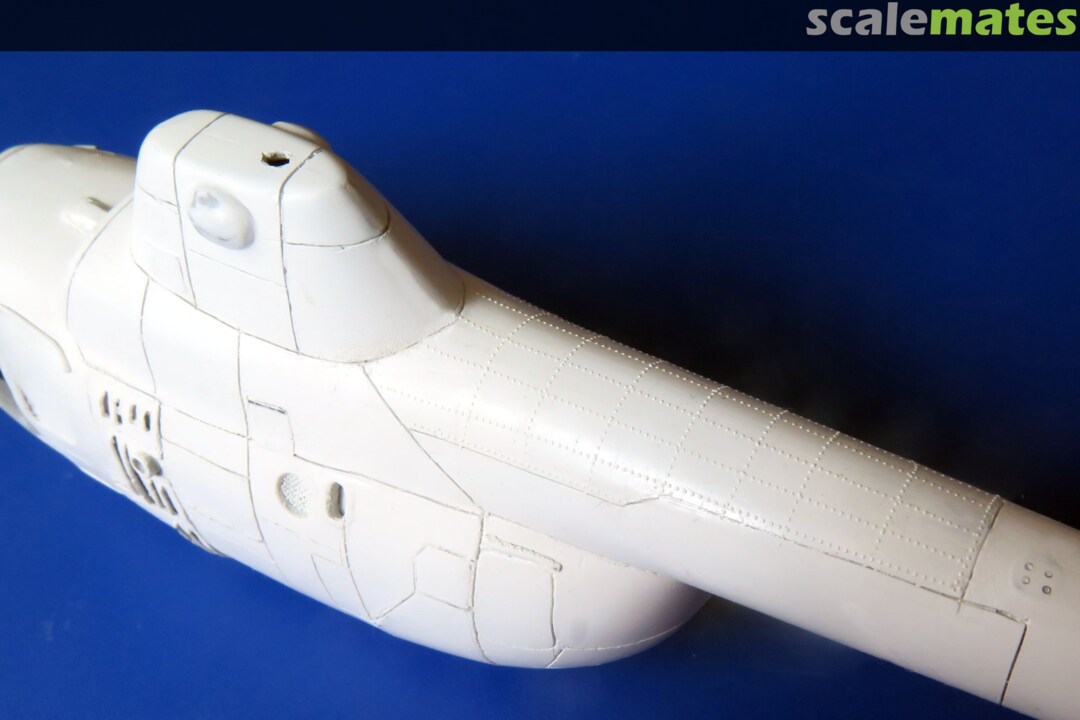
After relaxing by the water, I continue gluing the rivets to the helicopter fuselage.
1 19 August, 21:42
Ben, you're right. There are a lot of rivets on such a small model. I can't measure it in kilometers, but still... at this point, there are already almost 5 meters of rivet rows glued to the model. 😉
The riveting of the model is nearing completion. After today, I only have a few short rows of rivets left to add.
2 22 August, 17:08
Those rivets causes some effort but the result looks great!
You should add the HGW to your project inventory or the other mates will buy the Eduard decals you listed 🙂
2 22 August, 20:20
I cannot compare myself to your Black Snake, but I appreciate your recognition all the more.
Thank you for pointing that out, I have already corrected the inventory. I originally wanted to use Eduard positive rivet decals. However, before I did so, I found out on a Czech modeling forum that some modelers complain about the thick backing foil of Eduard decals. From my own experience, I know that HGW decals have a very thin backing foil. That's why I also bought positive rivet decals from HGW. I stuck the rivets from both manufacturers onto a piece of plastic board. After spraying both decals, it was clear that the HGW decals were better.
Even though Eduard's positive rivet decals have a thicker backing film, that doesn't mean they're unusable. If you stick the stickers directly onto the plastic before painting the model, the backing film can be washed off with Gunze Mr. Color Leveling Thinner (or Mr. Color Thinner) and only the rivets will remain.
The same procedure can be used for HGW positive rivets.
5 22 August, 21:31
It is a great tip to wash the carrier off 👍 I would never have thought of that!
I glued my Black Snake carefully as sanding the seams is not possible but with your tip it would be possible to restore the positive rivets.
1 23 August, 10:17
It is better to glue the model carefully and prevent damage to the surface. However, if this is not possible, stickers with positive rivets are a welcome aid for replacing rivets in damaged areas.
2 23 August, 23:24
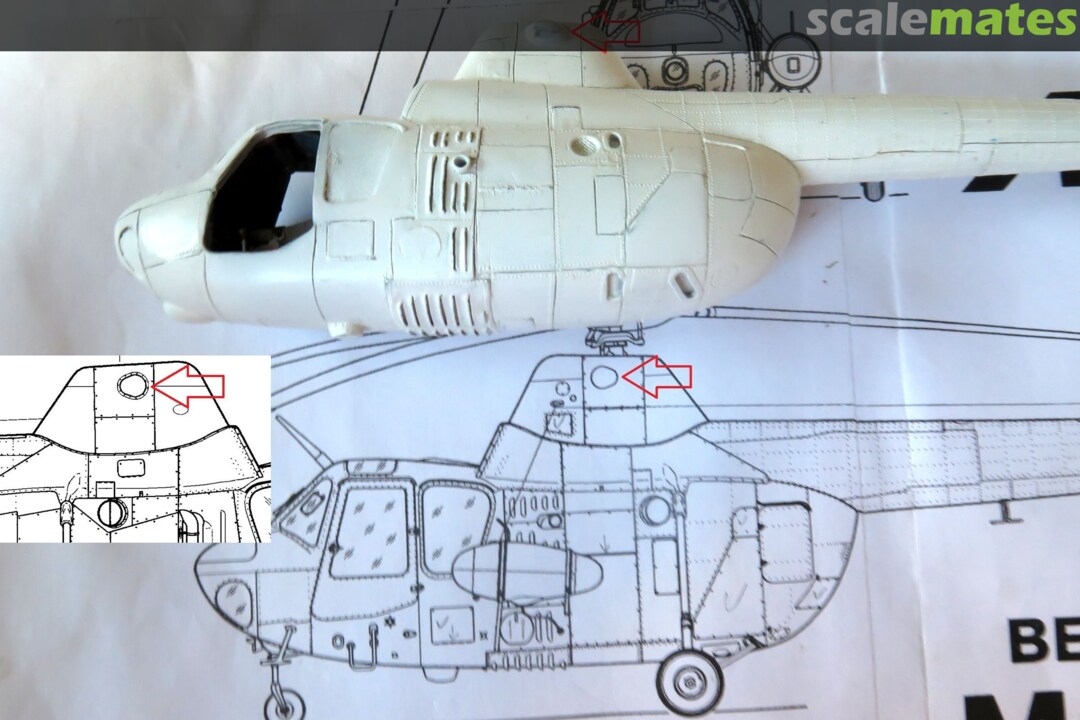
Although I have been working on the Mi-1 model for so long, today I discovered one mistake. I found it by accident while riveting. I described the mistake in detail in the comments to the newly added photos (numbers 116, 117, and 118).
3 24 August, 00:06
Hey, at least you caught it before riveting, much less painting/decals. That would have been painful!
1 24 August, 02:58
That's right. I discovered the error in time, and fortunately, the fix was simple.
2 25 August, 20:50
I didn't do anything on the model today. At the end of last week, I ordered a cutting plotter, and it was delivered this morning. So I spent most of the day testing the new plotter. It took me a while to learn how to use the plotter software. Then I started experimenting. Of course, I was also interested in how the plotter would handle the production of masks.
2 25 August, 20:53
The cutting plotter made my work on manufacturing helicopter cabin doors much easier.
2 27 August, 20:07
Nice progress Ludviku, the doors look awesome. What plotter did you get? The Tamyia adhesive sheet always worked great on my Silhouette.
28 August, 00:38
Bughunter, you're right. The plotter is a great help. As I gradually learn and discover the possibilities of the plotter, I keep coming up with more and more ideas on how to use it in model building.
Alecu, I bought a Silhouette Portrait 4 plotter.
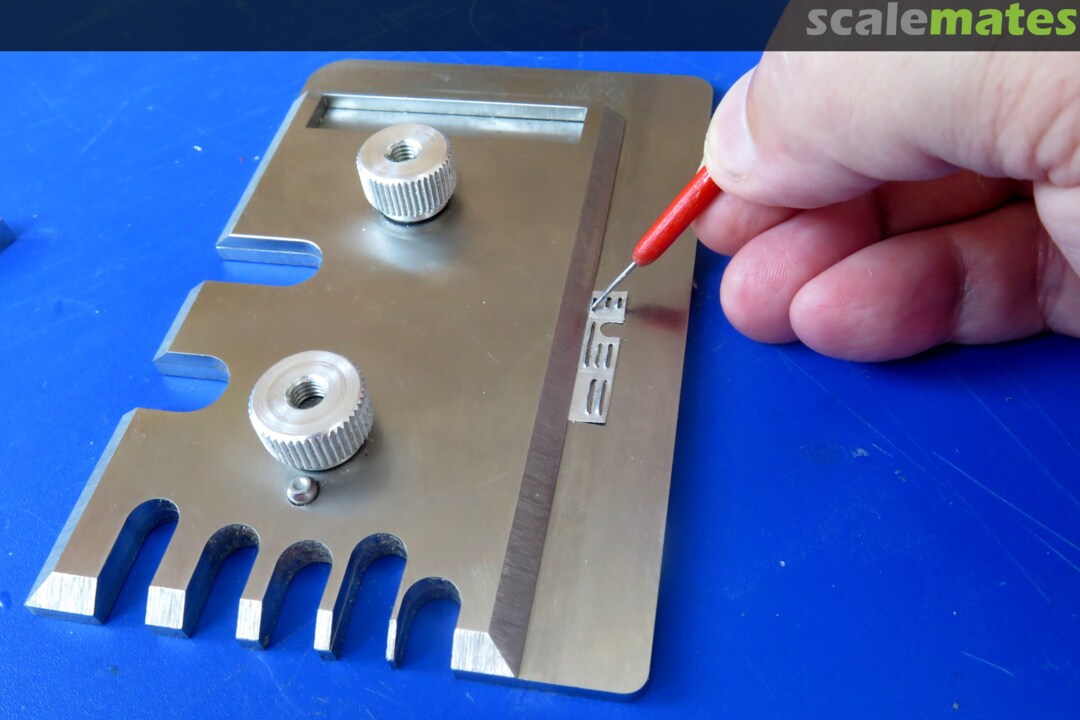
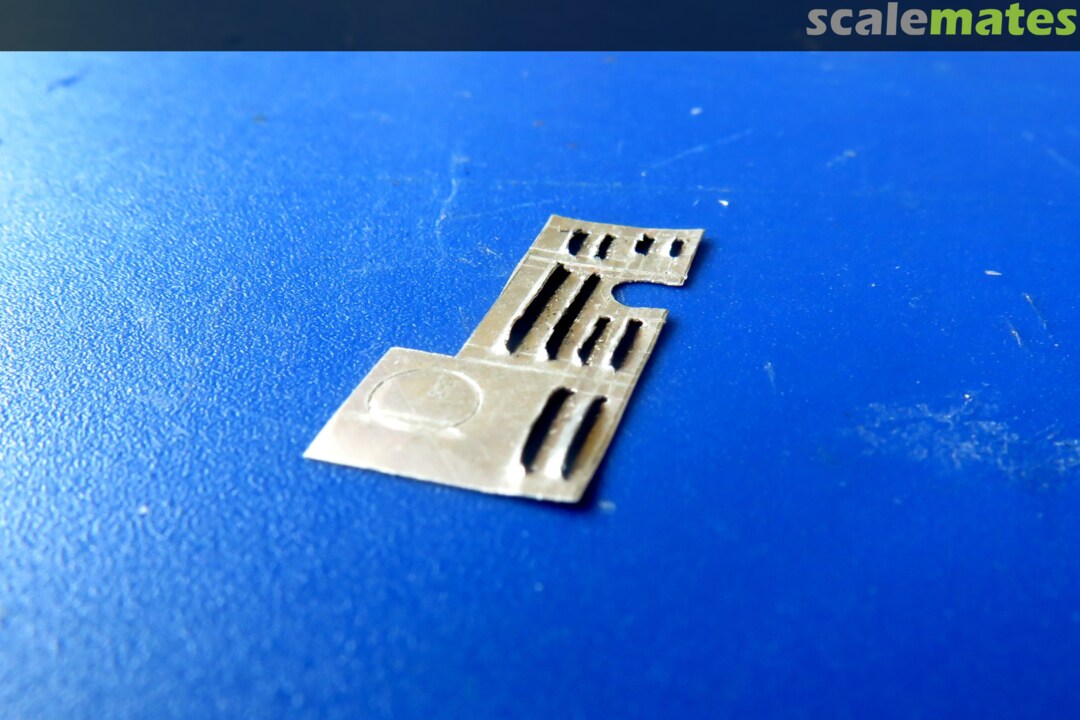
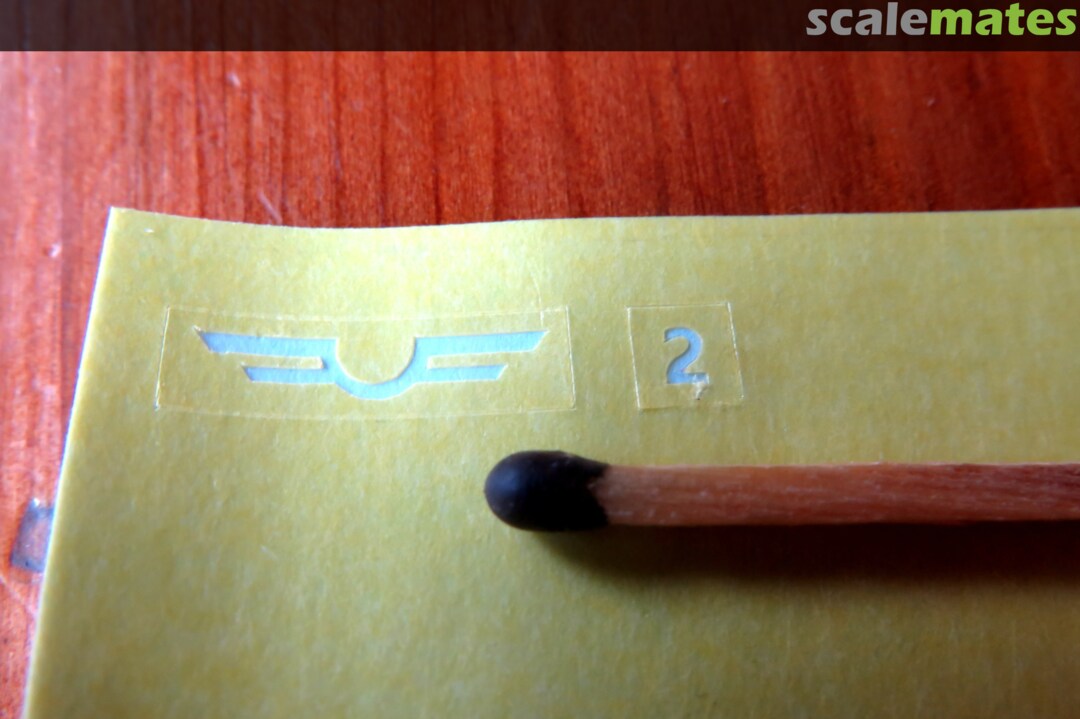
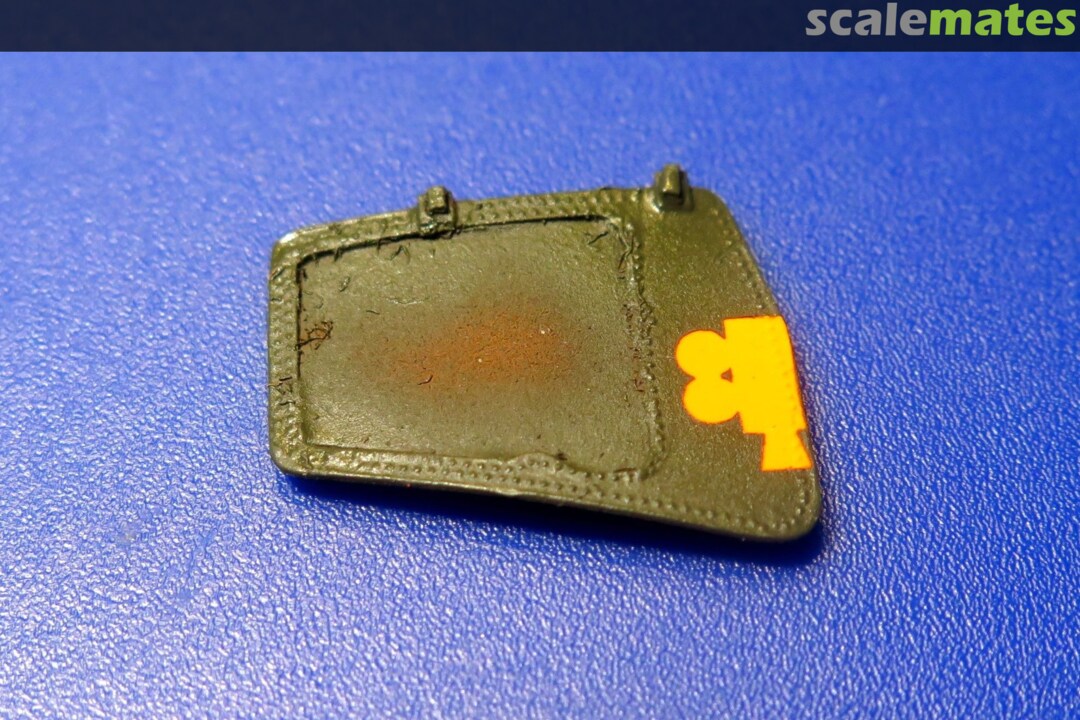
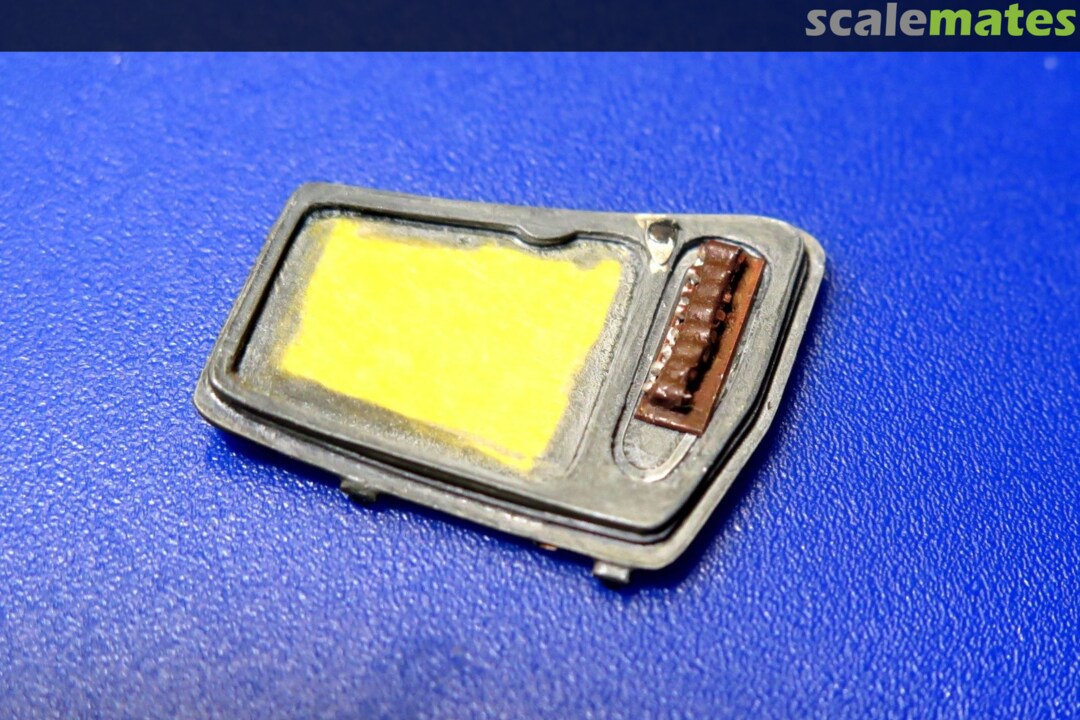
I think Tamia foils are good. I've been using them for a long time and I'm happy with them. The problem with cutting the mask was my mistake. The "number two with wings" motif is too small and delicate and is probably at the limit of this foil's technical capabilities. The individual parts of the motif are too small and too close together, so the adhesive on the foil cannot hold them together during cutting, and the plotter knife peels and crumples them during cutting. Therefore, I slightly modified the mask design and divided it into two separate parts – stylized wings and number two. After slightly adjusting the proportions and dividing it into two parts, the cutting result is visibly better. (appearance of the motif – image 120, cut-out mask – image 121).
4 28 August, 11:50
amazing job. love the details. silhouette is a great tool. I have not used it for plastic. for masks, I really can recommend thin vinyl, worls like a charm.
2 28 August, 22:10
I was going to use my cricut to make masks but the vinyl pieces came out so nice I just used them as is
2 29 August, 01:42
Spanjaarde,
Thank you very much for your advice. I have only had the plotter for a short time. I am currently testing it and looking for suitable materials for cutting. I used Tamiya film to cut out the masking template because I have it in my supplies. It was just a test to see how small details can be cut out of this film. Tamiya masking film is paper-based, but in my (so far minimal) experience, it is very well suited for cutting larger motifs and letters (4 mm high and above). It is certainly also suitable for making masks for transparent cockpit covers.
I know about thin vinyl self-adhesive film. Since I won't be home next week, I'll order it when I get back.
I find plastic and acetate films particularly useful for making various model parts. This is especially true when you need to make a large number of identical pieces. An example would be the recently made parts for the Mi-1 helicopter door. Other parts suitable for cutting with a plotter that come to mind are transparent window parts and their frames, various covers on the surface of the aircraft, etc. Compared to manual production, this saves a lot of work.
Bene M,
I am sure you will find many uses for your Cricut. If only because masks are not available for all models.
2 29 August, 11:51
Already doing quality and creative work with your plotter Ludvik. I look forward to seeing what you do with this plotter over time.
1 17 September, 04:52
i am yet to try my plotter with paper and plastic, so far i have done only vinyl. but for marking in small curved surfaces (1/144 cockpits) it is possible that paper works better (commercial masks are probably done in kind of tamiya paper probably for that reason). what plastic thickness are you cutting with the plotter?
1 17 September, 06:52
Spanjaard, I cut plastic sheets with a thickness of 0.1 to 0.3 mm on a plotter.
I often make parts from plastic sheets with a thickness of 0.5 and 1 mm. The plotter cannot cut these sheets. However, it can at least engrave the outline of the part into them. The engraved outline makes it easier to process the part more accurately by hand.
2 18 September, 13:32
I find scoring the styrene of any thickness almost easier than cutting through completely. You get a smooth wall when snapping, vs. angled when cutting through. It's a bit tricky with curves, but ir works with a little practice.
2 19 September, 11:53
Alec, there's something to that. I've had the same experience.
1 26 September, 22:34
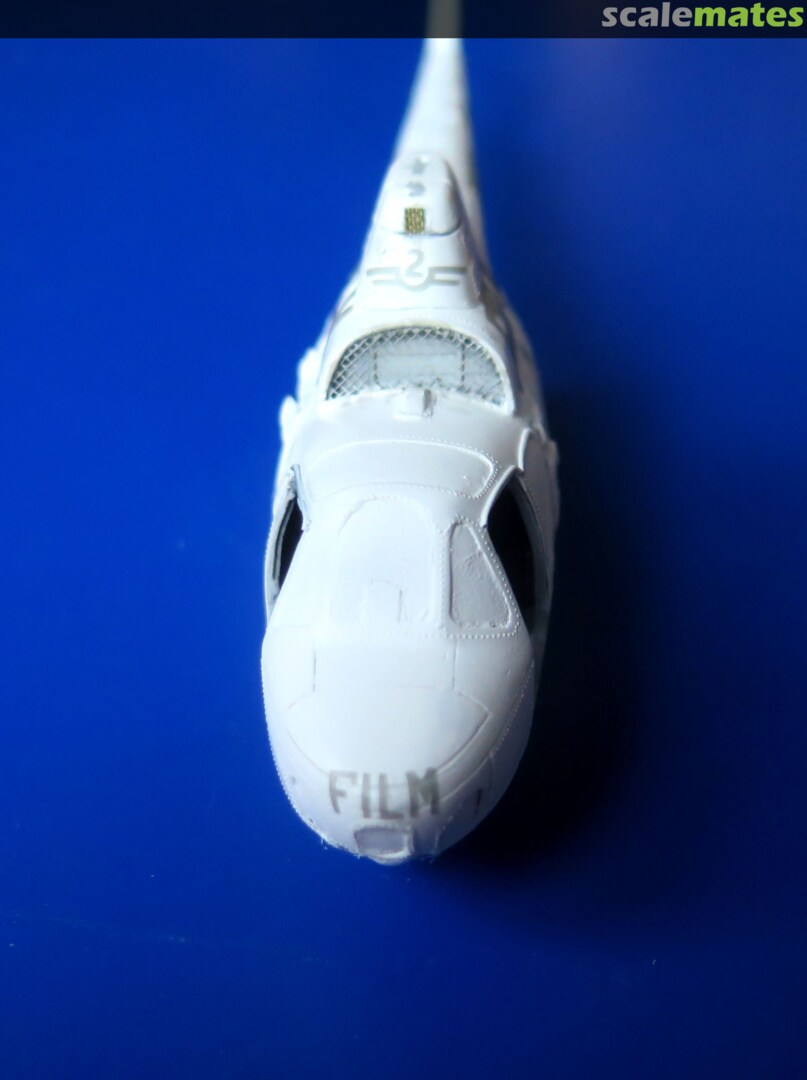
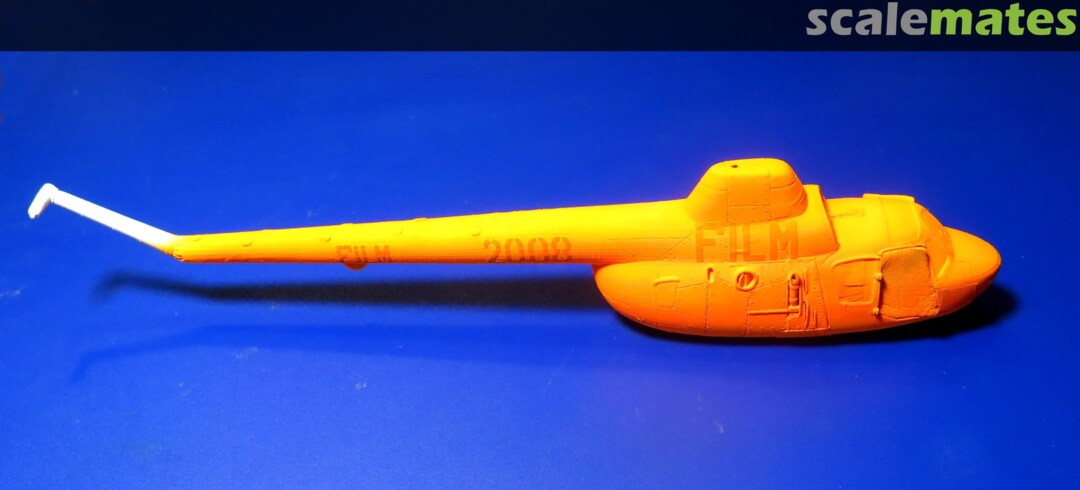
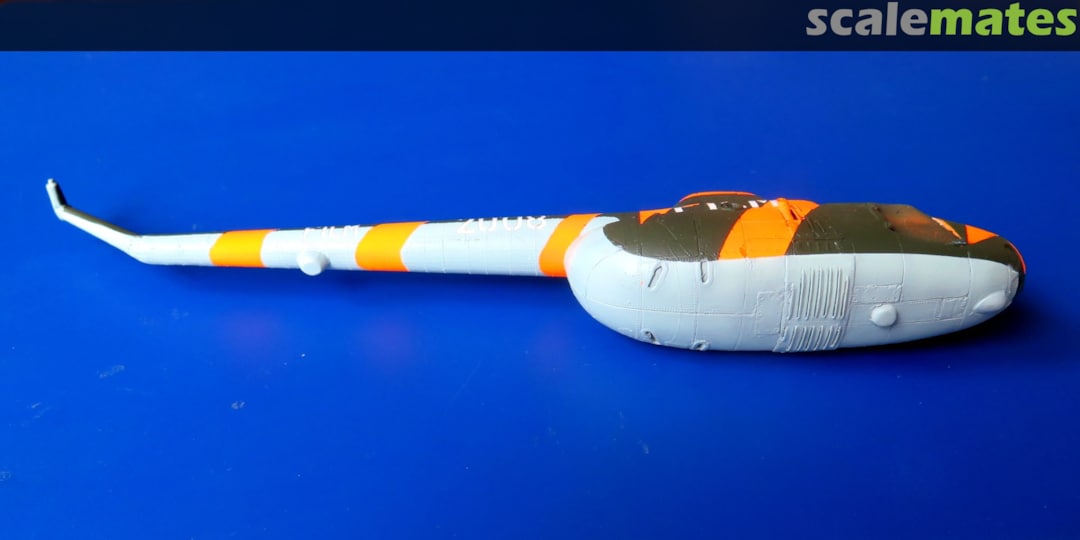
The helicopter began to change color. It replaced white with signal orange.
4 26 September, 22:36
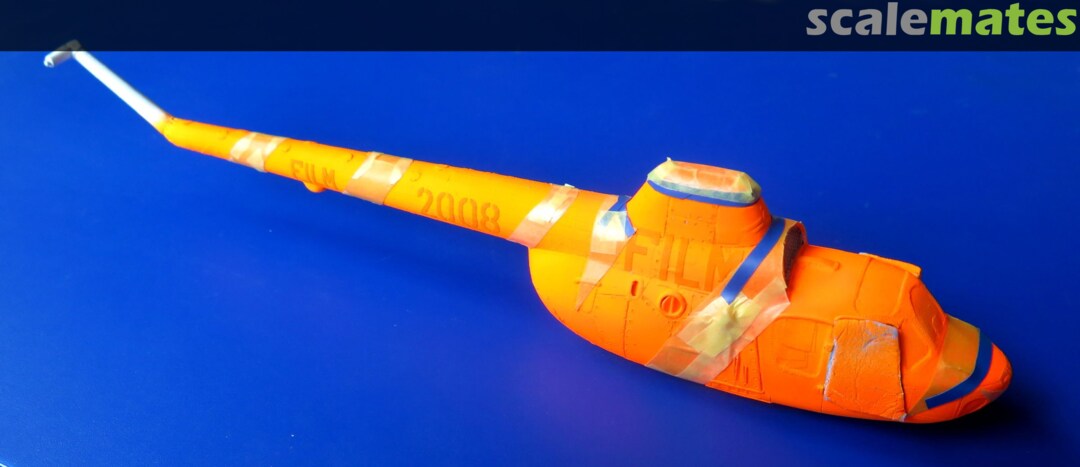
Today Mil played chameleon. 😄 He exchanged his bright orange color for a green coat. All that's left is to spray the light blue lower surfaces, but I'll leave that for tomorrow so I can stick masking tape on the dried paint.
3 27 September, 22:45
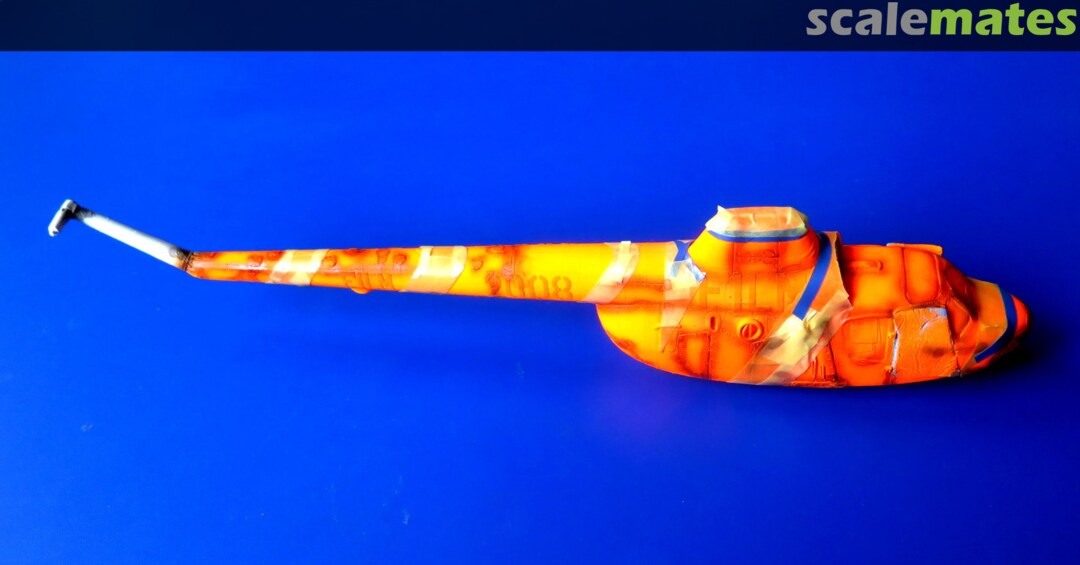
Today, the Mi-1 underwent another color transformation. I sprayed the lower surfaces with camouflage light gray-blue paint. By evening, the paint had dried sufficiently, so I could remove the masks and see the result of my work for the first time. The boring green "bird" suddenly turned into a colorful parrot. 😄
It's just a shame that the signal orange doesn't photograph well. It looks very muted in the photos. In reality, it's much better.
4 28 September, 19:26
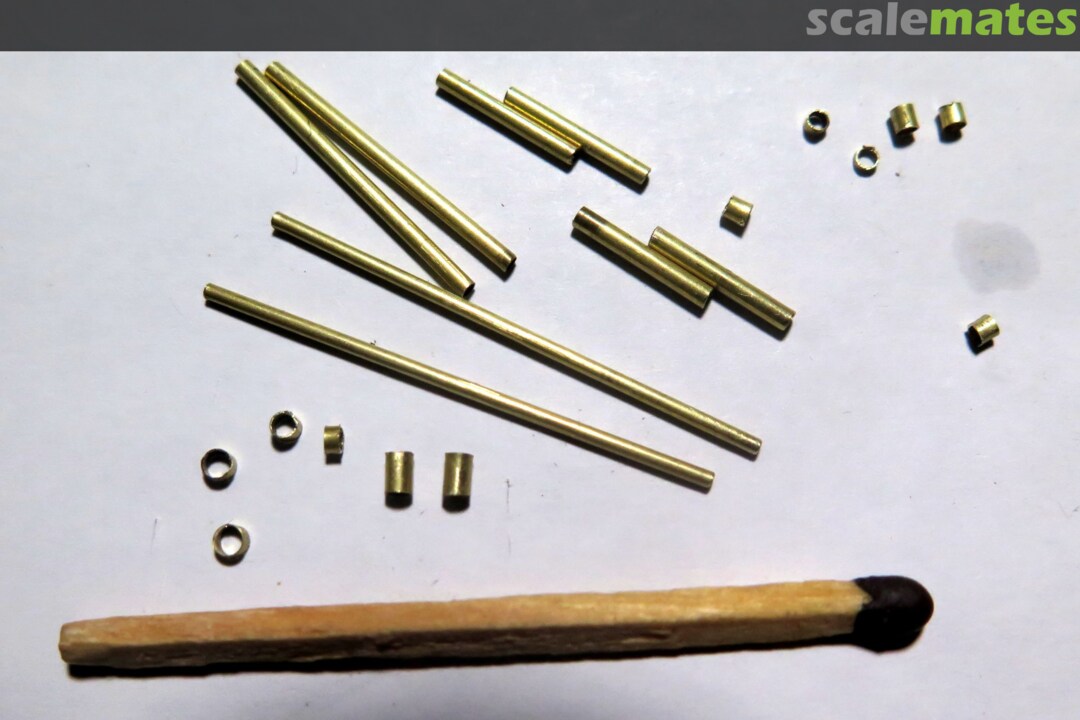
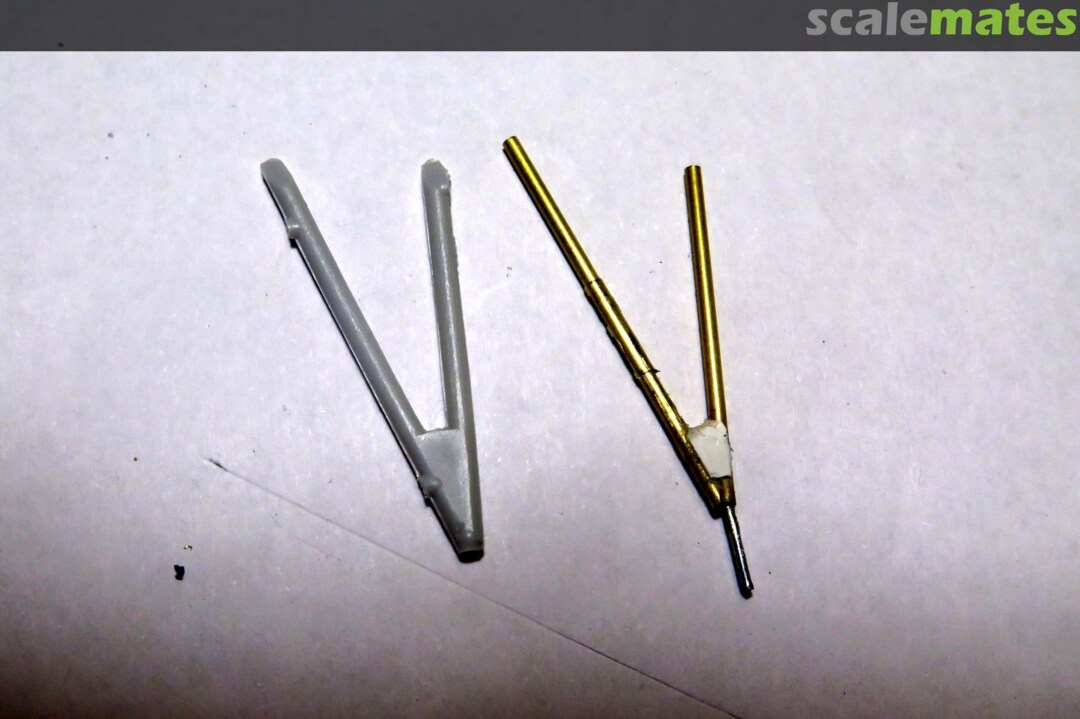
I have temporarily suspended painting the helicopter fuselage so that I can concentrate on making a new landing gear. The landing gear parts in the kit are quite rough and schematic, and modifying them would be more difficult than making new parts.
2 1 October, 21:26
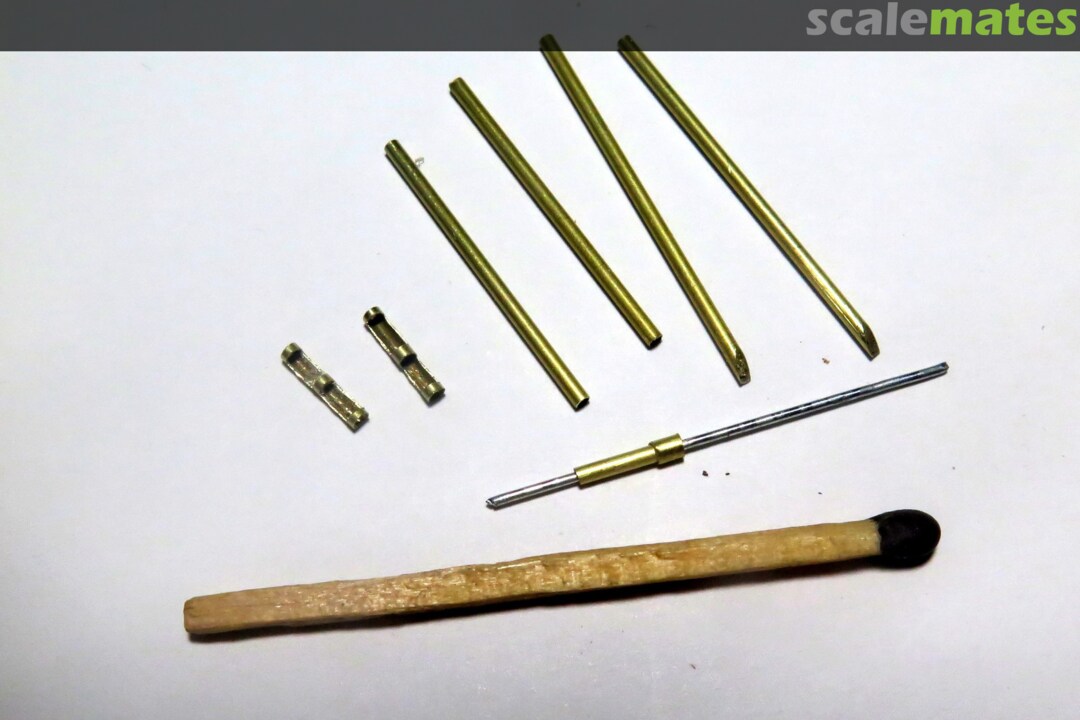
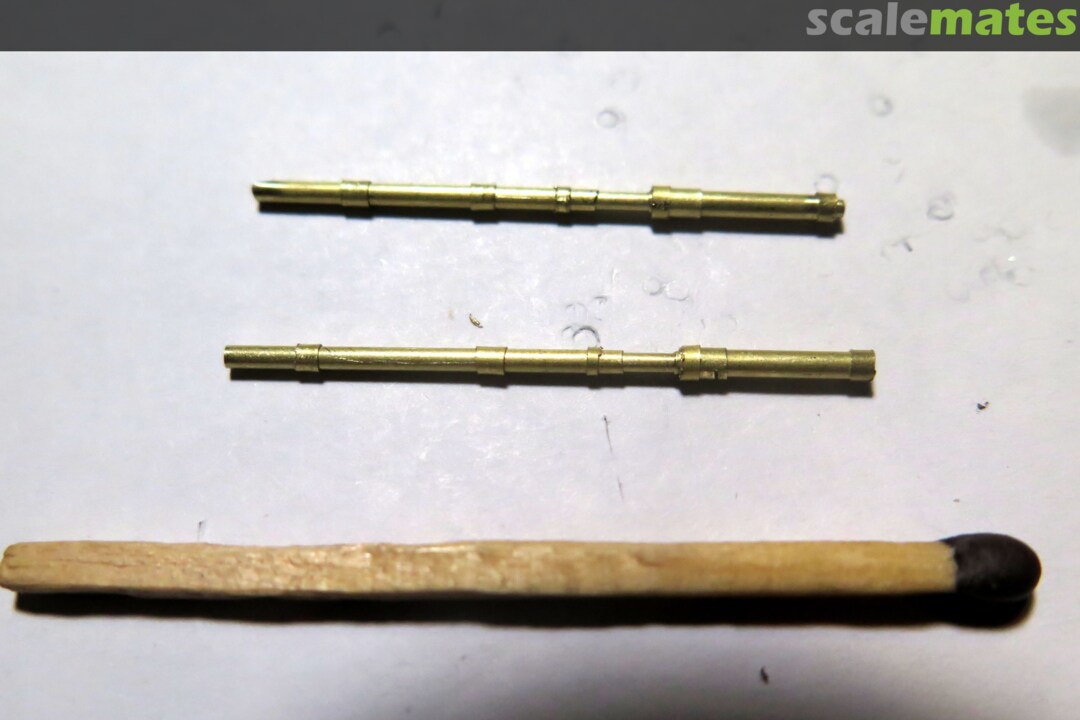
I am continuing to manufacture new parts for the landing gear.
3 5 October, 22:22
Album info
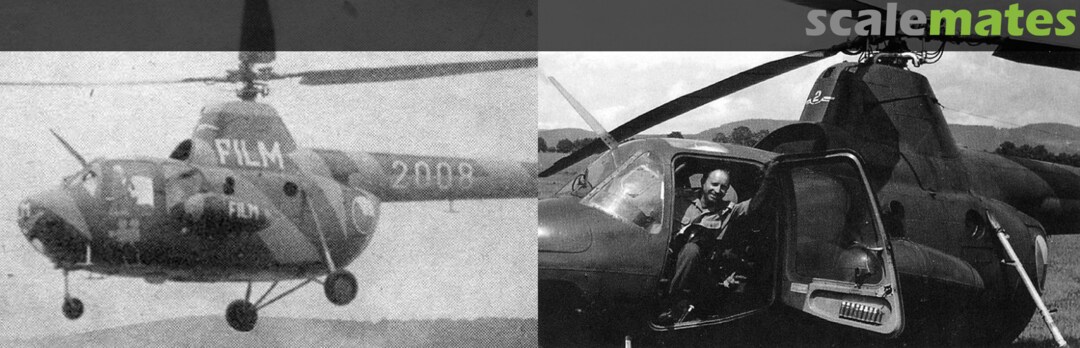
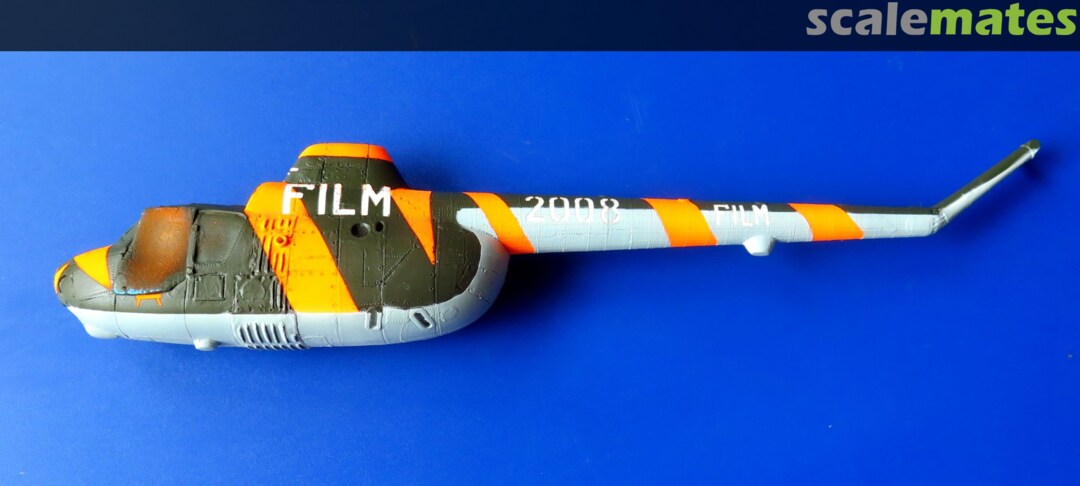
Probably the only Mi-1 helicopter kit in 1/48 scale is the (now hardly available) Mi-1 from Special Hobby. This kit is an early version of the helicopter. I, however, want to build a later modernized version of the Mi-1M, in a special adaptation for filmmakers in the form the helicopter was used for the filming of the Warsaw Pact Allied exercise Shield 72. The original and modernized versions of the helicopter were slightly different visually, so modifications to the kit will be necessary. And I will also need to make a few new parts related to the modification for filming.


