Fil démarré par eposone79
a ajouté un nouvel album.


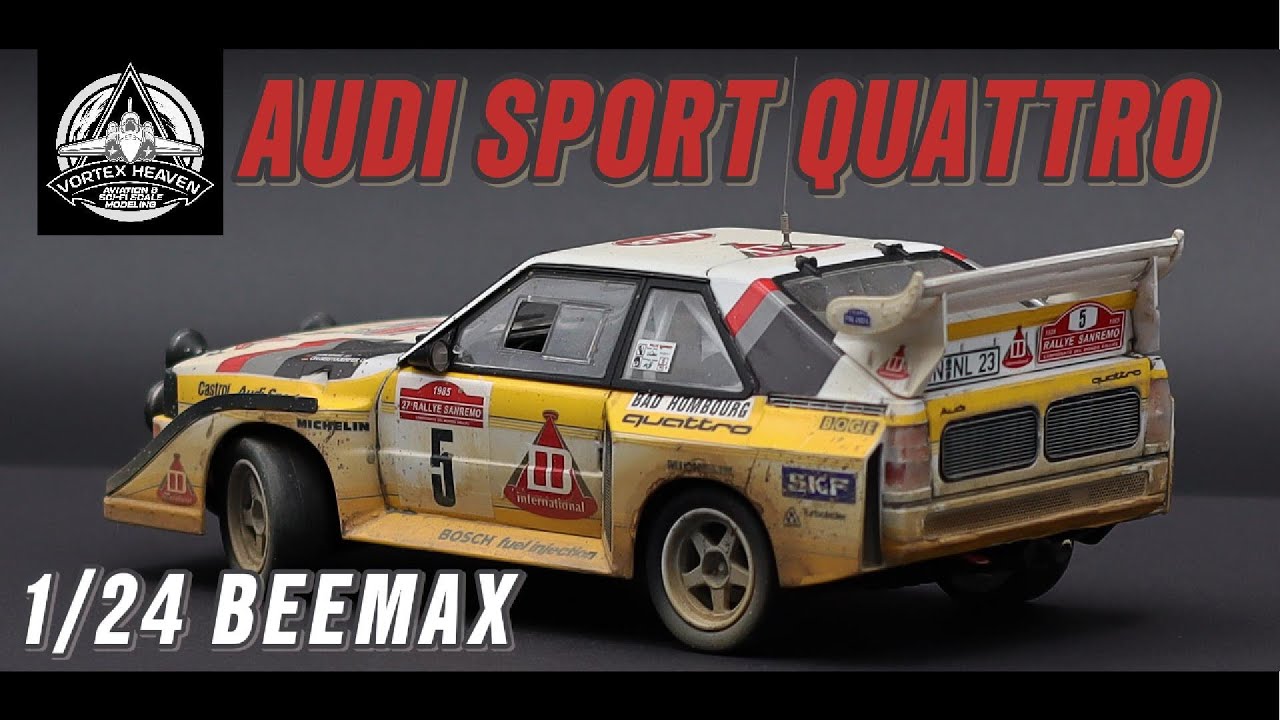
![1:24 Detail Up Parts for Audi Sport Quattro S1 [E2] (Beemax Model Kits EX24035)](/products/img/5/6/1/1432561-40444-30-t180.jpg)

56 8 July, 07:23
Decals done. Unfortunately the surface became scratched due to inappropriate sanding and polishing on my part. Have not learned that skill yet 😅😅😂😂
14 July, 08:01
Great work👍 Yes, sanding and polishing is very tricky. You can mess up quickly. What tools/materials did you use? For clear and polishing?
1 14 July, 08:17
Thanks Alexander
So I followed a tutorial/ guideline from a MiG Ammo Weathering magazine, where he used a plain red Porsche as a base. So I bought 2400, 4000 and 6000 grit sandpaper from Sanyo and Tamiya. After white primer and white base paint I added at least 3-4 thin GX100 MCLT layers.
Then the issue started where I probably sanded/ wet sanded too much of the varnish. It was difficult for me to guess how much is enough or not, to top. Then I made an additional mistake of using the polishing dremel, probably also too much but it was noticeable. So since the damage is done and I could not revert it, I finish this model how it is and applied final gloss varnish with decals before that. That's where I am at.
So I think the first thing I will try next is on a new demo model of a car to build.
Which guideline would you suggest/recommend? Thanks Alex and All!! Appreciated
14 July, 10:25
Hi Stephan, I usually apply the decals after the colour coats, then apply two or three coats of gloss. After that has thoroughly dried I use polishing compounds to bring up the shine. For availability, convenience, and compatibility I generally only use Tamiya products. There are any number of videos on YouTube on how to do this. Your Audi looks great, a little bit of weathering could cover up the parts you don't like, it is a rally car after all.
2 14 July, 13:33
Hi George, thanks for your comments. I will cover them up as good as possible. Thanks for your input and recommendations. I hav two compunds here, the Fine and Finish from Tamiya. I will check out some YT turorials on those. I also bought the Tamiya modelling wax. Cheers
14 July, 14:46
Sorry to read about the misshaps.
I would bite the bullet and buy a second kit - it's learning money.
When you were at the stage before you stared applying decals, nothing was lost. In the sence that you could have stripped the body down to the plastic and started again. If the paintwork is not 100%, the decals will never be able to fix that. I think that after the colour coat (white in this case) it was maybe not really needed toapply a gloss coat. If your colour coat is somewhat glossy, it will happily accept the decals. The most important thing being that your surface needs to be smooth after painting. I only clear coat a race/rally car if the base colour coat is matt.
The best learning is through building, trial and error. Buying a second kit is sometimes what I do...
I've never used a power tool to do the polishing - for my taste that is way too aggressive. Wet sanding yes, from 3600 and up to 8000, then Tamiya polising compound.
Just a few things that came to my mind - hope it's usefull.
1 14 July, 21:10
There is no law requiring a clear coat on a model.....especially a rally car. I would take Guidos advice and try again with a new kit. Don't feel bad, i've been doing this madness for 20 some odd years and I still wind up doing "learner kits". Is what it is. : )
2 15 July, 00:35
Thanks Guido and bossy. I will avoid that polishing dremel in the future 😂😂
I'm gonna roll with it for now and try out my new learnings on a new kit. It's always great to learn out of mistakes to improve upon.
Cheers
15 July, 05:44
The beauty of building kits for me is getting inspired to try something new, challenge my skills and learning something new every time. Even after 30+ years of building.
The ones that don't work out perfectly can turn out to be the most memorable builds, as they have a good story behind them 😊
4 15 July, 10:31
Hi Stephan, first there are countless ways to paint a model and there are countless guidelines out there. The secret is you have to figure out your own through trial and error. That means this model is a huge step forward. I cannot even guess how many paintjobs I have ruined, how many models I have repainted or threw away the body in frustration before acquiring some kind of proficiency in this matter.
What i think happened in you case:
-the clear was probably not dry/hardened enough
-the dremel polishing tool bit was probably too coarse/the bristles too hard or you applied too much pressure/ too many RPM
Any tips/thoughts for a better result:
-ditch the dremel tool, master the art of manual polishing first, use Tamiya compounds, they are really good. I wouldn't use a dremel for 1 component clears anyway.
- don't overthink the process, let the clear dry properly, wet 2000, a finer softer pad, polishing compounds. Maybe one round of Tamiya wax at the very end and you have a great result.
-it is possible to get a great body paintjob without polishing at all. If you browse through my gallery, you'll find a BMW Z3 and a green Opel GT. Both were painted with Tamiya spray cans, I did not treat the surface in any way after that. No polishing at all. The secret is, the better you prepare the body, the smoother your paintjob, the less you will have to treat the surface afterwards.
-A rally car doesn't need to be super smooth anyway, it is not a showroom supercar. Did I understand that right you polished it BEFORE applying the decals? This is absolutely and entirely unnecessary if your paint/clear you apply decals over is glossy. Does not matter if it has a bit of orange skin or it is not super smooth.
Anyway, just a couple of thoughts towards the topic. Sorry for the long text and shameless self promotion, cheers Alex
2 15 July, 16:24
Alex, thank you very much for your valuable input and suggestions.
Seems to go inline with what many others also do.
I guess I will have to find out the way on how to use the sanding paper properly, and yes indeed the curing time was not sufficient.
How do you use the Tamiya compounds, with what tool?
Thanks much
Cheers
15 July, 19:19
You use the compounds with a cotton cloth and your hand 😉
You can buy polishing cloth from e.g. Tamiya....
Compound Applicator (Tamiya 87090, No)
")
....or you cut up an old soft cotton t-shirt into little squares and use those. Both work great
1 15 July, 19:59
Those compounds get into the seams and the only way I have found to get it out is with a squirt bottle, set on stream, point blank to blast it out. I use Qtips when polishing, but I don't normally do large areas. You might also look at Novus Plastic Polish. It isn't as thick as Tamiya, but it also doesn't dry up in a tube.
1 15 July, 20:11
There are as many methods as there are modelers. 😉 but the most important one is "finger force", like Alexander is saying.
Me, I use old cotton cloths (des mouchoirs en Français) - or the odd old T-shirt as well.
The material needs to be soft in any case, work in circles and in smaller areas. This is a "take your time" task - like just about everything in scale modeling.
The compound does indeed creep into the panel lines, for this I use an old soft brush and water to clear them out and any residue that remains, is buffed with the cloth.
For hard to reach nooks, I use also a Qtip.
2 15 July, 21:01
Oh, and looking at your last image, it IS coming along very nicely actually now!
1 15 July, 21:02
I've used a cheapo polishing dremel before and made the same mistake, too much pressure caused an increase in temperature and caused the paint to melt. I still use a dremel style polisher but on the slowest speed with a super soft sponge made for non-model car polishing. After that has done alot of the work I then move onto the hand polishing with Tamiya compound and glasses cleaning clothes. Hope that helps, great build by the way!
1 15 July, 22:32
Thanks Alex, bossy, Guido and Nik for these tips. They certainly come in handy for my next car / plane build project. Cheers 🍻
16 July, 06:01
Up into the weathering shop before the beauty shots. Turned out to be okish for my first car model. Cheers 🍻
1 16 July, 14:35
Very nice indeed 👍🏻
Love the weathering, makes it look much more realistic than a clean machine.
2 17 July, 06:10
Turned out very good in the end, I at least cannot really notice the mishap in the end! 👍
Also on my mind to this subject at some point.
1 17 July, 11:14
Thanks all, the weathering indeed, thankfully covered up the scratches on the bonnet and roof. In dust we trust
cheers 🍻
1 17 July, 17:23